ZBrushCentral

Doom3 style Model

Hi

This my first model using zspheres, completely done in zbrush, the model stands at 1.3m polygons as more will be added. it will be normal mapped when its finished. Sorry for the low quality pic as this is a 3ds max render and forgot to up the resolution.

1_test.jpg

Some update and better pics, would like some feedback as I am a noob on Zbrush.

Mod_1.jpg

Attachments

Mod_2.jpg

Mod_3 .jpg

Good…keep going

Kudos! Looks amazing!
Keep on the good work!
:cool:

I’ve finished the head I think. I will be busy making the low poly now, please prvide any feed back on any changes I should make.

Head.jpg

Ok I’ve done the low poly for the head and did a quick test with the normalmap, here it is, what do you guys think.

test.jpg

nice work

Regards

Ok I have just about finished the normalmapping, the whole model is around 3700 triangles. I’m in the process doing a fine detail bump map which will be blended with the normal map. There are some small things to fix like alpha mapping teeth and eyes.

low1 copy.jpg

[font=Arial Black]Here is a pic of the blended together bump map. Doing the bump map in photoshop wasn’t easy a bit of trial and error, the same goes for the color map had to keep the texture flat as possible.

Welcome any C&C.

[font=Arial Black]Here is a pic of the blended together bump map. Doing the bump map in photoshop wasn’t easy a bit of trial and error, the same goes for the color map had to keep the texture flat as possible.

Welcome any C&C.

1.jpg

I think your normalmaps are reversed oon the torso and leg (in photoshop, try to invert the yellow channel on those areas…).

Nice job!

Yeah you are right, its the 3ds max metal bump shader its not that good, it looks better on the MD5 modelviewer. I will post a pic when I’ve finished the texture.

Ok just a small update, fixed the normalmap, made texture more like doom3 though I know little about how a specular map affects the diffuse map, getting a good skin texture is quite diffecult. crits welcome

1.jpg

I’m nearly done on the texturing.
[2.jpg](javascript:zb_insimg(‘18375’,‘2.jpg’,1,0))

Attachments

3.jpg

Did you create the color map within Zbrush ?
Because I made a lowpoly model like you, and I didn’t foung a way to make a symmetry color paint as I did with the normal map.

Thanks

I used photoshop to paint the color map.

Then what did you used to unwrap?
Did you use max to fit all the polygons unwrapped into a texture?
Because I think you can’t do it inside max, and if it is a lowpoly model you should have a texture like this, don’t you?

Attachments

magbody2_.jpg

Well this what I did.

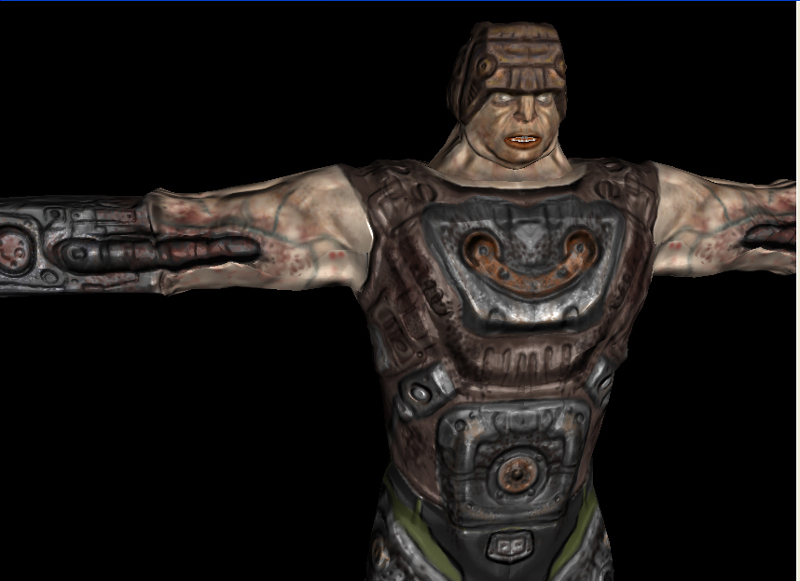
  1. Created model in zbrush using zspheres, added all detail to model.

  2. Exported Subd level3 (12,000 polys) to 3ds max 6, optimised it manually down to 1,800 polys and also making sure all the joints are there for deformation.

  3. Unwrapped the low poly in 3ds max (half the model) then exported as OBJ. with texture cordinates.

  4. Exported highest Subd level from Zbrush as triangles(Orb works with triangles only)

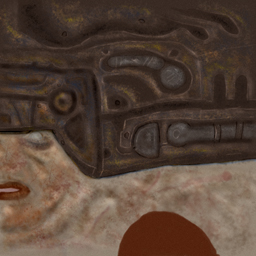
  5. Baked normalmap in Orb using low and high poly.

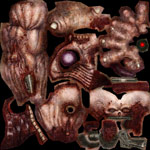
  6. Color map created in photoshop using the normalmap as a guideline.

Well this the method I used as Zbrush does not cope well with mirrored texture cordinates. I have tried GUV tiles but this leaves too many seams when displayed in a game engine.

Macaco, that texture map is awesome did you paint it.

Attachments

Head_d.jpg

Body_d.jpg

Sorry for the qüestion, but… what is orb? :o
Is a program for normal mapping a character?

The texture is not mine, it was just an example.
You can see a character from me here:
http://forums.cgsociety.org/showthread.php?t=278617

bye

Yes, its a great free tool and produces quality normalmaps and also has a option to blend a greyscale bump map with the normalmap for extra detail.

You can get it here.
http://engineering.soclab.bth.se/tools/177.aspx

If you need help using it just ask me.

Gotta go bye