ZBrushCentral

Displacement Zbrush->3ds Max problems

Hi,

i´m trying to get the displacment maps from zbrush to 3ds max and i´m having some troubles.

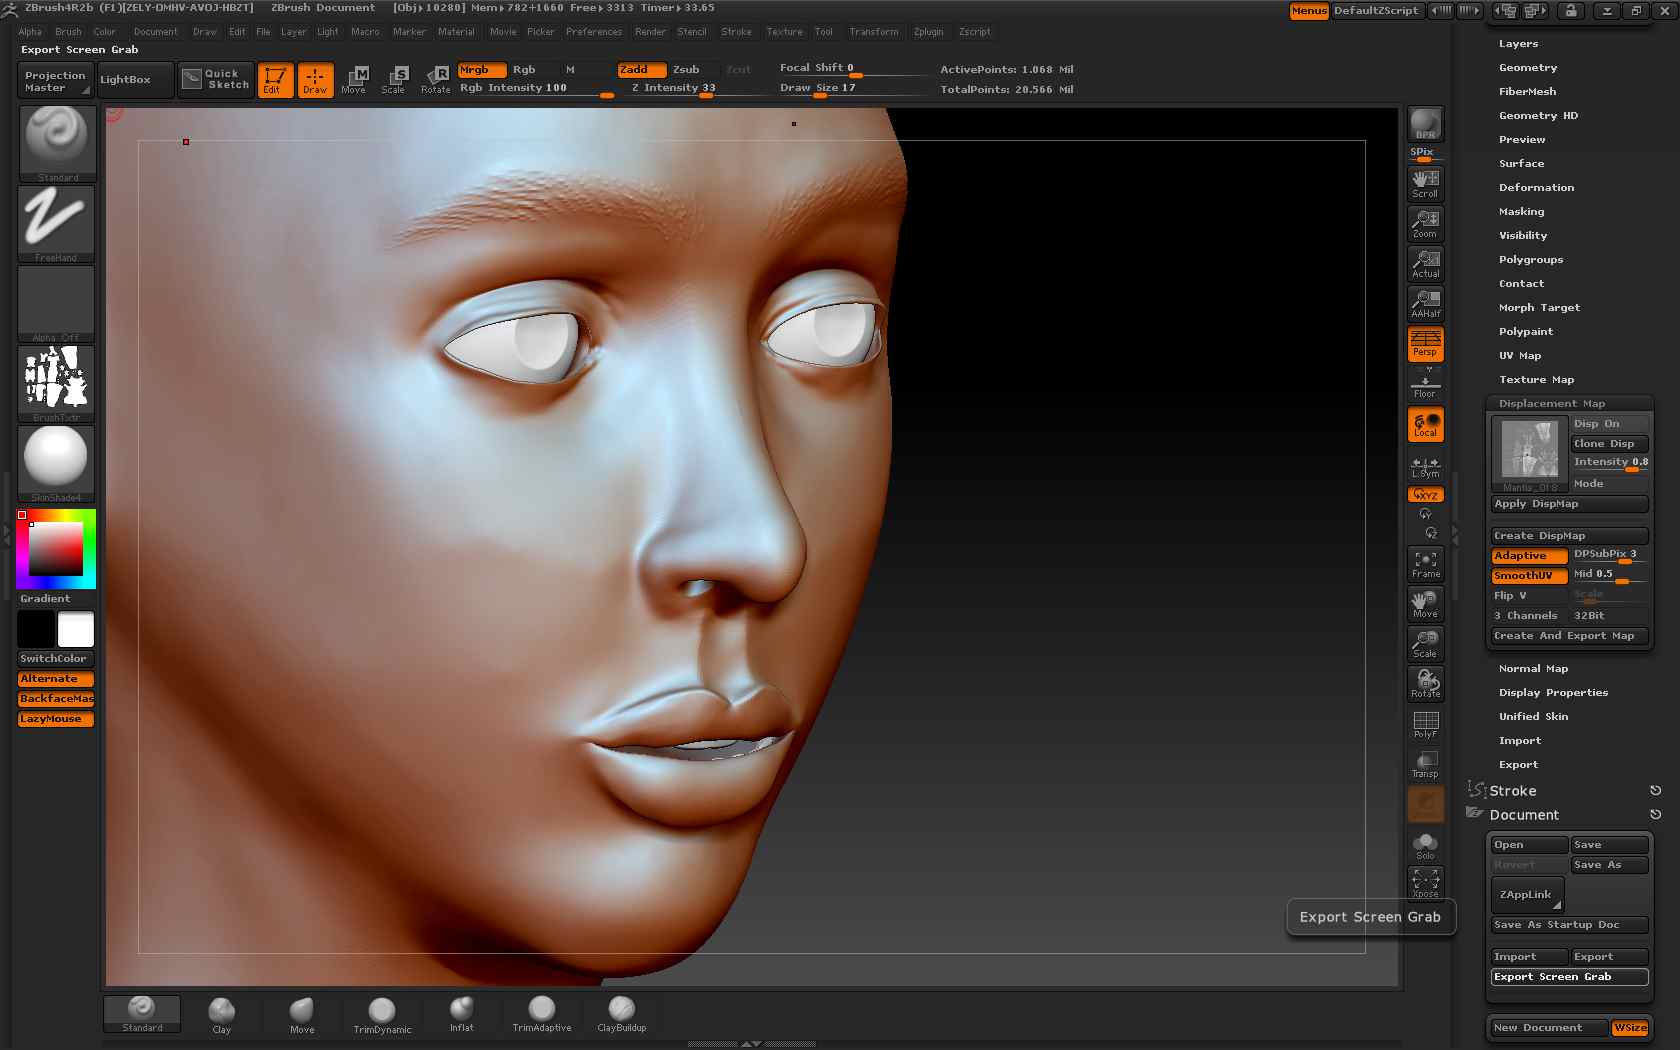
I export with my subtool active, from one subD lower than the highest (wich is at around 1m polys).
You can see the settings in the screengrab from Zbrush.

I then import the map in 3DS max, put a turbosmooth on top of the lowres mesh, on top of that the displacement modifier.
Settings: Strength 4cm
Luminance center 0.5
use existing mapping.

Two problems i´m having:

  1. The displacement looks not like the sculpt in zbrush…you can see this especially around at the mouth.
  2. I´m getting artefacts.

i´m guessing the problem lies somewhere between UV-layout and resolution, the map is 4096x4096 and you can hardly see the part for the face…

Also i just used a basic fast skin shader without maps. And since i know there is also a fast SSS+displacement shader, i´m wondering if i should apply the displacement map directly on the model or rather use the shader.

Any advice or links to good displacement workflows are appreciated!

Attachments

That modifier isn’t really well suited for this type of work (terrain is more it’s suit; procedurals work well with it too). For Mental Ray the fast SSS fast skin+displacement shader is a much better choice. If using VRay as your renderer, it’s the modifier named VRayDisplacementMod you’ll want. I can’t speak for other renderers since I’ve never used them, but they too likely have their own dedicated displacement shaders. Is there any particular reason for using the subd level one down from the highest instead of subd level 1? Just curious is all.

So, i´ve been on it today for a couple hours now and i still can´t figure out the best way to do it.I tried the Fast SSS+Displacement shader in Max and it took me a while to realize i didn´t have to up the iterations on the turbosmooth that high anymore…I also found the 3dsmax pipeline guide and tried to follow it, unfortunately its already a bit outdated and some plugins seem to have disappeared.I found the displacement exporter online but it doest work in zbrush 4 as it seems (crashes zbrush when installed).One thing that helped was to start with the altered level 1 mesh from zbrush in max (didn´t store a morph target before sculpting…).The best results i got so far was by manually creating a 16 bit displacement map and playing around with the settings in the 3D Displacement Shader in Max.I also tried to create a 32 bit displacement map, but the settings recommended in the pipeline guide just gave me weird results. i played around with the settings for strength and scale again, but the results just looked wrong and finally max crashed on meso i couldn´t post an image to illustrate the results.I´ve read about a dozen different threads with tips and tricks now and i´m starting to get really confused if theres any science to the process at all…So i´d love some more insights at the process from creation in zbrush to rendering in Max…Also i can´t get rid of the artefacts around the eyes other than manually painting them out in photoshop…any idea what might cause those? wrong UV layout?Here is another shot from my experiments…:

ok, so i finally managed to nail down the cause of the artifacts: they almost completely disappear once i disable adaptive mode in zbrush while creating the displacements…
But thats not what should happen i guess…

The problem is with your UV island boundaries interpolation. If you have no way of having linear edges around your UV island boundaries in max, then turn off Smooth UV in the Zbrush displacement palette.

Ok so far i�m doing this in Zbrush:

  1. Turn off adaptive mode.
  2. Turn off smooth UV.
  3. Use 16 bit-tif.
  4. In Multimapexporter hit “get scale”.
  5. create and export displacement map.

In Max:

  1. Use Mental ray 3D-Displacement.
  2. Put displacement in Extrusion map slot.
  3. Offset RGB Output by -0.5.
  4. remove blur from map (set to 0.01)
  5. leave extrusion distance at 1 cm.
  6. Set extrusion strenght to something similar like the intensity value i got in zbrush from “get scale”.

Turning off adaptive mode gets rid of the spike-like artifacts, but turning off smooth UVs doesn�t get rid of the artifacts around the seams. So i guess its still a problem with my UVs (created in Max), but i dunno how to resolve the problem…

I attached two more pics to illustrate the problem:

Displacement_005.jpg
Displacement_006.jpg

yeah, I’d have to see how your UV map is lining up with your displacement. If these UVs were created in max I think the UVs are being smoothed in a way that is not compatable with Zbrush displacements. In which case you need to change the smoothing to something better or use linear UVs inside of max.

ORRR, your UV layout is simply not working with your seams and texture space well.

yeah, i already read about the smooth uvs in 3ds max issue…i think it was on neil blevins wish list for max and i think its not possible without a workaround.
I just can´t believe there isn´t a way of getting it to work in Max nevertheless, but i tried pretty much every combination of buttons to click in zbrush…
What software are you using for rendering?

…and next time i´ll remember to resize the screengrabs before posting, it´s kind of annoying this way…:wink:

I’ve used zbrush displacements quite successfully in lightwave and modo. I’m positive that it’s completely possible to get 95-98% accurate results in any application when compared to your high rez mesh in ZB. Of course the higher your polycount for your sub-D cage, the more accurate your displacement maps will be when you create them. It is a UV resolution issue you have to solve on a per character basis. There is no majik settings for all characters and their respective UV sets. You may like to try PUV or AUV uv tiles or you may not.

Well, i�m quite positive aswell, that it should be possible to get accurate results, especially since Max isn�t really a niche-product…its just a pity that the pipeline guide is so outdated and in none of
the tutorials and guides i read anybody mentions the problems i�m having with the UVs.
I already tried zbrushs native UV solutions (including Guv tiles and UV master), but the problems with the seams persisted.
The displacement for the head already works quite well though (if i untick adaptive and if i use 0 as a midtone for 32 bit).
I haven�t tried all of the subtools on my character yet, but i guess it�s not so good to have seams were alot of displacement is going on.
On the example i posted above i have some spikes (it�s a mantis-arm) exactly where my seams were going and thats also where i had the artifacts.
But since i also tried other UV-Layouts and the problem persisted, i figured out that it�s probably a problem with the topology itself (i can post a picture when i�m back at my workstation).
Its probably not the best starting point to figure all of this out while testing a character with a lot of spikes on edges and such things…
Another tip i found somewhere else was to just export a higher subdivision from zbrush as the basemesh to max and that helped a bit with the problem.
I really have to get into the habit of storing morph targets before starting to sculpt away, i think some of the problems i�m facing are due to smoothing of already thin geometry (for example the eyelids).

Thanks for your input though, think you can shed some light on my confusion with the “scale” and “intensity” values?
What are they actually defining, or how are they altering the displacement-output?
Do i just need to click “get scale” when i�m using 16 bit displacement and just leave intensity and scale at 1 when using 32 bit?

I use max for it’s character studio plugin but I don’t use it for software rendering, mental ray is a little out of my course of studies I’m afraid.

Based on your last comment, I think I know what is happening to you. There are two different workflows that work really well concerning your cage mesh (sub-D level 1).

The first workflow that I used to use for characters that were already rigged and skinned:

-) I would import that cage mesh (pretty low poly) into ZB and first save a morph target. Then subdivide it and after I sculpt, I would come back down to level 1 and then switch back to my morph target.
ORRR you could simply load back in your original obj on top of you sub-d/ level 1 mesh and then the sculpting would then get transferred onto the imported mesh. ZB uses the GoZ feature at that point.

Then you create your displacement map and apply it to your rigged mesh in your rendering and animation app. Because you switched back to your original morph target the displacement will fit your UVs perfectly.

-) The second technique is without usage of the morph target when you generate the displacement, and instead you simply export your cage mesh from Zbrush and use that model with the displacement map for max. Don’t use the original model you imported into ZB.

Granted it might not fit your rig if you have already created it. If not then it’s no big deal if you don’t use a morph target. Simply rig your Level 1 Zbrush cage inside of max.

Make sense?! I have a feeling you aren’t exporting your base ZB cage for rendering in max. You are using your original mesh you modeled in max right? Don’t do that, but do use one of the above techniques.

Unfortunately i already covered that part: I simply exported the altered lvl 1 mesh from zbrush, and used that in Max, since i haven´t rigged the character yet (i was really just concepting away without knowing how many limbs the
character would have in the end. ended up with an even number on each side, guess my imagination is still a little scared by the technical side of things…).
So that´s not the cause for my problems.
Like i said: I´ll have to post a pic of my Lvl 1 mesh.
It´s a little hard to explain: Where the little spikes in the sculpt are, i just have an edgeflow on the lvl 1 mesh, no actual polys…like i said, hard to explain.
Apart from my confusion with the settings (the most essential part in the pipeline guide evolves around the displacement exporter wich simply doesn´t exist in Zbrush 4), i´ll have to try some more subtools to confirm that it´s a topology-problem
and not a problem with UV-incompatibility between max and zbrush.
Not that i couldn´t use a LOT more practice with creating good UVs…

So, i did some more testing and its definitely a problem with bad topology and not with wrong settings or uvs.
Here you can see the basemesh for the previous post (i highlighted the edge where the bad distortion in the displacement was occuring):

Displacement_009.jpg

i tried it on another subtool and it worked way better.
I still had some topoology issues though: The base mesh has a relatively thin shell, and while sculpting some of the polys must have gotten to close to each other, so i get these kinds of clipping issues (for example above the eyes):

…wich can easily be removed by fixing the base mesh:

Displacement_008b.jpg

and just for good measure, here�s a screengrab from the original sculpt:

Displacement_008c.jpg

to avoid such errors in the future, i�ll remember to always store a morph target before sculpting from now on…

But since most of my issues seem to be due to sculpting on and around thin geometry, i�ll have to look up some tips for that.
For example: I had to reproject the mesh at some point, because i changed the original topology and couldn�t just GoZ, and during that i got alot of errors, especially on thin parts of the geometry.
which naturally i tried to smooth out on different Sub-D Levels, resulting in some bad topology around those edges of my model (again: eyelids for example).
Is there a quick way to avoid these smoothing issues?

So now i have to go though all of my subtools, check whether i have some topology problems and if needed retopologize and reproject (and be careful while cleaning up projection errors)…
In some cases it�s probably faster to just resculpt the whole thing.

Still can�t get 32 bit displacement to work right (zbrush tells me to leave midpoint at and i saved three identical channels so 3ds max could read it, still doesn�t look right in the end though) and i still don�t quite now
what to do about scale and intensity values…i just click “get scale” first and then adjust the settings in my renderer til they look about right…

Well, it´s not just the geometry after all.
I´m definitely also getting artifacts along my UV-Seams, they are clearly visible on my displacement map as black and white pixels.
So it´s either a problem with my UVs or the creation/export of the displacement map in zbrush…

Think i finally found a fix for my problem: I had my FS Border set to 8.
Bringing it down to 0 got rid of the artefacts, but then i had a visible thin line at the seam.
Since i can´t use fix seam on a displacement map, i had to just bring it up to 1 and that fixed it.
I just did some tests, so i still have to try it on the problematic areas (like the eyes or the mouth).