ZBrushCentral

Displacement problem in Maya

Gidday,

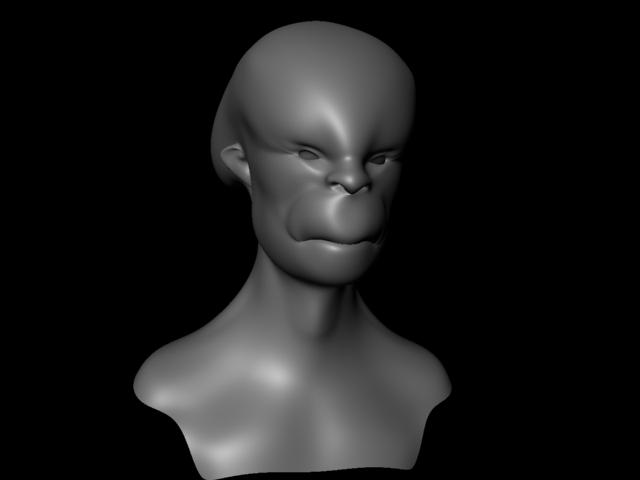
Got a bit of problem again, I have generated a 32bit floating displacement map in Zbrush (with multi displacement 3)to be used in maya using the mental ray renderer.

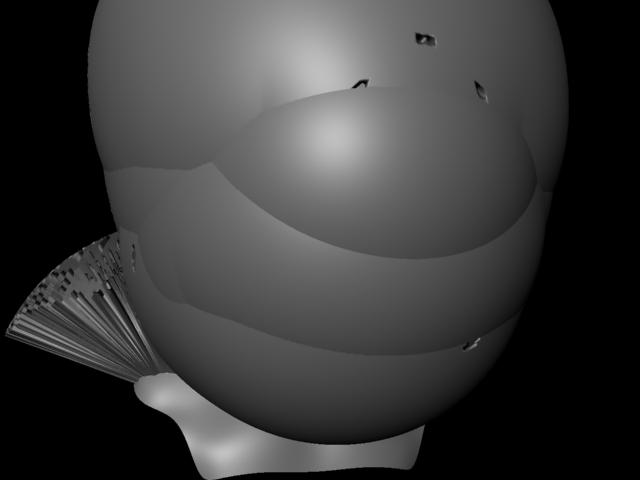
The displacement simply doesn’t look at all like my Zbrush sculpt when I render the model in maya.

It’s either extremely bloated or there is hardly any detail in the model. It looks very smooth with no fine detail.

I have tried to fix the problem by changing the alpha gain and offset for the displacement map but nothing really seems to work.

The different settings I have used:

AG- 2.2
AO- -1.1
(this setting looks bloated)

AG- 1
AO- -0.5
(this setting looks bloated)

AG- 0.0
AO- 0.0
(this setting looks too smoothed)

Also used the expressions:
AG = 2.2 * Head.scaleX.
AO = -2.2 * Head.scaleX /2
(this setting looks very bloated too)

All other settings are pretty standard
feature displacement is turned off and I have set the N subdivision level to 4 or 5.

As well as the settings in multi displacemtn3 in Zbrush

Everything is set to full range vertical flip is on channels are set to 3

Below are some renders so you can see what I mean.
This is my first time trying to use displacement maps and I am not really sure what can solve this problem, anyone got an idea?

Thanks

Attachments

Bloat.jpg

Toosmooth.jpg

there are numerous threads about this, but I’ll give you a check list of things which might help

  • good UV layout
    -may need to turn on suv when you subdivide the model, if already done without suv you’ll need to project all onto a new model base with suv on when subdividing
    -4k/2k map
    -DE3, DE-LBEK-EAEAEA-R32
    -map size adjust 0
    -DpSubPix 1 or 2
    -32 bit alpha gain/offset ratio 2.2, 1.1 (this could also be 100, -50 get the idea)
    -mental ray, feature disp off, catmull clark subdivision, approximation node subdivision and set to spatial, 3,5 and edge length 0.1, if need be 4,6 EL .01
    production quality.

remember its not important to get every single detail out of a disp, you can also use normal and then bump and then a cavity map to punch out all the details.

Heyah Morph thanks for the reply and the tips.
Most I have tried already though, but I have a feeling the map generated in Zbrush is the problem. Maybe I should set the model to the highest subdiv lvl when generating the map?

Oh yeh maybe this sounds a little stupid but what did you mean by SUV. I am not an expert in Zbrush lingo yet :smiley:

Thanks

suv is next to the divide button under the geometry submenu
Tool>geometry (it can help avoid uv seams in the map)

disp should be generated from the subd lvl you intend to export.
Zbrush has a tendency to generate multiple maps if it detects uvs outside the 0-1 range, also if uvs are bang on the 0-1 border.
Which will result in one of the maps being almost void of detail (unless you had intentionally placed uvs outside)

a quick test is to open your map in photoshop and adjust the levels and see if there is anything there.

Also try applying a disp to your model from nothing more than a white dot on a black background.

outside of a production pipeline disp is a pretty straight forward procedure.:smiley: