ZBrushCentral

Displacement map showing good result in maya 8 but not in maya 2009

Hey guys

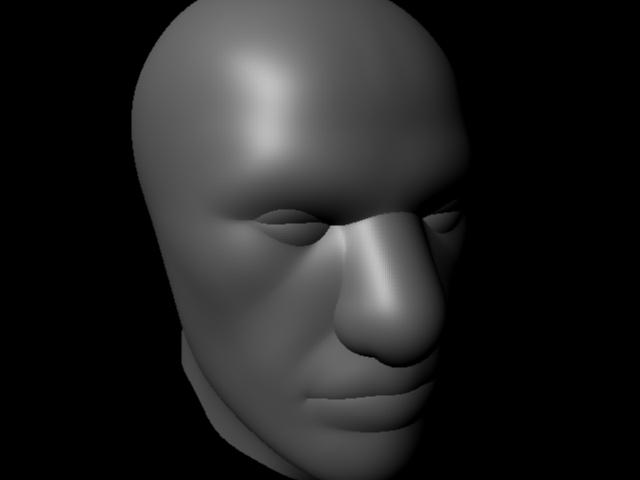
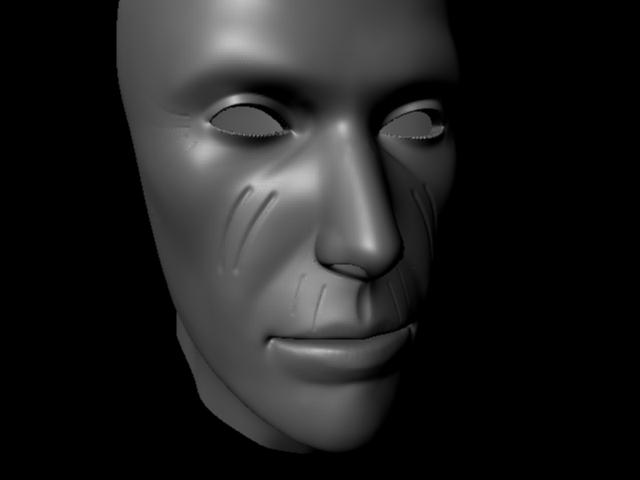
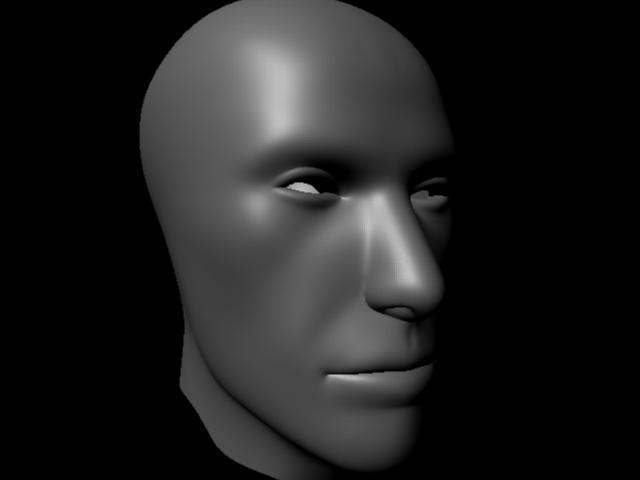
I am creating 32 bit displacement map in z-brush and applying it in Maya following the tutorial of Scott Spencer ( http://gnomonology.com/inst/18 ), but when I render the scene in Maya 2009 and render the scene result is not good (please look at the first image), but when I use the same process and settings in Maya 8 ( the version Scott Spencer used in the tutorial )the result is excellent ( please look at the second image), then I went back to Maya 2009 and played with alpha gain and alpha offset, I got the better result but not good as it was in Maya 8 ( please look at the 3rd image), I have rechecked the sittings many times as those were in the tutorial but don’t get the good result. Is there any difference in settings of Maya 2009 and Maya 8 which can effect the result ? or something else, please friends solve my problem.

Attachments

maya_2009.jpg

maya_8.jpg

maya_2009_2.jpg

It looks to me like you’re not restoring your base mesh prior to creating the displacement map. This means that the map is being created for a version of the model that has been affected by subdivision smoothing rather than the true model that the map is to be applied to.

When you divide a model, the smoothing algorithm causes the model to shrink. When you return to level 1, the model will adjust to that change and so will be smaller than what you started with. If you now calculate a displacement map, the values will be too strong.

Always restore your base mesh prior to creating a displacement map. You can do this by storing a morph target before you divide the model, then switching to it when you return to level 1 to make your map. Or if you didn’t do that you can go to level 1, store a morph target and then import your original model again. Or if you don’t have an original that was created outside of ZBrush you can compensate by going to level 1 and turning on Tool>Geometry>Cage. This will adjust the level to be a cage that you can create a good displacement map from. You would then export both the cage geometry and the displacement map.

hey aurick first of all thanks a lot for the reply, also i tried the method you mentioned but same problem is occuring , first I exported the character before dividing it and then edited it and after that I went to 1st level of division and created the displacement map and applied the character which I exported before dividing. But the result is same :cry:,

Alternatively, go to subdivision level 1, export it as an OBJ (give it a different name than your original OBJ base mesh). Bring the new OBJ into Maya and apply the Displacement map.

Your displacement map expects your geometry to be a specific shape. If that shape is altered, even slightly (like aurick was describing), it can give you wonky results in your displacement.

If you lay your UVs out manually, after you’ve done the bulk of your Transpose work like posing limbs, adjusting proportions, etc; it’s a good idea to go back to your UVs and relax the shells. This will relieve any distortion that may have occurred due to the disparity between your original base mesh and your final base mesh.

Thanks to aurick and dustinbrown to reply and also thanks to the friends who read this post, hey guys I found the solution, just I need to turn on the option Alpha is Luminance in the Color Balance section of the displacement node in Maya 2009 and bang :smiley: the result is perfect I got the result as it was in Maya 8.