ZBrushCentral

Displacement exporter errors

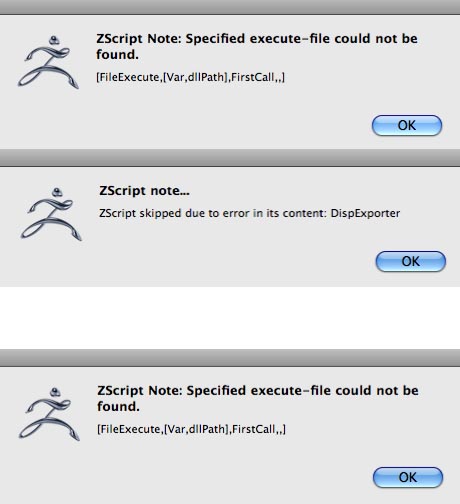
I have downloaded the Mac version of your Displacement Exporter, and followed the install instructions. When launching ZBrush I get the first two error messages in the attached image. The buttons appear in the alpha palette, but pressing either of them returns the third error message.

I have read another post that advised no spaces in names along the file paths. I am not sure if this applies here, but the only space I found was in the main folder as it arrived from the installer ( ZBrushOSX 3.12 ).

Just in case, I removed the space, with no change in the outcome.

I have also re-installed both the main App and the Exporter, again no change.

Please advise.

B.

Attachments

Errors.jpg

The plugin is not compatible with 3.12. We are currently working on testing and updating the official plugins for re-release on the Mac.

What are my other options for configuring the export of maps?

I have the same problem, it would be nice to have been warned about these issues when I bought it, at the very least give us some documentation about work arounds and a release date for the new plug in.

To create a displacement map in 3.12:


  1. Go to Level 1 of your mesh.
  2. Restore your original mesh by switching to the morph target that you stored before dividing the model. (If you didn’t store a morph target, then do so now, then press Tool>Import and load your original mesh again.)
  3. Set your map size in the Tool>UV Map menu.
  4. Assign UV mapping if necessary.
  5. Adjust the Tool>Displacement Map settings if necessary. You can choose between DPSubPix or Adaptive mode, and also choose whether or not to smooth UV’s. (You will normally want to use Adaptive, and leave SmoothUV off)
  6. Press the Create DispMap button.
  7. To export the map, press Tool>Displacement Map>Clone, which sends the map to the Alpha palette. Then press Alpha>Export to export the map.

Currently, only 16-bit maps can be exported from 3.12. The 32-bit maps will require the Mac version of Multi Displacement 3 as soon as we can get it released.

To create a normal map you would use the Tool>Normal Map menu instead of the Tool>Displacement Map menu.

Hi,
I have tried the above method of generating normal/displacement maps, but I keep generating totally blank images or ones with banding lines, but never any of the model’s texture.

I have followed the steps exactly several times, both with tools with subtools and without any. My tools do not have morph targets, so as per instructions I switched to Level 1 subD, store a morph target. In order Import, I export an obj of the lowest subD, then Import…? I have done this as well as loaded the ztool again, as well as turning on the morph target then simply generating a normal, all yielding the same result.

Has anyone successful generated a normal map, and could they please help me?

Help very much appreciated!!

:o

Attachments

normalerror.jpg

Hi,

Same problem here. The workflow described here above leaves me with blank file information with some kind of banding. I’m very interested in the cause of the problem and a good solution or a workaround. An overview of the 3.12 workflow to get working displacements/normal maps would be welcome. I’m stuck at the very enjoyable sculpting proces for the moment.

For normal maps you can actually skip step 2. Restoring the base mesh is not necessary with normal maps.

Beyond that, it would really help if I could see what you’re doing. Do you have any images of the high and low res meshes? How about the UV mapping?

I got my normal map generation working :slight_smile: If anyone else has experienced this problem and want me to describe how to deal with it, let me know

Peace and Light
S