ZBrushCentral

Diary of a VSWIP (Very Slow Work in Progress)

Moochie:
Thanks for the interest man You’re also one of the ones I first I remember when I entered the comunity

Ok guy… and gals
I’ve read somewhere in the community a common “problem” in the newbie circle regarding adding details.
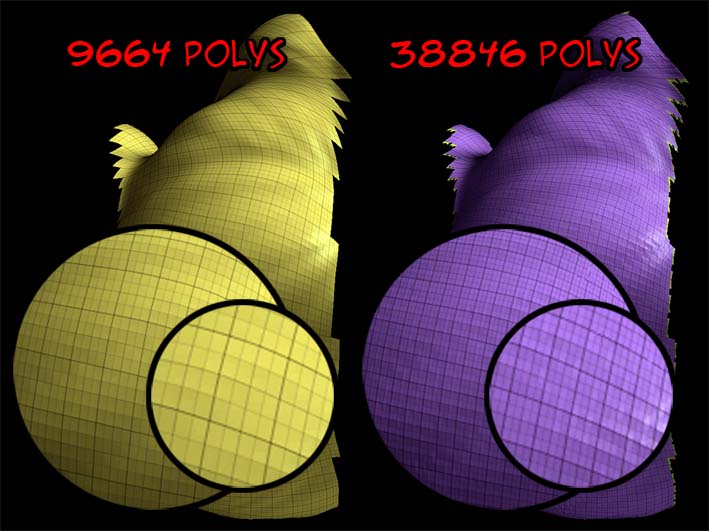
They -and I- claim that even having models -or templants- as high as 2 million polys they -we- still can’t achive very fine details like pores, good resolution of alphas, skin bumps, wrinkles, etc. I’m sure this is a newbie issue, but I tried to explore it without any great conclusion, only more questions and one severe headache

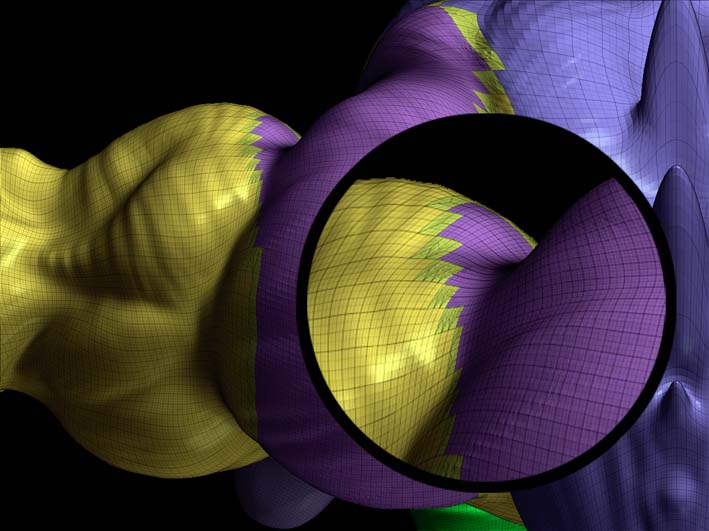
So I used Ezequiel’s shoulder to experiment in which are very “expanded” polys and tried something at Projection Master:

Basic Structure 10 copy.jpg

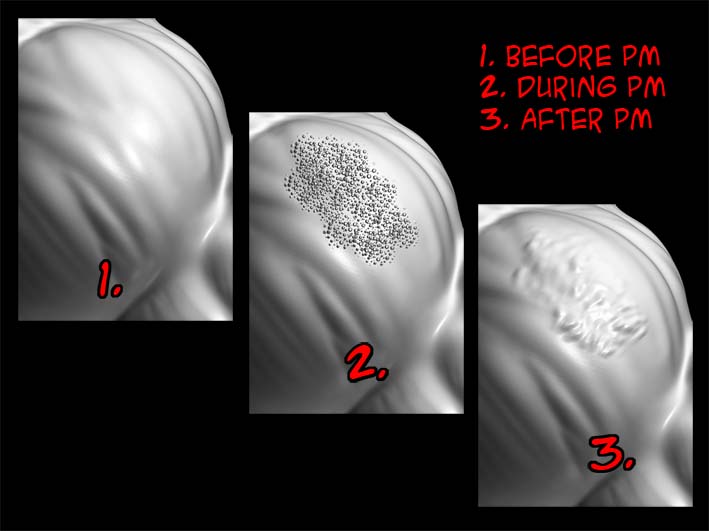
It seems that when you try the second way, it only SubDiv’s the visible part and not hidden one

This could be of some help… but I’m not sure about that… aaaaaaaaaaaaannnnnnd… here is where the z-experts (no, not sexperts… or who knows ) jump in and correct my nonesense effort.

I’m not sure if this is adviseble or the “best way” of finding a solution to my headache… so I’ll leave it to anyone who want’s to give some valuable insight

PS.
The “Quick/edit mode” is only to visually demostrate these issues better

Oh!.. and if it is not too much to ask… this question is still unanswered:

Is if there’s a difference between a displacement map made from a mesh with 500.000 polys and one with 2.000.000 polys. There probably are differences… but just want to be sure what are the differences

Thanks A LOT as always… there are some newbie lurkers around and very willing to learn -I know one at least -

Attachments

Basic Structure 10-3 copy.jpg

Basic Structure 10-4 copy.jpg

Theres no easy way to fix your detail problem. I think you schould go on working on what you have, without adding new polys. Its importand to make a good base mesh before you divide it :confused:

or you add the small details with a bumpmap

load the bumpviewer material, add a 50% grey texture to your model, go into the PM and paint with black/white/greytones your bumpmap and see the result while you painting

I think you got cought in the ‘divide to much to early’ rush. While observing the results of mega masters like Sebcesoir I found that they usually end up with a three step aproach.

  1. Base mesh with surprisingly low poly count where every poly is right were it belongs.
  2. higher resolution to build the displacement map.
  3. Ultra high resolution to build the high frequency bump/normal map.

When you experiment with the Displacement capable render engines you will quickly encounter that pores and small blemishes are hard if not impossible to achieve with the displacement map. Use a Normal map on top for the ‘high frequency’ displacements and you will look at the results in awe.

Any other approach leads to Zbrush Blobs. The ones I am trying desperately to get away from…

Lemo

PS:DONT WRITE SO DARN LOUD FIDEL I AM GETTING A HEADACHE FROM IT;)

Hahaaa elarcano you’re a funny guy.

i feel your pain man. I’m also a newbie & am in the process of creating a dragon (trust me to start with something ‘easy’ like that!). There’s a cool thread on CG Talk where the guy creates new poly mesh 3ds from hidden parts of his mesh & then subdivides from there. It actually works pretty damn well. You can go up to 6 mil or so polys for the head alone.

Check it out: http://forums.cgsociety.org/showthread.php?p=1875716&mode=linear#post1875716

Otherwise great model. Am very impressed for a first try!

Keep up the good work. Looking forward to future posts

Hi ya folks!

Slocik:

[color=#d0d0d0]Theres no easy way to fix your detail problem. I think you schould go on working on what you have, without adding new polys.
Lets say that there’s a little voice inside my head that says that somehow I can over come this issue… Oh! It my stuburn side

laber and lemo:
I’ve been trying out your recommendations… although it’s kinda hard for someone who doesn’t even know what UV means or stands for

Bobina:
It seems we share a South American sense of humor… AT LAST SOME HUMOR RECOGNITION!!!
Thanks for the words of support and the link… I’ll have to re-re-re-re-re-re-re-read it

I also wanted to thank -again- Jason, Woody and Lemonnado for helping me in a more one to one way -no! not in the way you’re think of-

Oooook, here I go…

Remember post #41? -The before, during and after PM issue- well, this time I tried using the bump viewer material -which I imagine simulates what your texture will look like in another app ¿?

I created a gray texture (R128 / G128/ B128) with a 4028 height and width -the highest resolution-
And then -I’m not sure for what- I pushed the AUVTiles… went to PM and with a grey tone (R226 / G226 / B226) -a very light grey- did some test like the last time (post #41)

These are the results -the good old shoulder again-:

Basic Structure 12 copy.jpg

It got fairly good details… so this method seems to work even with me… now that’s all in ZB, I have to see how goes within another app -oh Lord! Another headache-

I’m still thinking that maybe splitting the model could be a good solution, that way each separate part can have more poly count… hmmmm… still have to experiment more… maybe splitting the mesh and the bump map method could give me what I’m looking for -huh!-

I hope this is usefull for anyone… waiting for someone to correct my nonesense again

PS lemo:
I’m font-aly deaf

elarcano … u are one very funny guy :slight_smile: … this thread has to be one of my most favorite threads ever posted at ZBC. Well at least the thread that made me laugh the most :slight_smile:

Dan

Now this is the great thing about not been known for doing good 3D models… you can dissapear for more than 2 months and nobody notice it hahaha… I could of started a new thread and say the “I’m new to 3D” routine all over again

So, I got to the part I wanted to tackle the problem with my model and understand things a bit more… so I went to scratch -literally- and doing some “design improvements”

SO! here’s my first base mesh in XSI -and yes, I know, it’s not the cleanest mesh you’ve ever seen- It’s 5630 polys and according to some generous insight that’s a pretty good base mesh count

Base Ezequiel 1.jpg

Any comment on the “unclean” mesh will be repaid in the afterlife :wink:

Thanks

Attachments

Base Ezequiel.jpg

hey from one person who remembers ya =P. The model looks good. The more i am sculpting the more I realize how important it is to have those base mesh skills down. Am recently looking into topology and edge flow. It gets kind of confusing haha. Welcome back.

Ignoring how clen the modle is, you really need to fix the hand and the head part i marked :expressionless: 
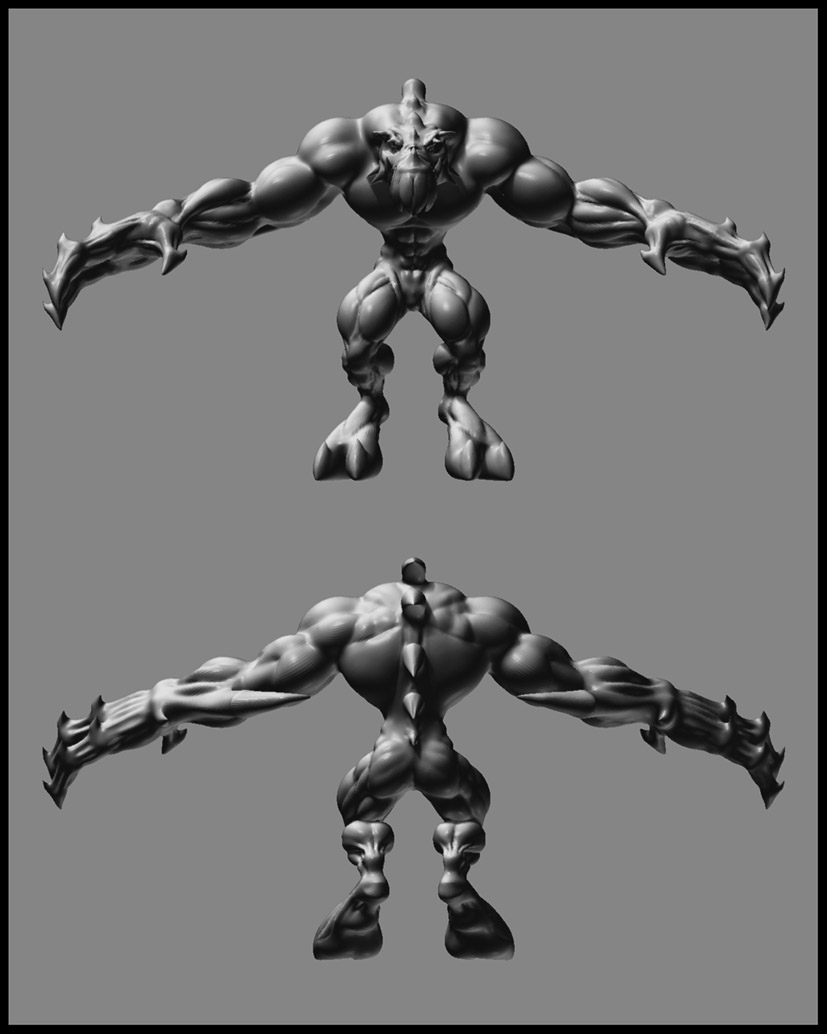
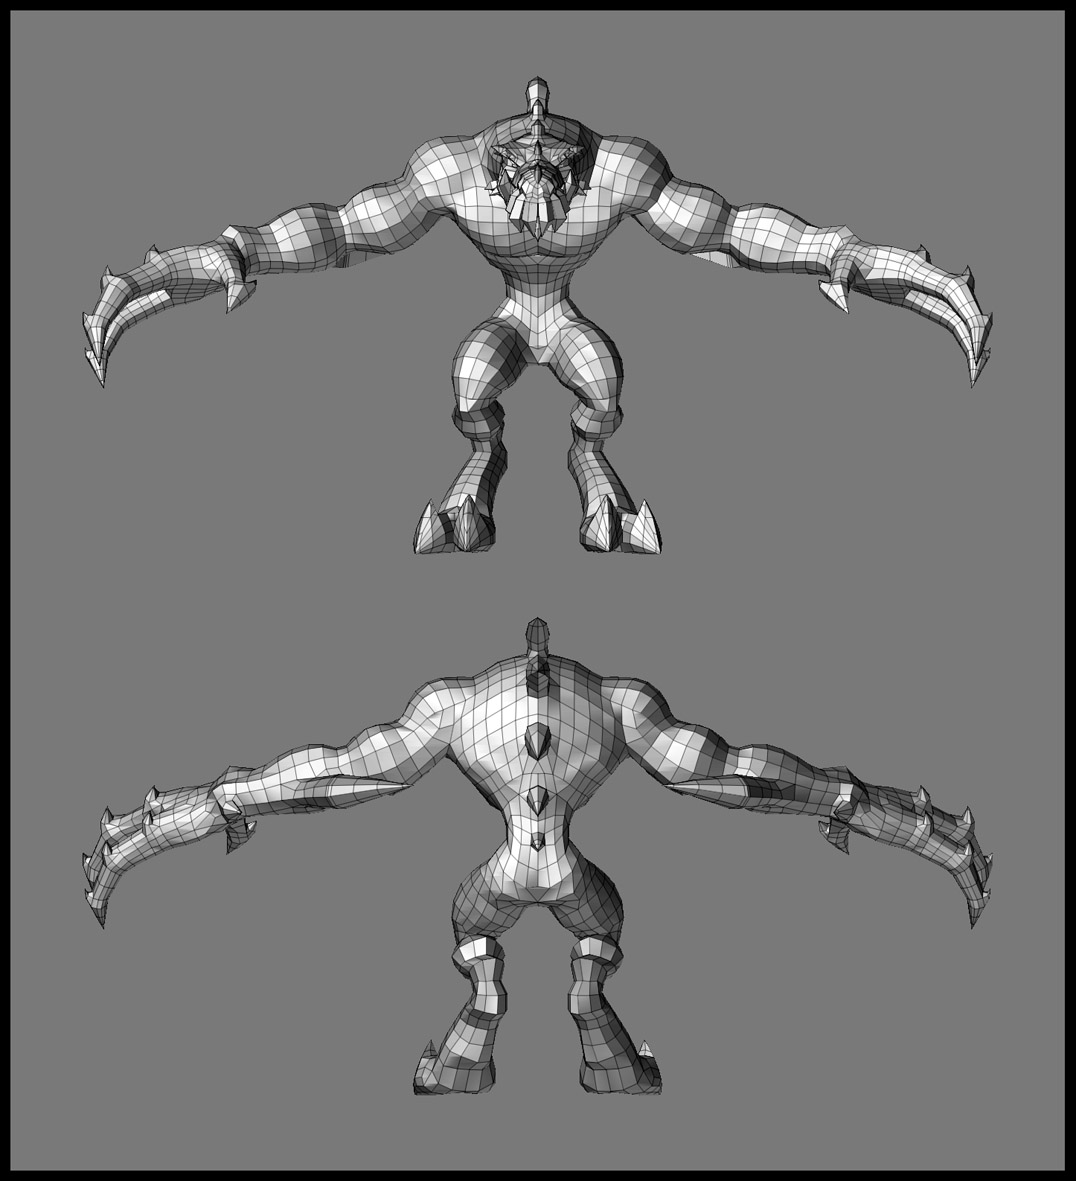
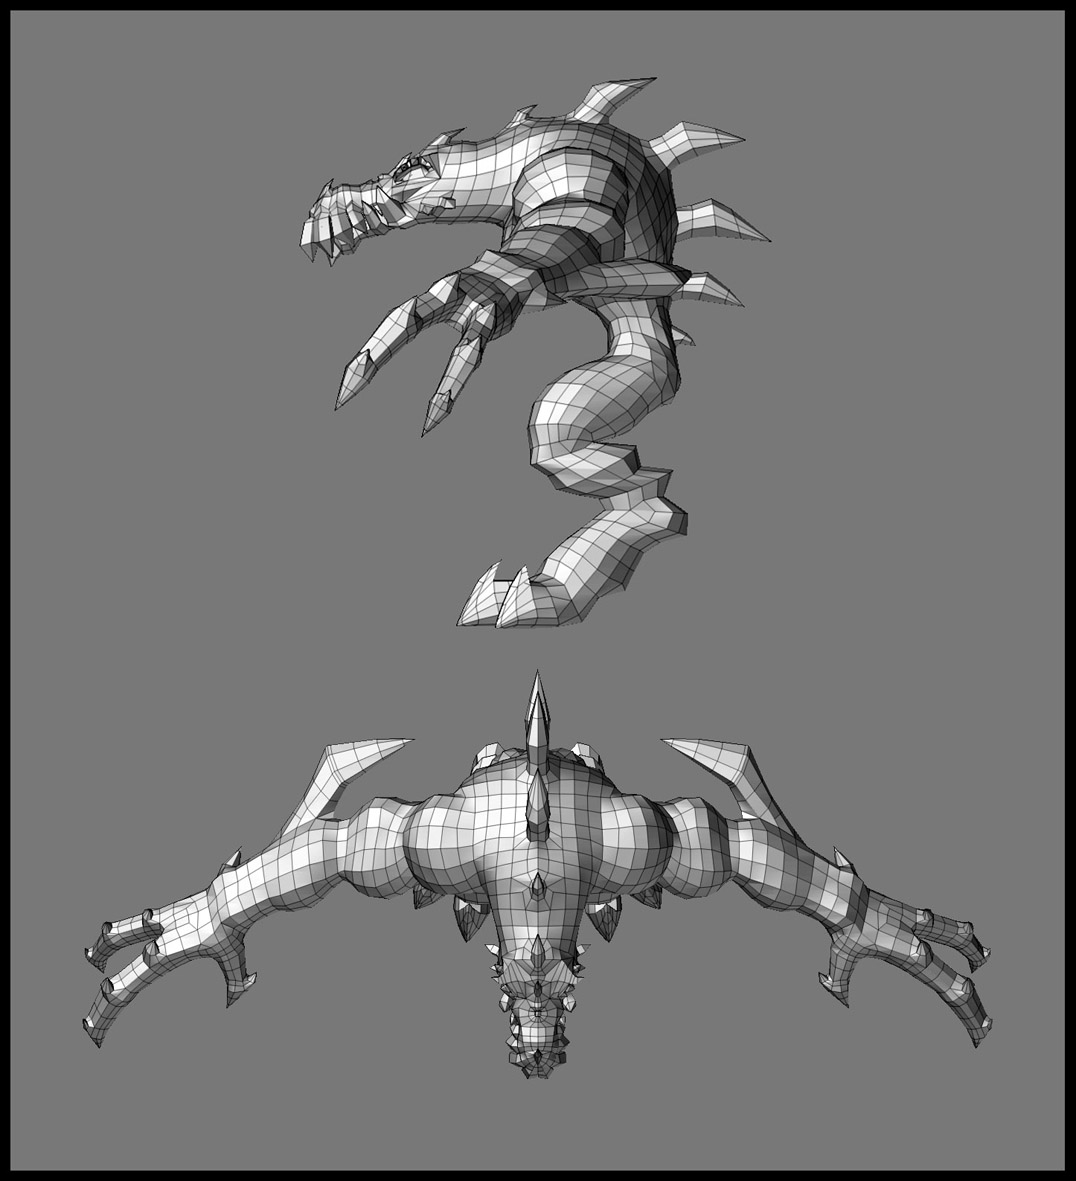
Especialny the head part, you will geat not too much polys there :expressionless: And delete some eages from his belly :] You really would want to make every polygon the same size :smiley: Keep up the good work ;]

Base Ezequiel.jpg

Hi guys, good to know you’re still around :+1:

cspalak:
Thanks for the compliment :wink: 
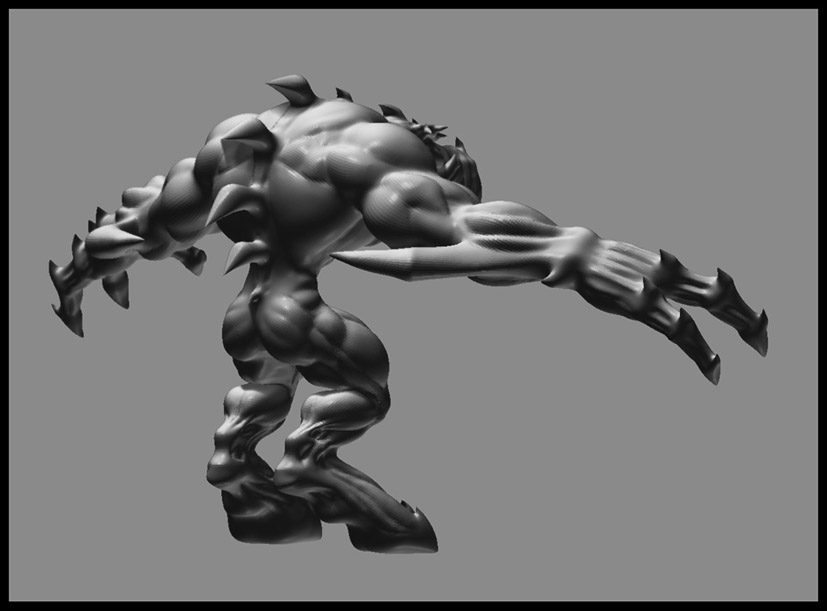
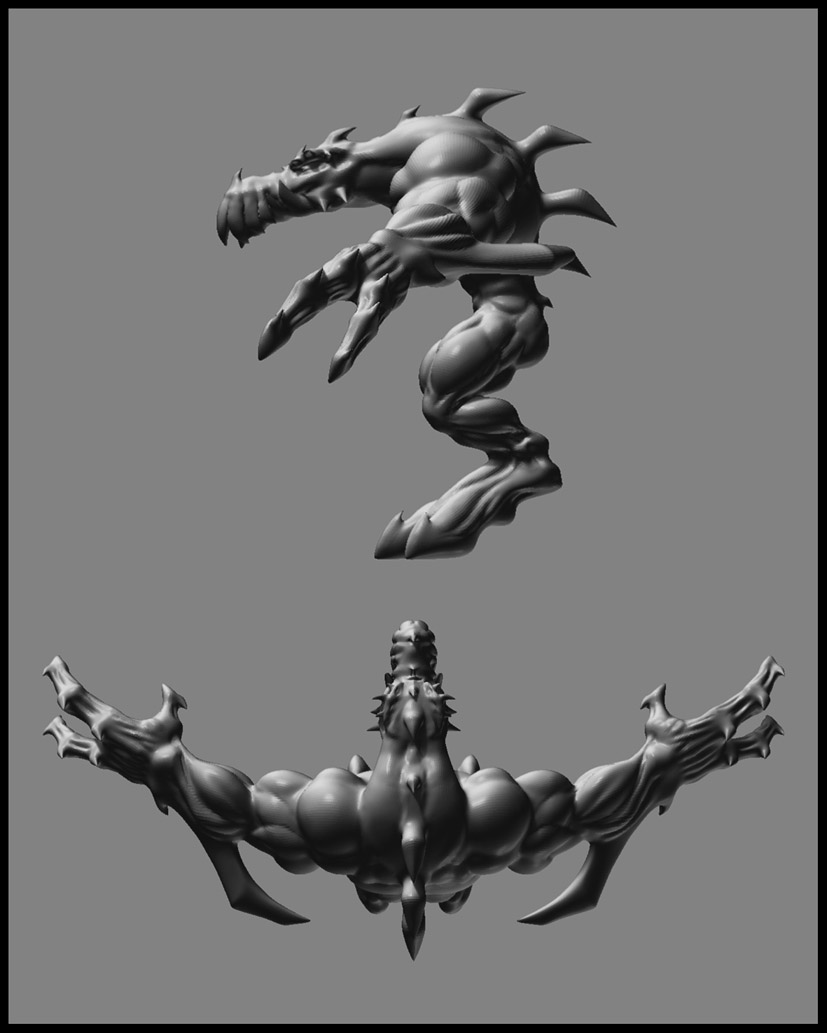
ZB can create basic mesh through zspheres but I wanted to learn how to make a basic mesh. A lot of people do their basic mesh in another apps and just wanted to go though it. Supposely it gets better results -anyone can comment on it?-

Slocik:
Yes, you are absolutely right… now, the thing is, adding some edges will do the trick or just moving the ones I already have around? Oh! And thanks a lot for the self explanatory image :+1:

Ok, back to XSI… the headackes continues :roll_eyes:

Thanks guys :wink:

I’m glad to see that you’re back. I like the form of that model. I think you have a really good base.

I am quite new at this and anything of value that I add is due entirely to the education that I have gleaned from masters at this such as Glen Southern and the folks Gnomon. Commensurate with that goes that anything stupid I say is my own misjudgement and lack of experience.

With that said: 1) The mesh should only be dense on those areas that require it. i.e those areas that undergo deformation will need the ability to adapt properly to changes in ther anisotropic values. Basically where the skin needs to stretch and deform direction a lot to accomodate movement you need more mesh. So you have too much mesh in the abdomen where little flexing is needed and not enough around the joint areas as slocik points out. 2) One of the variations of the temptation of to much detail to soon is trying to sculpt what should be in the higer subd levels in order to make the base mesh. One of the things that I see in masters base meshes is a very angular and harsh looking base that never the less creates this amazing image of the final. This is quite smooth for a base mesh. Worry less about the final details and get the basic forms and directions right. Squint your eyes where needed. :lol: I can't agree with others more though. I LOVE your creativity in combining non-traditional forms. Amazing work that I hope to attain someday. As a developer with little artistic talent that is asking a lot :confused:! --- Best regards, prometh3us

cspalak:
Thanks for remembering me… my mom sometimes shouts out robber when she suddenly sees me in her house… that wouldn’t be that bad if I didn’t actually live with her! -31 and he still lives with his mom!!! Hey! That’s the way in my country! -
Well I guess it is better to know how to do a good base mesh just in case someone commissions you to do a model from scratch… and it’s kinda fun and not that confusing -after 200 hours spent on one model -

slocik:
Let’s see if it’s better this time Again, thanks for the pointers

billrobertson42:
I really never left, I was just busy with the other image posted in my signature. Thanks for the welcome, always good to speak/type to all of you and thanks for the support

RobLively:
First of all, thanks for breaking things in a very clear way and from what I’ve read you’ve been doing very well you’re homework
Regarding the amount of polys used to make a base mesh I think it comes to a personal preferences and some objective needs -which I’m unaware of -
As I said before -in another thread- XSI offers you a pretty good full body base mesh and it goes up to 5000 and something polys, but then I saw a few day a go a good full body base mesh in the forum -odhinn’s thread- that was 1700 polys… and there is no very big difference between them, meaning that the higher poly base mesh is not all that more detailed.
On the other hand, the very kind Lemmonado pointed out from personal experience and from forum entries pointed out this little chart:


  • Lopoly about 5-6K
  • Mid about 10-20K
  • High about 100-150K
So I imagine that it all comes down to animating the model from the lowest poly count using normal maps, displacement maps, etc.
If anyone cares to give some input about this, please feel free to do so

Ok, this took me a fair amount of time… around 200 hours -literary speaking- to get the base mesh I’m happy with -Man! Am I gonna land BIG times on the CG world or what -

Good Base Ezequiel Front.jpg

So, I think it’s time to take this guy to ZB -finally!-

As always, comments and critics are very welcome

Thanks for hanging around

Attachments

Good Base Ezequiel Right.jpg

Great work, and good job on correcting the topology :slight_smile: I think there are still a few kinks but nothing major. I think it’s time for ZB too :slight_smile:

Keep us posted

Nice work on the topology, i see you lerned a lot :] Still You can work a little on the head :smiley: And dont worry, you will spend a lot more time on things like that :]

Thanks slocik and x-titan for the topology compliments and critics

I’ve notice that I tend to stare at whatever I’m doing -in a non-productive way- just staring as an idiot as time goes waaaaaaay by. This has been a thing I’ve been doing since art school and maybe that is why I’m so danm slow at doing anything… that or it’s my low IQ and that I’m slightly retarded… hey! I should put that in my resume… that should get me instant commissions, huh!

Ok, here are some updates on the muscle shapes… still lot of work ahead … wait a minute… deja vu?

Ezequiel Front.jpg

Thanks guys for the interest and specially for posting

PS.

He has a very stupid face when seen from the side! hahahaha Yeah! really menacing… I can almost hear his goofy laugh

Attachments

Ezequiel 3-4.jpg

Ezequiel Right.jpg

Great looking model! I can see this being in a platform video game.

Thanks Kraken! Your frog model is awesome man
Video game, that would be cool but for now how about an online comic? … if I ever finish the first model!

Ok, this is getting embarrasing… I’m pretty happy with the new model but as always there are things I can’t understand… for example, some of you complimented on the base mesh so I imagine I must of done something right… BUT! What I can’t figure out is that the old model when up around 2.5 million polys and the new one went up to 4.3 million polys -for testing purposes-… BUT! Amazingly the old one with less poly count would allow me to do more muscle definition.

The following example is just to show you the differences between the good old shoulder of both models

Poly Comparison.jpg

The new model seems to have bigger polygons than the old one wich doen’t allow me to go futher… danm! Deja vu is really kicking me in the… oh well you know where

Is there something I’m not getting? Like a Brain?!!!

Any insights are always welcome

PS.
I wonder if I’m going to be the first one to be thrown out of the community because a boring-not-going-nowhere-useless-time-and-space-consuming-thread?.. I still fear Aurick -glup!

ha…any thread that shows progress is not a boring useless waste of space. besides…any thread that shows the good with the bad and tells us what ya learned along the way shall save some other perhaps the same fate and progress a tad faster than they would have yesterday. So…post on!

and enjoy the learning process…even when ya bump uglies with the wall…keep going til ya blast thru or climb over…it’s all good.

didn’t read that far back but what were the starting polys for old and new meshes?