ZBrushCentral

Deformation maps and not having lower subdivisions to delete.

|Hi Everyone,
|
Hya ZBer!

This is just a quickie I think…
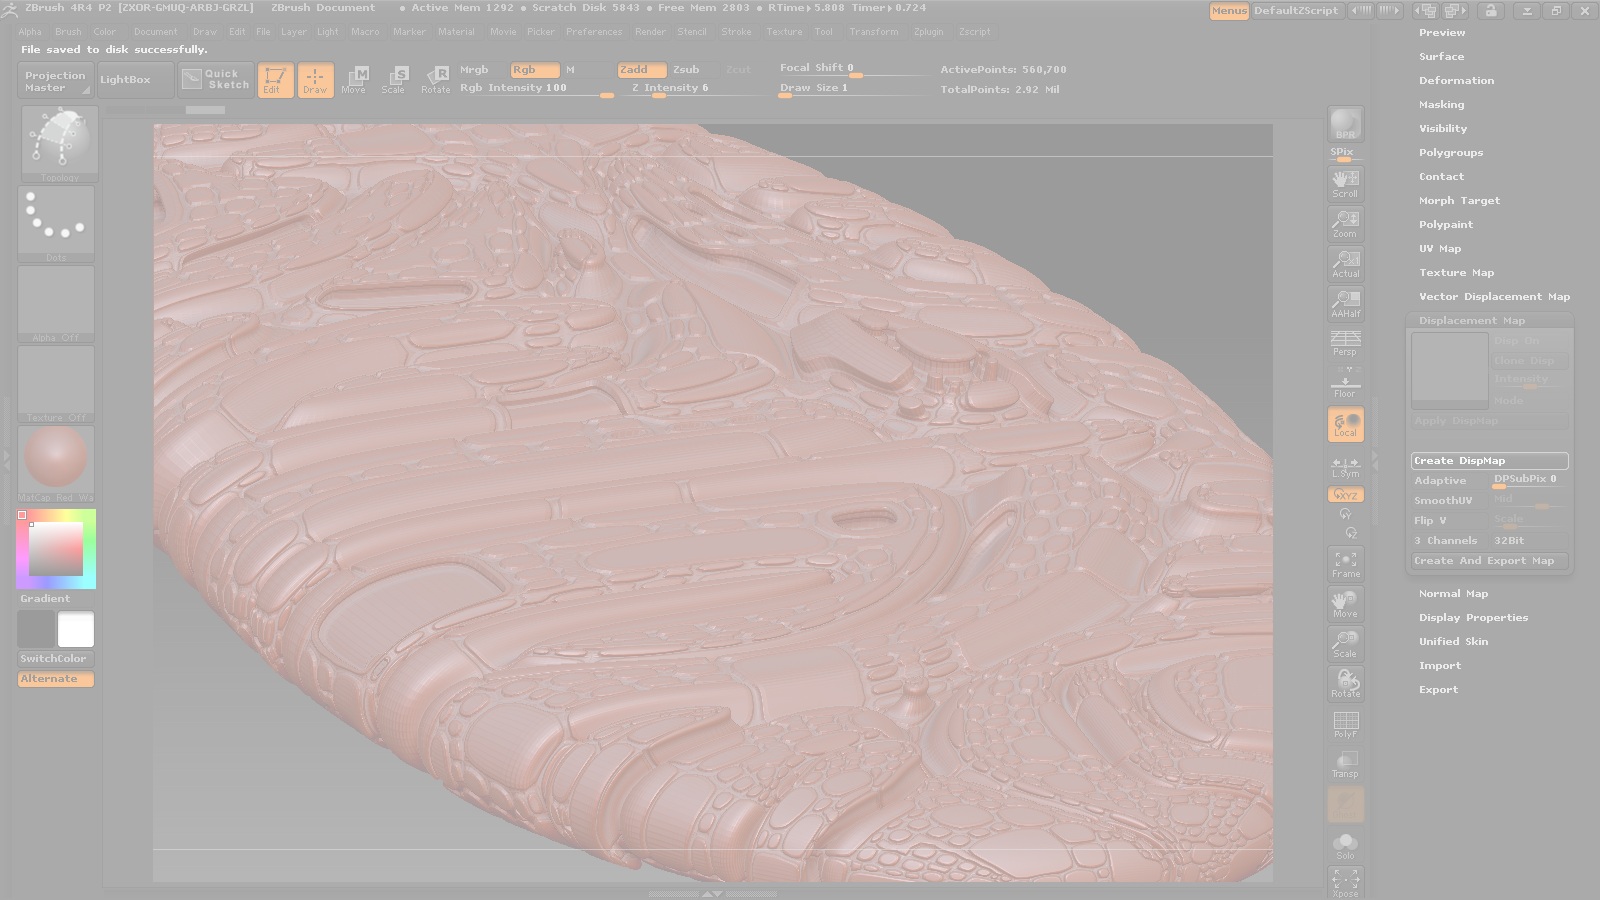
I am trying to try out using displacement maps but cant make any, no mater what I do I am told to delete lower subdivision levels that I do not have. This happens on things that were subdivided but have had all the lower ones deleted, and to things made with dynamesh which don’t have any and never did.
Is this fixable? Also am I doing it wrong?
I just make a thing, open the displacement Map pallet under Tools and hit the Create Displacement Map button and POOF I am told to delete nonexistent stuff.
I looked in the PDF but i cant find anything about this stuff, just how to export things I haven’t been able to make.

Cheers! (And thanks!)
Mealea

EDIT:
Actually it says I cant do this while the higher subdivision level is ACTIVE, since there isn’t one I made one and switched to the lower one, now I don’t know what is happening or how to describe it…

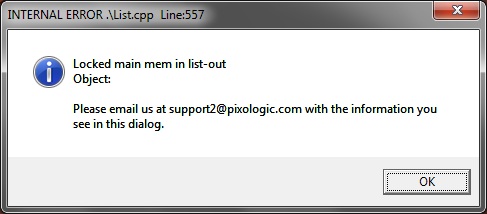
But wait there’s more!
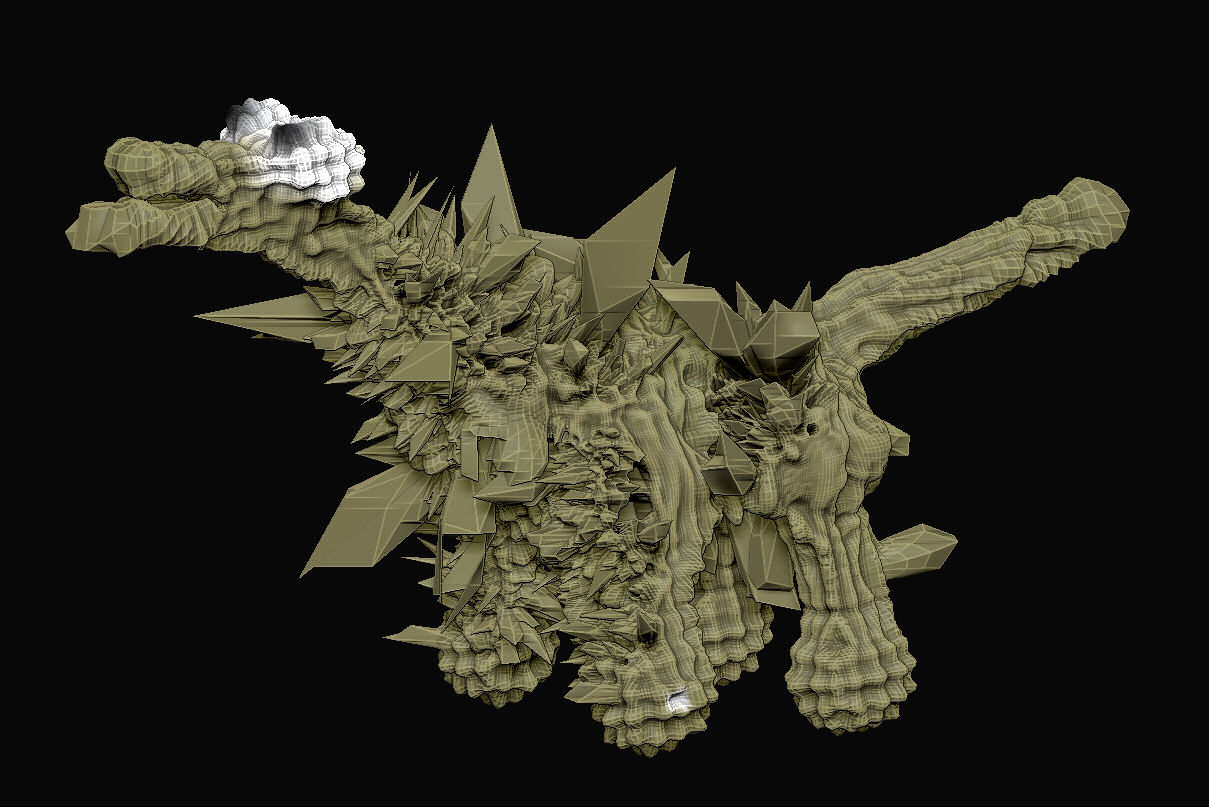
It crashed me violently:|

Attachments

Blah.jpg

error.jpg

Maybe you looked here already. http://www.pixologic.com/docs/index.php/Creating_Displacement_Maps

I have now… Thank you
I basically did that (the stuff you showed me) but leaving it at the default settings, it just tells me I have subdivisions which I do not or if I make subdivisions it crashes or scrambles my object, sometimes making a bunch of pars of it sort of invisible or turning other parts black.
Should I screw with the sliders?

Also how did you find this? When I use the wiki thing I usually wind up finding stuff from very old versions of ZBrush…

Spent more time looking for stuff to read than trying to make displacement maps. Wish I could offer you more.

HAHAHAHA!!!
That’s awesome, thank you for making me laugh.
And you did help I think, I have it doing very little but not crashing now and I know where more stuff is… not that that is good, its just much more interesting!

GRIN!!!

|On that page you showed me "Tool:Texture:Uv>Txr" does not exist as near as I can tell, I think this is another example of ZBrush 3.x documentation leaking into the future or something.
|

Hmmmm…

|

Hi Mealea,

It’s now Tool:Texture Map:Create:New From UV Check. If you see any red in the resulting texture map, your UV’s aren’t that great. At least to ZBrush. You definately need UV’s for a Disp Map. The best way , inside of ZBrush, is probably to Unwrap in UV Master. I found that the most reliable.

I had to use Qremesher on my model before having any luck. Managed to generate a map with some wild results. lol

Attachments

TEST of DISPLACEMENT.jpg

|

Hya ZBer!
Thanks for that, it came out with no red, turned parts of stuff black and left other parts alone.
When I did Unwrap in UV Master ZBrush hung and stopped working after “Export something something file” in the progress bar slot happened.
So…
I forget why I’m doing this now.
Oh yah…
Im playing with UV Master because I want to use displacement maps to make little bumps on something. And maybe exporting them to something else so I can bumpify a low poly version of it for rendering.
And I forget why I wanted to do that now.

Ok I started ZBrush again and opened it again, hit the work on clone button in UvMaster, hit the Unwrap button and it got further but then said “An error occurred during the process!”

Now I totally forget what I was doing and why.

GRIN!
This is getting silly, I have at least five new ways of crashing ZBrush now!
I’m going to try for six, this time I’m going to try a cube with eight polygons.

|

Good god thats a fun object! What did it look like in the first place?
You used Qremesher, how many polygons did you start with?

QRemesher is a weirdo. I wonder if after is a usable mesh!!! I have so much to learn…

Before:
AntiQ.jpg

After:
Q.jpg

Did you use the auto masking button and same?

|I forget what I was doing in the first place.
|
Qremesher makes a ridiculous mesh, subdividing it to 4 times as many polygons as the original and re-projecting makes spikes all over the place and other mangled areas. It has no UV’s and you cant copy the original ones to the new mesh. Applying a displacement map to it from the old mesh results in something that looks like some pre-psyco kid with a magnifying glass went nuts on a small blob of wax.
So as I understand it, The original object has UV’s which dictate the shape of textures created on it via everything from polypaint the texture pallet and all that stuff, and the same UV’s control displacement maps, normal maps and texture maps both inside ZBrush and when its all exported to something else.
But when I try to do this the ONLY thing I can apply the UV’s from the original model to is -que drum roll- the original model. Note here that this is a pointless ability though I am guessing that its for lower subdivision versions of the same thing which have the bloody UV’s anyway, amusing you HAVE lower subdivisions in the first place which I do not as Grouploops forbids their existence.
UV Master will not paste onto anything from Qremesher, retopo via ZSpheres, Dynamesh, and Make Unified Skin. .
What am I missing here?
Wait…
Decimation Master has a Keep UV’s button…
I will be right back!

|

No…
Wait, I’m not sure hang on, are they default?
Most likely not…

This is an awful lot of hoops to jump through to wind up having no clue what I was trying to do in the first place…

Ok…
I’m lost, I have no idea what I was doing, now I’m just trying out random stuff.

Gak.
From a nice thing with 400k polygons to a nasty blob with 2.1 million.

ThisIsntWorking.jpg

|I just realized (by reading my original post) that I have managed to make a displacement map!
|
It sucks and was not at all what I thought it would be but I did it, and now I know that I need something else… but I don’t know what.

Thanks for the help you guys!|

Creating good displacement maps in ZBrush can be quite an extensive topic. They are not really needed if you are just working inside of ZBrush. It’s more for exporting to other apps and using on a low poly model in combination with a normal map.

That’s one of the things I was thinking of doing. Like into Unity or something.
Normal maps just come out a flat blue on this thing. They are supposed to look like bumps in sort of pastel colors right?

Once I learn all this stuff I am going to wright the most blisteringly cool and easy to follow tutorial ever, this process is infuriating and needs to be made simple.

Here’s how my test turned out. Maybe the settings can help you a bit.