hey Dave nice work neighbor dyna mesh and clay polish works well with parts like these !!! small_orange_diamond
Dave, That Cannon is really looking great. The ammo box too. Excellent modeling. I can see your fastidious in your work by the quality detailing of everything.
I noticed you advised Voodoo that adding a slight bit of move when rotating. I can’t help wondering if there is a means to use the transpose with two actions activated at the some time or do you just do a little of one action then do a little of the other in a back and forth method?
Anyway loving the cannon.
Ezra
Pigmalion, thanks and I like to consider any design task regardless of it being organic, hard surface or what have you as being made up of the same fundamental shapes (cubes, cylinders, spheres, cones). Using those anything can be reduced to primitive representations and it follows that any primitive representaion can then be refined into infinitely complex forms. When I do hard surface ZBrush work I subconsciously </SPAN></SPAN>think of the brushes as real world milling, grinding and cutting tools etc. and the Subtool I’m working on as being a hard substance (steel, wood etc.). When I do soft surface work I think of the brushes as real world sculpting tools and the subtool as a soft substance (clay, wax etc.). What is so great about ZBrush is the flexability to imagine any type of substance and imagine the tools manipulating that substance. What is really cool is using the same brush to achieve a desired effect for either hard surface or soft surface be simply re-imagining it’s function as you manipulate a surface. If that makes any sense.
Voodoodad, no worries your answering a post; it’s how we all gain a better understanding.
Gary Komar, thanks.
EZRA, thanks and as far as I know you can only manipulate one transpose at a time. So what I do is use a heavily blurred mask and bend using the Rotate transpose then switch to the Move transpose and snap the transpose line perpendicular to the direction you need to move and hold Shift to constrain the move transpose. Sometimes it’s best to bend while at a lower subdivision level.
I delineated one process I use to do this kind off thing here: http://www.zbrushcentral.com/showthread.php?157723-Howto-Quickly-create-a-long-bended-stick the 7th post down.
It’s written extremely step by step to help people new to ZBrush but you may find some of it useful.
Excellent skills…Great job on everything posted in here…small_orange_diamond:)…luv that cannon that your working on…small_orange_diamond:)
I’m more into organic forms most of the time myself, but if I ever get into hard surface modeling, …I know who’s thread I will be checking out for Inspiration, so…Keep Inspired and Inspiringsmall_orange_diamond:)
Glenn
P.S …That white tailed deer on page 2 in here would be a great model to try out the new FiberMesh feature on…Just a passing thought on my part…
Glenn
Thanks Glenn, I’m working on finishing little parts like nuts and bolts on the cannon and hope to wrap that project up soon. I too had the thought of playing with FiberMesh on the whitetail and was working on it a bit last night. I’ll have to post my progress on that and the cannon soon.
I’m looking forward to continue following your thread and seeing how your experiments with with your lion sculpt evolve.
Dave
Hi All,
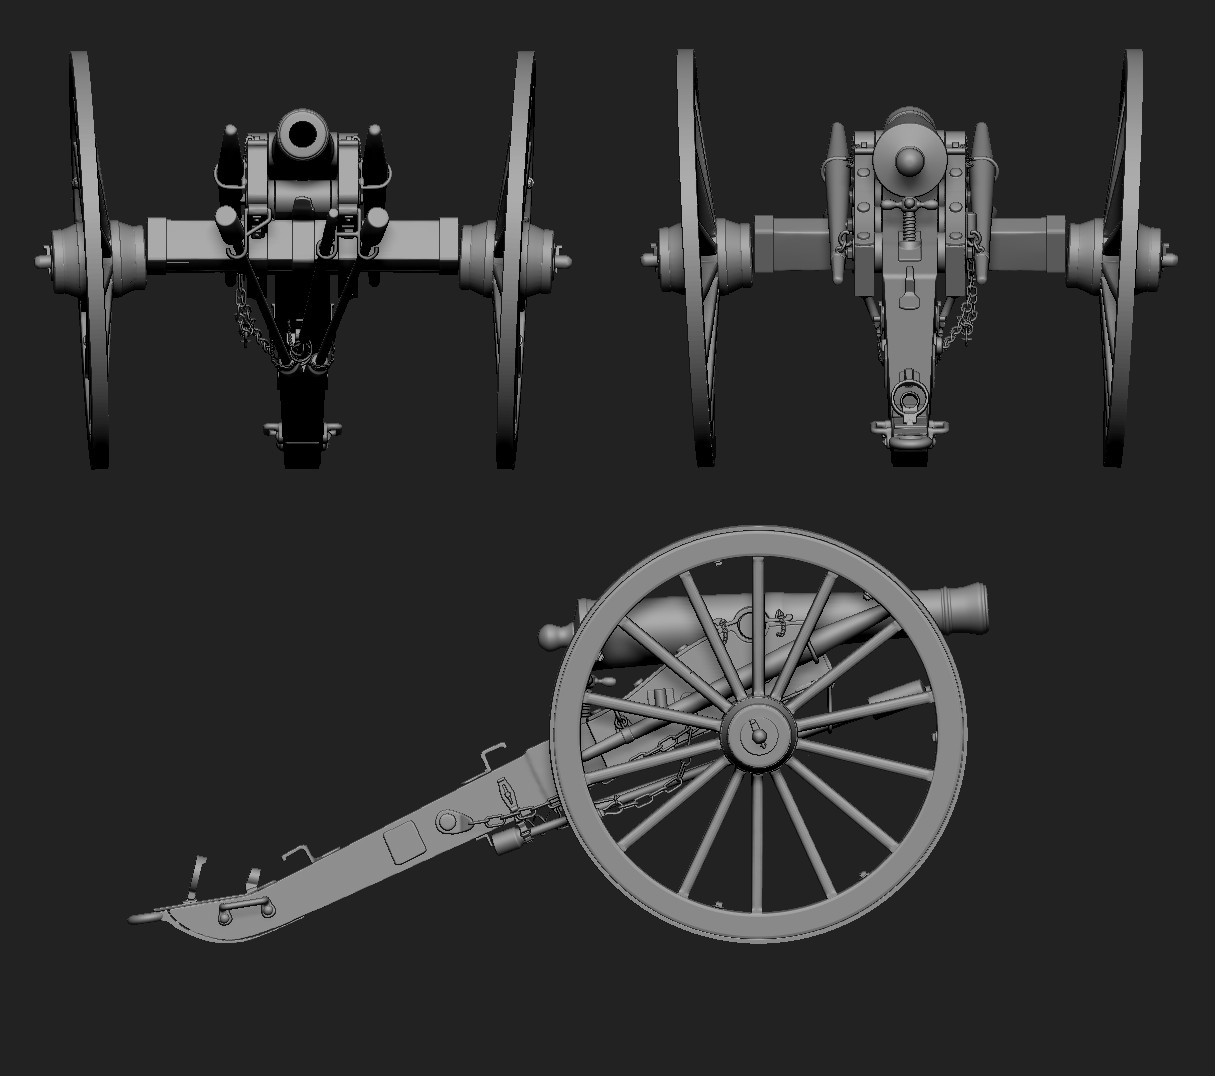
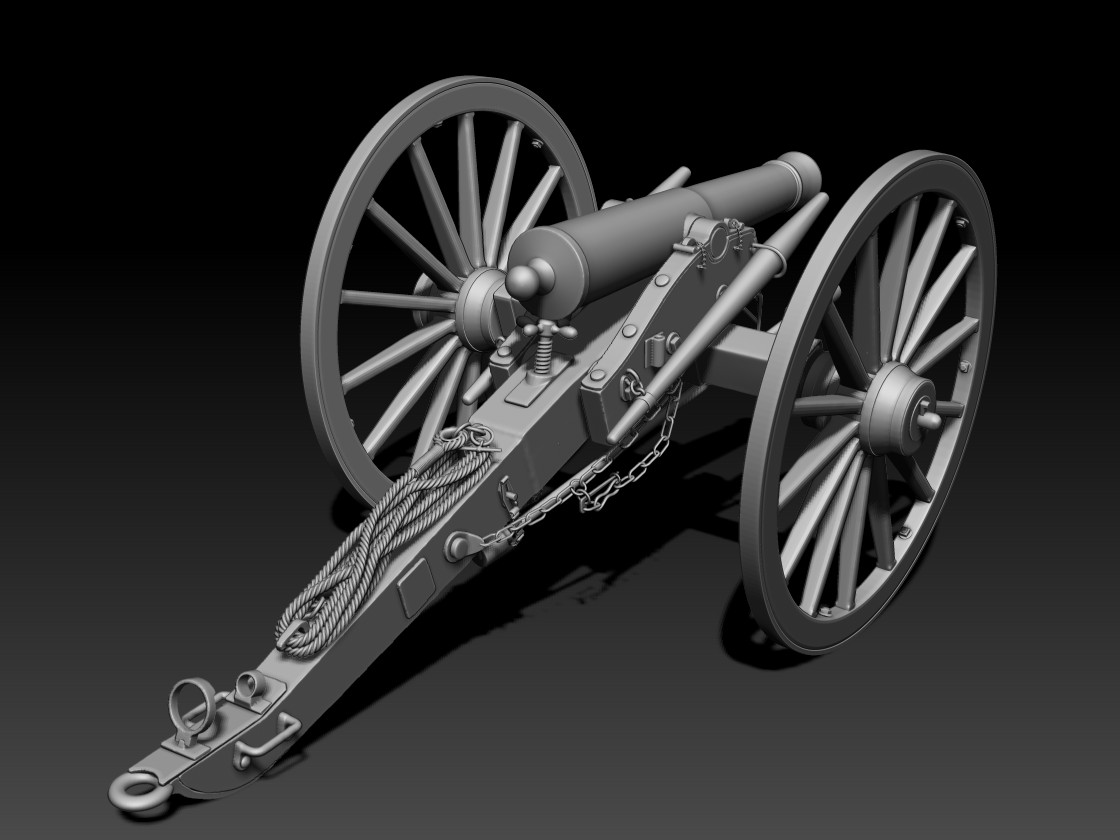
Here is an update on the cannon; only a few small pieces left to add i.e. nuts and bolts. Then I need to tackle making a rope wrapped around the two prongs on the trail piece. I’m not sure what approach I want to use yet so it’s experiment time.
Attachments
lookiin great Dave like too see some tex - mats - wooden spokes n all !!!small_orange_diamondsmall_orange_diamondsmall_orange_diamond
Very nice!
Any perspective view?
Do you plan do add materials details, like bumpyness on the canon metal, and wood pattern on the frame?
is that normal that the wheels are angles inside?
Dave, that looks great! Give us some color!
Thanks Gary and Sebastian;
Materials and textures are on the agenda. I am working on a rope that wraps around the prongs on the trail piece right now.
Yes, the wheels are angled; my research shows that the rims are mounted on the hub with spokes that make the wheel have a “dished” appearence to better support weight and the wheel is mounted on a tilted axile so the spokes on the bottom are nearly perpendicular to the ground.
I’ll post a perspective view for my next update.
Dave
Looks great!
Thanks voodoodad and asecbrush
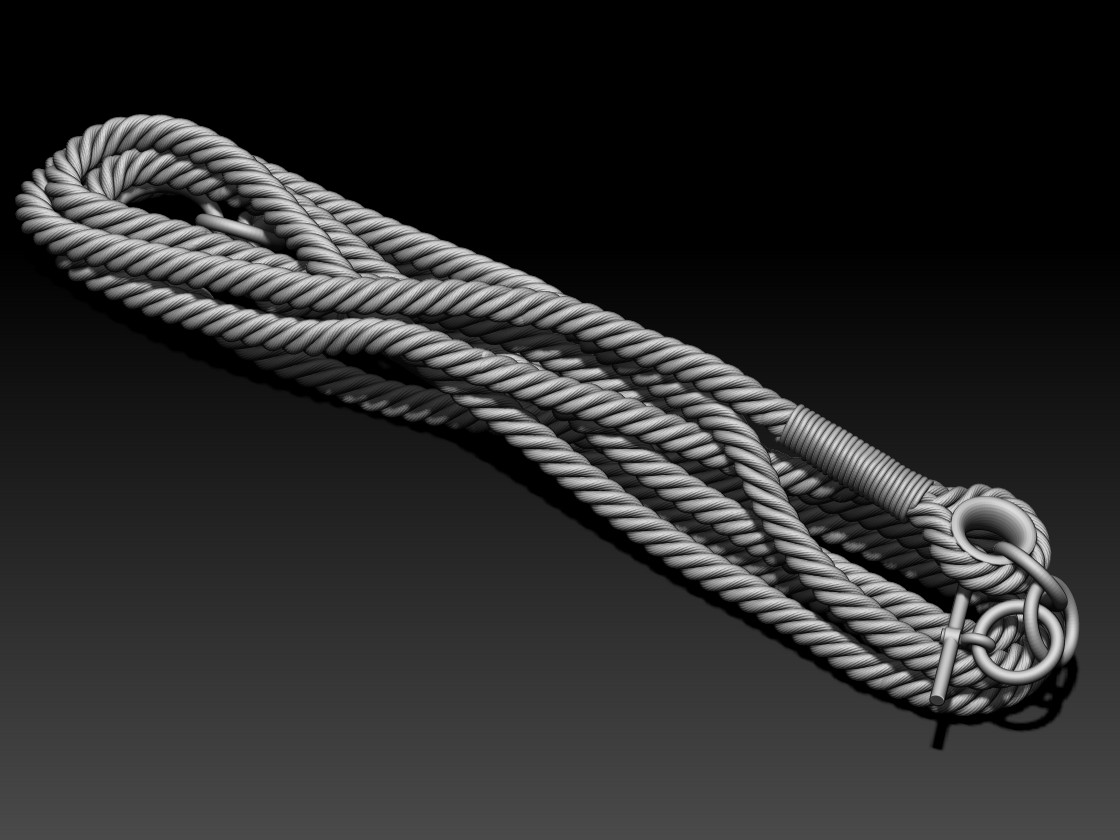
After a bit of experimentation I came up with a descent process for making the rope that wraps around the prolonge hooks. I think it needs some adjustment but overall I think it works C&C welcome. As promised I have included a perspective view of the cannon; still a few little bits to add before working on textures and materials.
Attachments
nice and clean work Dave - be cool too sit with a local and chat 3d over a beer sometime !!small_orange_diamond
Thanks Gary; chatting 3D over a beer sounds good to me.
Relly nice job on the canon! small_orange_diamond
The rope is beautiful, Dave! Care to share the process?
@Zber2; Thanks;
@voodoodad; thanks and here is a tutorial for making the rope/cable segments. When I get a chance I will post another one where I “splice” them together and use ZSphere rigging to manipulete them and turn the individual segments into a longer rope/cable.
Tutorial: Braided Rope or Cable using the CurveLineTube brush and a Cylinder Primitive.</SPAN></SPAN>
Draw out a Cylinder3D and make the following adjustments in Tool>Initialize subpallet:</SPAN></SPAN>
Set X and Y size to 5;</SPAN></SPAN>
Set HDivide to 36 and VDivide to 128.</SPAN></SPAN>
In Tool>Masking:</SPAN></SPAN>
Click the MaskAll button;</SPAN></SPAN>
Set Select Count to 2 and Skip Count to 1;</SPAN></SPAN>
Click the Column button.</SPAN></SPAN>
In Tool>Deformation:</SPAN></SPAN>
Inflate to 8 on X and Y axis only.</SPAN></SPAN>
In Tool>Masking:</SPAN></SPAN>
Clear the mask.</SPAN></SPAN>
Make this object a PolyMesh3D.</SPAN></SPAN>
Now in Tool>Geometry:</SPAN></SPAN>
Divide one time.</SPAN></SPAN>
In Tool>Masking:</SPAN></SPAN>
Click the Mask By Cavity button;</SPAN></SPAN>
Click the GrowMask button one time.</SPAN></SPAN>
In Tool>Deformation:</SPAN></SPAN>
Inflate to 8 on X and Y axis only;</SPAN></SPAN>
Inflate Ballon to 1 on X and Y axis only.</SPAN></SPAN>
In Tool>Masking:</SPAN></SPAN>
Clear the mask.</SPAN></SPAN>
In Tool>Deformation:</SPAN></SPAN>
Twist to 100 on the Z axis only and repeat up to 10 times.</SPAN></SPAN>
Rename the tool to something like: Twist_Base.</SPAN></SPAN>
Now in Tool>Geometry: </SPAN></SPAN>
Delete Lower Subdivisions.</SPAN></SPAN>
Select the CurveLineTube brush.</SPAN></SPAN>
In Brush>Modifiers:</SPAN></SPAN>
Click on MeshInsert Preview and select the Twist_Base tool.</SPAN></SPAN>
Now the CurveLineTube brush is set to draw out a curve using the Twist_Base tool.</SPAN></SPAN>
Now draw out a new primitive Cylinder3D and make the following adjustments in Tool>Initialize subpallet:</SPAN></SPAN>
Set X and Y Size to 5;</SPAN></SPAN>
Set HDivide to the number of strands you want the braided rope to be (i.e. 3 or 4).</SPAN></SPAN>
Make this a PolyMesh3D and snap it in position by holding Shift while rotating the tool.</SPAN></SPAN>
In the Transform pallet:</SPAN></SPAN>
Click the Activate Symmetry button and select the Z axis;</SPAN></SPAN>
Turn on Radial Symmetry;</SPAN></SPAN>
Set Radial Count set to match the number of sides on the PolyMesh (i.e. 3 or 4).</SPAN></SPAN>
Set a fairly large brush size and draw out a curve along the length of the PolyMesh. Adjust the brush size and click on one of the curve end points until the instances of the curve tube touch one another without overlapping or leaving a gap.</SPAN></SPAN>
In Tool>Deformation:</SPAN></SPAN>
Twist to 100 on the Z axis only and repeat up to10 times.</SPAN></SPAN>
Rename the tool to something like RopeBraid_Base.</SPAN></SPAN>
In Tool>Subtool:</SPAN></SPAN>
Click the Group Split button to separate the braided rope from the PolyMesh used </SPAN></SPAN>
to support the Curve Tubes. You can delete the support mesh leaving the braided </SPAN></SPAN>
rope.</SPAN></SPAN>
Now you have a section of rope/cable that you can duplicate and move to match up end to end. You can use ZSphere rigging to manipulate the rope anyway you need it. I recommend using ZSphere rigging on only one instance of the rope at a time and making it an Adaptive Skin. Then inserting the new Adaptive Skin tool and adjusting it to match up instances to build the rope section by section.
Here is a link to a video for making the rope/cable segments:
</SPAN></SPAN><iframe src="https://player.vimeo.com/video/35830537[/vv]
Wow, that was fast! Thank you Dave! This will be very helpful in future sculpts.