ZBrushCentral

Creating a Mug out of a cylindertool and zspheres - Noob

Hi all,

Last week I started with zbrush and have been looking at videos and tinkering around with it. I realized that I need to start small with basic object shapes so I decided to try and make a mug. I started with the cylinder tool and shaped it to my liking then I needed to add the handle portion. Using zspheres could make this happen, however when I add the first zsphere the cylinder seems to be inactive. Meaning I cannot rotate or modify the cylinder body of the mug only the new zsphere I just put down. I checked and I only have one subtool in my project but I’m unclear how to switch back to the body of the mug. Hopefully this makes sense otherwise may be able to post a pic. Thanks.

Tjvelcro

it might be better to add the handle using the curvetube brush. If you use dynamesh it’ll fuse the to pieces together.
zspheres are a totally different type of ‘building block’ - the two don’t really co-exist. you’ll need to create an adaptive or unified skin from the zspheres and then append that to the body of the mug as a subtool.

really though - I wonder if you’re loking at ZBrush in the right way? - it’s not really a standard 3D package. I doubt many people would build a simple geometric object like a mug at all in it. And certainly not in the ‘standard’ way as in say 3DSMax or Maya - it’ just not designed to do it

ZBrush can be used to make a coffee mug, quite easily in fact, once you know how it’s done. And there’s more than one way. One week is not enough time to grasp the possibilities. You need to Append the handle to the mug, then you could merge down or remesh them. Read more> http://docs.pixologic.com/user-guide/3d-modeling/modeling-basics/subtools/

I guess a mug can be made easily enough, but would you say it’s the best thing for a newcomer to try Doug? In it’s own way, a perfectly cylindrical form, with straight edges, smooth surfaces and even curves is probably just about everything that’s more difficult in ZB

I’d still suggest tying a more organic form such as a rock or worm. A mug doesn’t sound as if it’d lend itself to trying out the various brushes etc. Much better to make a glorious mess with everything thrown at it than a simple controlled object :smiley:

Sculpt a big spiky boulder and smash the mug! :]

Who ever said a simple mug? I’ve seen lumpy coffee mugs. He or she didn’t say they had other modeling software to work in. You have to start somewhere, this person chooses to do a mug. Hopefully, investigating the link I provided will help you to understand the program enough to make whatever it is you’re trying to make. I made the mug first. Next I loaded a cube and entered Shadowbox to make the handle. Then I trimmed the ends off the handle and created an insert brush from it. I had to use Dynamesh to get the handle welded nicely to the mug. Good luck and Happy ZBrushing.

Tjvelcro suggested that a mug is a simple form that’s why they chose to do it.

It’s just that, to me, something of that nature sounds like an object for a standard 3D package. And as Tjvelcro is by their own admission, new to ZB, I’m merely asking if it’s really the choice they would make had they more understanding. It’s perfectly reasonable to assume a newcomer might make a poor choice based on prior knowledge of3D, especially as they talked of rotating the body of the mug - it sounds like they have some idea of the principles of 3D.

Some general assumptions have to be made so that a conversation can take place. I may be wrong of course, but it doesn’t stop me from being allowed to voice an opinion. I’m not telling anyone what to do. You assume Tjvelcro is male and so word your reply accordingly. You don’t mean to offend anyone, and neither do I.
I was just asking your opinion on whether you not you think the mug is a good choice - clearly you think it is.

I also assumed Tjvelcro might appreciate a general comment from someone who has more experience than them, to help guide them in their first steps. In the same way that they’ll hopefully follow your advice too, and the link.

Hi,

My end goal in the end is not to only create mugs or other simple objects. I did start with a head of a base female when I first got ZB but got overwhelmed with all the different tools and options. Gotta get the shape right, two minutes later looking at videos about making eyes, minutes later messing with polypaint. Making a simple object allows me to concentrate on what the tools are doing not whether the object is particularly good looking. For me the KISS principle applies.

What is the name of the area on the right side by default that has a small preview of the objects I have been working with? Is it still called lightbox? If I look under lightbox -> tools I cannot see the objects that are on the right side menu. Are these objects stored as part of the project I’m working on? Thanks!

PS I’m male :slight_smile:

Tjvelcro

Hi, on the right should be the Tool panel, it has all of your tools and any subtools stored in it with your project. It may be a bit confusing but after a while you’ll figure it out. One tool(model) can be made up of many subtools. I hope there was some helpful information on the page I linked to.

hi man, :slight_smile:
the lightbox is a kind of repository of ‘things’ that come with the installation of ZB: you can load extra brushes, alphas, tools (as you’ve mentioned) . you’ll also find the quicksave files here that’re saved automatically and can be useful to recover work.

the whole tool/subtool thing is confusing - one thing that makes it so is that an entire ‘scene’ is referred to by whatever element you have selected at that time. To see this, go to lightbox and open up the big guy in the project tab (koteinlk eart or something) then open the subtool section of the tool menu and, as Doug says, you’ll see all the various parts (subtools) that make him up. clicking on any subtool in the list selects that item.
If you then go to the big square in the tool menu where that item is now shown, click on it and select say, a cube - a cube will now appear in the view; you’ve effectively opened a new ‘scene’ with that cube in it (you may have to ‘make polymesh3D’ to be able to do anything to it). if you go to ‘append’ you’ll see the object you selected in the big guy scene as one one the items you can choose, if you wanted to append another part of that big guy scene, you’ll need to go back to that scene (or ‘tool’ strictly speaking) then go back to your cube and append. Throws a lot of people off and often explains why you can’t see the items you’re working on listed anywhere. Once you’ve tried it a few times you’ll get it.

if you save a ‘project’ you’ll save everything as it is - the cube, the big guy, lighting setup… everything. if you save the tool, you’ll save just what you can see in the viewport and anything in the subtool list at that time but nothing else. either way is acceptable providing you understand what you’re doing. Don’t save a document as you’ll just get a picture of the viewport =\ unless that’s what you want of course :slight_smile:

I’d still recommend not thinking too much about the actual item you’re making. Just practice moving around, adding a few bits together, trying out the brushes and alphas and whatever else you come across. If you mess the object up it’s no big deal. Accept that your first attempts will be rubbish :] ditch 'em and move on…

Thanks for the advice so far! Even after messing with ZB for a few hours this weekend I’m starting to understand a few more of the shortcut keys and features.

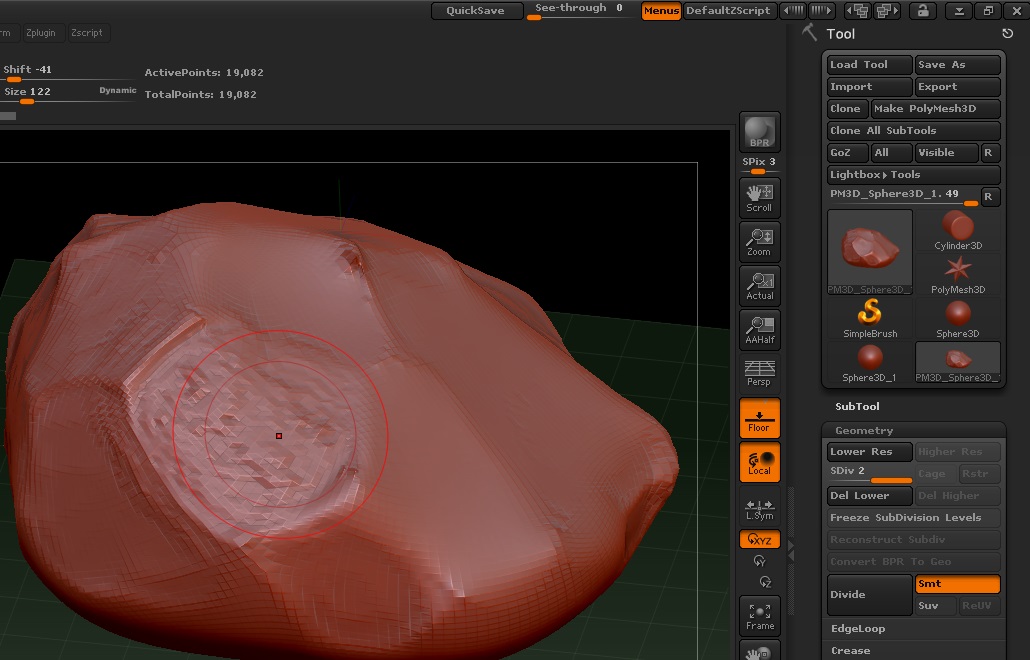
I was wondering about the right hand column and the ‘scenes’ that are there, in the screenshot there are 2 of my rock, 1 cylinder, 1 star, 2 spheres and 1 golden S. I suspect some of those are there by default. If I add more items to this list and save the project, exit, reload then I will get the same. I have noticed when playing around I get many more objects in this list, how can I delete those? No sense in having junk objects taking resources and clogging that area.

I have been trying to use the following youtube video about rock building and around the 2:40 mark he tells/shows us to use the flatten tool/freehand stroke/ alpha 23 or 7 (not sure which) brush however this just gives me a slightly jagged flattening motion. An example of this is in the attached screenshot Not even close to what he is accomplishing. A lot of the comments even reflect that, any idea what setting could give me those sharp edges like in the video?

http://www.youtube.com/watch?v=3tz7na7Y75o&index=1&list=FLZp1RrkMGIoqzHnPdluxPlw

Tjvelcro

Attachments

New Bitmap Image (2).jpg

Some are there by default and can’t be deleted. The others can be deleted manually or there’s this script. It will remove all but the selected tool.http://www.zbrushcentral.com/showthread.php?176896-How-to-clean-the-excess-3D-Meshes-in-the-tool-palette-Answered&p=1011378&viewfull=1#post1011378 There’s also a letter “R” which will collapse it keeping all of what was showing. The Golden S is the Simple brush which is selected when the program loads.

it looks to me like the resolution of your mesh is too low, plus the redwax material often accentuates ‘detail’ in that way so try changing that as well.
at a glance I’d say he’s using the planar brush, not flatten…