ZBrushCentral

create bump out of displacement map

Hey folks,
I am pretty new to zbrush and really enjoying it so far. I mainly work with max and use zbrush to add details to my models. But now I have a problem, I just modeled a base head in max and added really fine details as skin pores to the model (with projectionmaster and alphas) but didn’t make any major changes to the overall shape. Now I’d like to transfer those fine details to a highres bump/displacement map but zbrush always transfers the rough distinctions between the stored morphtarget and the level 6 hi-res model. I always end up in having a grey map with dark/black and white spots but I can not get it to only show me the pores and not the shape changes… :mad: These maps do not show any small details… and I just need a bump map for max, no real displacement map.
The funky thing is however, that I already managed to got a bump map like I need to have but with a way to low resolution (400x400 as a test) and then my pc crashed :evil:. Actually I am not able to recreate this map… There are only few settings in the displacement map creation tab and I am pretty sure that I use the same settings but I always gives me the same wrong/ugly ****ty map I don’t want :confused: Even random settings give me the same results… I am pretty confused and need a little help from you guys… Please. I just want a normal bump map to paint my diffuse from and no heavy displacement map with drastic changes in the model… thanks

Have a good day anyway :slight_smile:

Joe

ZBrush will calculate a map based on the differences between the current subdivision level and the highest level. If you ONLY want your map to show the high frequency details, then go to the highest level that doesn’t show those details in the geometry. When you calculate a displacement map at that level, it will only include the high frequency details and can then be used as a bump map.

The Hand tutorial by Rimasson in the ZBrush 2 Practical Guide shows this at work.

Many thanks aurick :+1:
that worked out. however ironicly I found it out by accident a few hours after posting… but I ran into another really wicked problem. I unwraped the base model in max and then detailed it in zbrush. Now I want to create the displacement map but I won’t let me create one with a res above exactly 3000x3000 pixels, not even 3001x3001 :confused:
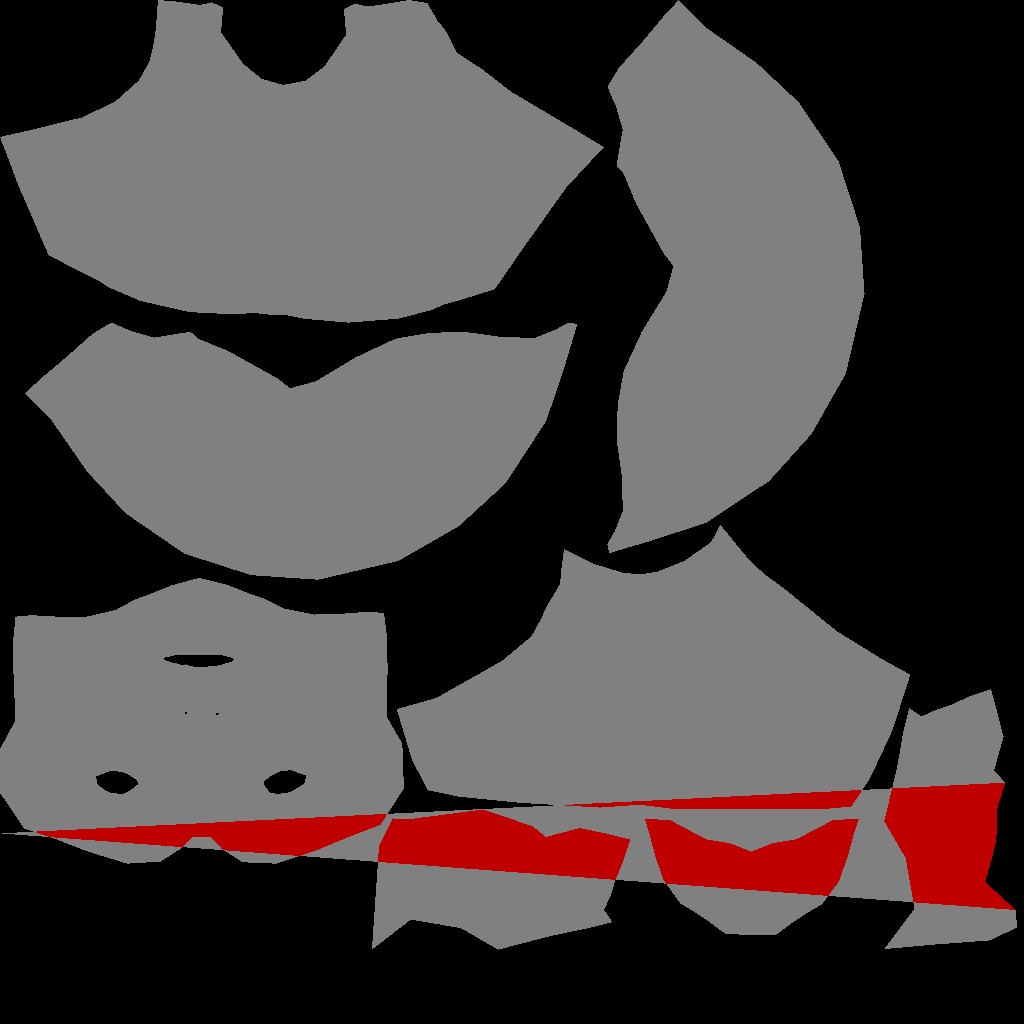
So I sort of investigated and found out that in zbrush I have one little mistake in the uvw map (one Vertex is strechted across the whole map and overlaps it) It isn’t there in max nor in the exportet *.obj but in zbrush itself. Zb somewhat does not like this because if I use the AUV or GUV mapping from zb everything works out well. But I’d like to use my own mapping. How could that have happened? I really want to keep my displaced/textured model and do not want to redo everything. Plus I’d like to export the map as 4096x4096 … Is there a simple solution?? mybe reimport the model? Or maybe zb interprets the mapping slightly wrong… I don’t know.

Greetings,
Joe

Does that point by chance fall rather close to one of your map edges? If so, it’s possible that differences in the way that each program registers the points is causing the one that’s too close to the edge to be read as belonging on the opposite side. The cure for this would be to adjust the UV’s slightly so there’s a bit more room around the outside edges of the map.

Nope. Frankly, it has nothing to do with the borders, it’s in the middle of the map and it is so f***ing wicked… I never saw this before. It’s still there even if I reimport the base mesh from max. If it were the borders I had no problem, but this is something unusual, I have no clue. Sure is however, that I don’t wanna use zbrush’s mapping, because of some editing in photoshop. Maybe zbrush reads the uv mapping differently. Is there a way of doing the mapping in max again or chage it but keeping the modified/detailed model in zbrush and transfer the displacement map? redoing the mapping takes less time than redoing the detailing process and then finding out that it didn’t work as well…

Thank you for so far aurick :+1:
Maybe you or anyone else has a solution.

Attachments

zbcentral.jpg

So long as you don’t change the point order of your model, you can swap out subdivision level 1 with a version that has different UV mapping at any time. That would of course affect any texturing that has been done, but will not affect higher-resolution geometry. Here’s how:

  1. Go to level 1
  2. Press Tool>Morph Target>StoreMT
  3. Import the newly UV’d version of the model
  4. Press Tool>Morph Target>Switch
  5. Return to your higher subdivision levels and continue sculpting

OK thank you very much, I am going to try that. Do you have any idea how and why this could have happened? I mean the overlapping in the middle of the map. I created the map for the base mesh in max and zbrush should be able to read that properly, doesn’t it? Max does not show up any seams/overlapping but zb does… I don’t get this and I’d like to prevent this from happening again.

Thanks.
Joe

The most likely cause is a glitch that happened someplace during the whole export/import process. It could have been a flaw in how the file was written in the first place, or it could have been a hiccup when the file was read.

Mh, I think there must be something very wrong, either with my workflow or any of the apps I am using. Because reunwrapping and even checking for any notwelded verts plus refining the topology didn’t halp a bit. I always end up with atleast one vertex draged across my map and thus destroying it. The thing is though that If I create the uv-cords. in zb than everything is fine. But I don’t like having 100+ little squares randomly spread. It’s fine if you do not need to edit it afterwards but I need to get it in ps for further editing.
The only problem I can think of is that I did the unwrapping with an external uv unwrapper, what might lead to a missinterpreting in zb. But max shows the model and the map perfectly without problems. Nothing I can think of helped so far, and I really need your guys help…

BTW:
Thank you very much aurick for taking the time to help me out.

Attachments

uverror_zb.JPG

Yeah, I solved it myself.
Actually it’s pretty obvious and makes absolutely sense. This vertex that’s causing the trouble was slightly out of boundary and thus might have been missinterpreted by zbrush. I think that the automatic packing put this vertex a little bit too close to the edge and zb seems to dislike this. :idea:
Anyway, now everything is working again and I think this information might be concidered to put in the offical FAQ, just a thought.

Have a nice day. :smiley: