ZBrushCentral

Close holes causing faces to span across overhangs (screenshot)

Hey all,

I need some advice for this model that I hope to output to a 3D printer.

Two questions.

#1
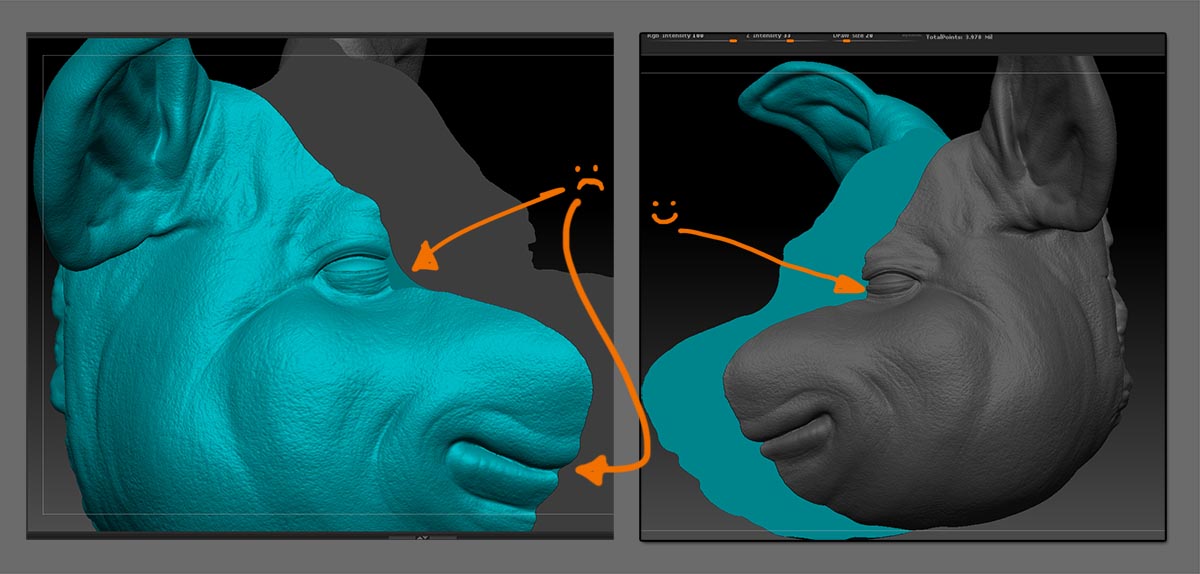
How can I avoid the faces shown in the screenshot when I close holes on open subtools that have overhangs? Oddly enough it only happens on one side of the face. They aren’t perfectly symmetrical, but close.

To ‘fix’ the problem I’ve been isolating the newly formed cap (via polygroups) and selecting/hiding/deleting the offending faces. I’m then going back and patching it up with the CurveBridge brush. It’s slow and doesn’t give the cleanest results.

#2
I’ve missed a few of the smaller overhangs and have since unified polygroups, so my fix technique would be tricky.

I plan to 3D print these meshes. Were I to leave the ‘spanning’ faces, is it likely the printer will reject the .STL, or will it print anyway? I realize they are so thin they might not even print… I figure I can always trim those faces away when the print is complete, if they do manifest…

Any advice, perspectives, comments, are welcome.

Attachments

close_holes_issue.jpg

Do you have other 3D software besides Zbrush?

Indeed. I have access to 3DS Max 2014, Maya 2014, Netfabb basic.

I did some cutting with Netfabb but found it painfully slow AND I found the single export per OBJ to be maddening. My piece will have in excess of 20 pieces.

Is the above screenshots a single subtool or two separate subtools? If they’re the same subtool Zbrush may have some issues filling in holes when the objects are physically separated. Try separating the subtools and filling in holes on them individually to see if it’s still an issue.

Also I’m just curious as to why you’re splitting the model in half like that?

Hey, thanks for your reply! These are two separate subtools. I will be continue to cut until each piece will fit within the build volume of the target 3D printer. There is also a middle section that is not shown that will also get cut up into build volume chunks.

You may get better results by setting Preferences>Geometry>Mesh Close Holes to 4.

Decimate the model first and then bring it into netfab or Maya and do some cuts with planes, etc.

Must be a small print area or a rather large model if you’re splitting it up that much. If it’s a small model you’ll lose a great deal of detail and you can decimate quite a bit. Just don’t over do it.

Hey, thank you for the tip! I still got some errant faces, but it is much less than with Close Holes set to 3.

Man, I continue to be amazed how many switches can be flipped in Zbrush.

Much obliged!

Edit

I’ll be damned if dialing Close holes down to 2 didn’t actually work better?!

Heh, sort of both. It’s an approximately 11 x 14.5 inch pig’s head, that I am planning to print on the Form 1. My build volume is about an inch smaller on all axis than the actual printer’s specs allow, but I wanted enough wiggle room to position the STL in order to get a good print.

Good call on Netfab or Maya. I will consider them on my (hopefully smaller and less ambitious print). Between having already done half (painfully) in Zbrush and Marcus’s suggestion, I think I’ll continue in Zbrush. Thank you again, nonetheless!

Again though, I wonder how these (albeit the thinnest of thin) pieces of geo would effect the print, if at all.

I’m currently downloading the Form 1’s software now (I don’t own the printer) to see if the STL will load. Granted that isn’t necessarily an indicator of print success/quality but it’s a start.

EDIT Loads and then prompts for a repair. After the repair, the .STL loads fine. Still not sure as possible issues in the print. I have since posted on the Form 1 forum.

The Form 1 has a minimum feature of 300 microns and a 25 micron layer thickness. More than likely it will ignore planes as they have no thickness. However it depends on the repair of the 3D print software. It might ignore/delete them or it might try to average it out, the latter could cause unwanted deforming around the problem areas.

Another option is to cut the model along a plane about 1-2 microns above the problem areas. This will cut out the planes without a noticeable difference in size. You won’t miss 1-2 microns.

I’m also guessing you might be bringing the model straight from Zbrush to NetFab or Maya. This could be why it’s taking so long because it has so many polygons in the model. That’s why you need to decimate your model before bringing it into any other 3D package. This includes sending the print file to the printer. It will cut down on file size and processing time.

Thanks again. Excellent tips.

You are absolutely right about decimating. It’s something I always hold off on as long as I can. When I do finally get to decimating, it never fails to amaze me how well it holds onto detail!