ZBrushCentral

Brush Texture Transparency

hi.

I am making jeans. I want to use a brush that has creases and stitches, but I want to apply polypaint to the stitches, so I will get a color ID map from the obj when I take it to substance.

So I opened the brush alpha in photoshop and painted the stitches in a pretty red and then saved out just the red stitches to a new texture and imported it into the zbrush brush texture slot.

This worked except when I have overlapping strokes. Here is a pic on a test cube

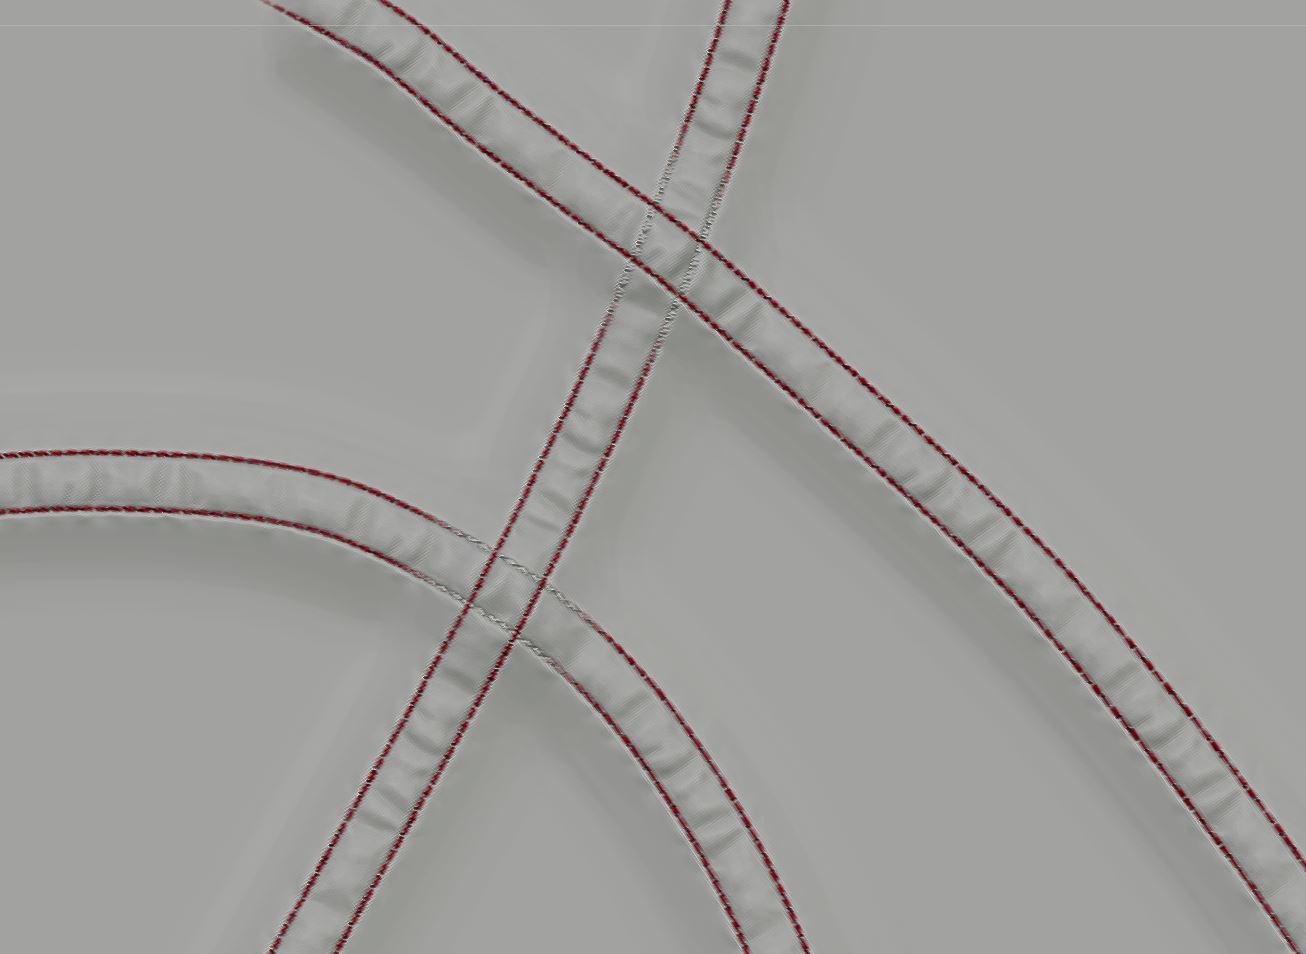
The texture I made in photoshop is just red dots on a transparent background but when I add it to the brush texture slot it gets a white background, and apparently loses its transparency.

So I gave the texture a black background, and enabled the transparent texture button in zbrush and placed that in the brush texture slot, but now I am painting black everywhere.

And I am stuck.

I also had a problem with decimating my mesh using “use and keep polypaint”. This resulted in a decimated mesh that had exploded in numerous places … not sure about what is going on there … but when I export the undecimated mesh (which took forever … ) this worked, took it to substance, baked, got my ID map, nice normals …happy days … except for the parts that overlap, obviously.

Can anyone help?

Hrrm. I’ve never done what you’re trying to do, so I actually can’t say if this is working as intended in Zbrush, but I don’t think it can do this on the brush level. I just really cant remember differently.

See, for textures, Zbrush reads 100% black as transparent, and this works when you apply it as a texture to the object. But for brushes, the transparency is governed by the alpha. In this case you want the alpha to do double duty and define elevation as well as the color transparency that differs from the elevation, and I don’t think it can do this, but am not certain. It would be simple to create a stitch stroke in which the alpha served as stitch elevation and also served to only produce color on the stitches with whatever the brush’s color was set to. It’s the fact that you also want the alpha to define those soft wrinkle elevations at the same time without contributing color that’s the tricky part.

It would be great if the brush texture slot could also read transparency independently of the alpha in this case, and my instinct, like yours, is to think that it should. But again, I cant say that it’s ever been different.

You may need to alter your strategy–perhaps separating the wrinkly component and the stitch component into separate tool applications. For instance if you first drew out a curve along your intended path, you could then apply a stitch stroke and a wrinkle stroke in turn.

In the end, it may be easier to just continue with what mostly works for you, and touch up the color at the stroke intersections by hand.

A warning on the decimation though–It doesn’t mix well with polypaint. Remember, polypaint is vertex paint, and decimation master reduces and distorts geometry in ways that rarely does justice to high rez polypaint.

Ty. What a great reply.

I think you are right. I think separating the brush into components is the way to go. I guess, as is usually the case, there was a reason I couldn’t find anyone that had ever tried to do this.

Regarding the ‘double duty’ I think the brush alpha is already on this to a degree. Trying to find a solution I watched an #askzbrush vid on textures and polypaint that mentioned, in passing, that when a brush texture and alpha are enabled together, the alpha acts as a mask. Not particularly helpful in this exact instance but interesting none the less and these little snippets of information have a habit of popping back later for a “hey, but since the alpha is a mask, we could …” moment.

It is a shame because I bought this enormous pack of stitch and crease brushes which produce exactly the results I want in a single stroke, but having stitches embedded in the mesh without a way to access them later is … … pointless. Unless there is a trick that doesn’t involve picking them out one by one later, which I am not doing.

oh and the decimation. Yes, of course… yes of course … (insert mental image of connecting dots)

Anyways, nice to meet you. Ty for the help. :smiley:

Hrmm again. It’s not so much a case of your purchased items being pointless, so much as they cater to different tech. Polypaint was designed to be more of a transitory state between traditional UV/2d image maps. In the meantime other tools have risen to significance, with different ways of doing stuff.


The brush alpha does act as a mask, and thats great if you want it to do either elevation or color masking work, but both at the same time is tricky if one isn’t the same as the other. See, your alpha consists of a stitch shape, but also soft grey sprays of elevation for wrinkles that arent supposed to be red just because the alpha is elevating them.

Not to suggest there aren’t many way to stamp in a complex level of color and detail into something in ZB, but brush based approaches are limited by the capability of the tool.

But there are always a half dozen ways to do something IN ZB. If it’s any comfort, I think that it should do what you suggest.

I made my own IMM stitch brushes. The result is so superior in every way. I got over my depression about scrapping several hours of work almost immediately. Now I have better stitches, with more control, creating a vastly improved normal map and color ID map. This was a very fortuitous thread. Ty for steering me in a better direction Spyndel.

oh and ty to Paul Packham from Rockstar, for his so to the point tut on how to get it done. Tut is here

You a clearly a very tall and handsome man.