I’ll try to be clear, its a wip technique, heres how i did it:
Pink stuff is “the noob in me” doubting bout my workflow, please give precisions if you have a better wya to do the “pink things”
3DS MAX - Creating Basemesh, Unwrap, Export
01 - Model in max a base mesh. I relaxed the basemesh with relax modifier to remove tension on the model so displacement is more constant when i export from zbrush later on.
02 - UnWrap the base mesh (Unwrap UVW)
03 - Export .OBJ
ZBRUSH - Import, Sculp Neutral, Sculp Afraid Subtool, Create disps., Export .OBJ’s
04 - Imported basemesh in Zbrush. I didn’t stored morph target, i rather use the “zbrush smoothed” level 1 subdiv basemesh, export/import in 3ds to give more accurated displacement.
05 - Added like 5 levels of subdivs,
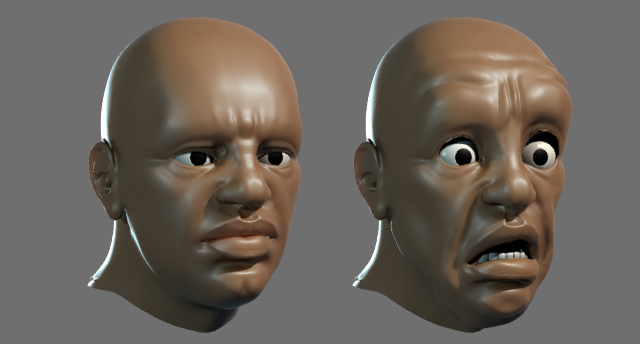
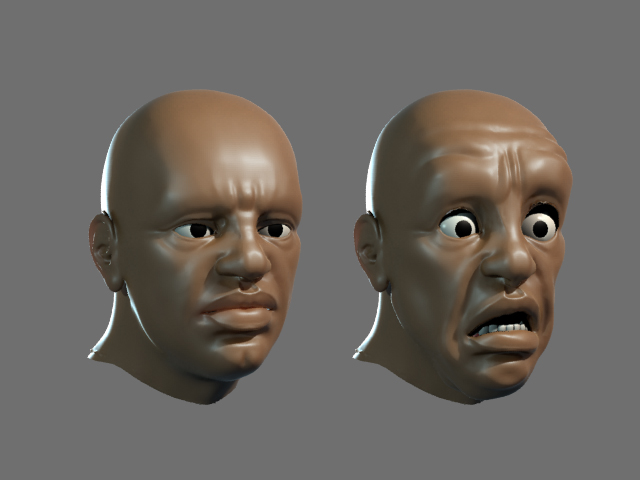
06 - Sculped “Neutral expression”, Created “Neutral_Displacement” from it.
07 - Back to level 1, i cloned and appended resulting clone as as subtool to create the “Afraid” morphshape. I guess that could be a layer instead of a subtool. Well, does it makes a difference??
08 - Sculped “Afraid expression” (the subtool), Created “Afraid_Displacement” from it.
09 - Exported both Level1 Basemesh and Subtool in .OBJ format, now back to 3DS Max.
3DSMAX - Import, Morpher Modifier, MRay Fast SSS, Composite
10 - Imported both .OBJ’s, applied a Morpher modifier on the Neutral shape, added Afraid shape as a morph target.
11 - Setted rendering to mental ray, applied a FAST SSS material to Neutral base mesh (the one with morpher modifier), 3D Displacement in Displacement slot, lenght/Strengh 2/2.
12 - I added a Composite Map in the Extrusion map slot of the SSS Material. Added 2 layers. In the first one, added Neutral_Displacement image. Selected HUE as blending mode.
In the second slot of the composite, i added the Afraid_Displacement. Selected Normal as blending mode. Both Alpha to 100%.
I didn’t experimented alot there. I didn’t want th displacement to get multiplied as they belnded, I didn’t experimented to add Alpha maps either, but that could be the solution to isolated blending displacememnt to small sector. Right now the top layer is set to HUE so the layer “Afraid” beneath overrides it as its output range is up. Problem is wtf will happen when you have like 10 maps there?
3DSMAX - Manipulator/Reaction Manager
13 - Get that Joystick Setup http://www.bakaneko.com/howto/computer/3d/rigging/riggingTools.zip .I donMt know much bout those controllers, maybe it’s not the best… Worked pretty fine for me!
14 - If you don’t already, You must learn to use Reaction manager. Here’s a great tut, i just learned it there (NOT ITS NOT HARD, JUST DO IT!!) http://www.bakaneko.com/howto/computer/3d/rigging/ .
15 - Created a “Joystick” manipulator.
16 - In Reaction Manager,Add state for 0 Y position of the Circle controller:
ADD_MASTER(Click the Circle of the Joystick)/TRANSFORM/FK_SUB-CONTROL/POSITION/Y_POSITION .
17 - Add Afraid Morpher and Output level of Afraid Displacement so they are binded to the 0 position of the circle:
ADD_SLAVE(Click the Base mesh with morpher modifier)/MODIFIER_OBJECT/MORPHER/[1]Basemesh(TARGET_AVAILABLE) .
ADD_SLAVE(Click the Base mesh with morpher modifier)/SSS_MATERIAL/DISPLACEMENT/EXTRUSION_MAP-AFRAID_MAP/OUTPUT/OUTPUT_AMOUNT.
Set both Morpher/Output values to 0.
18 - Now move the Circle controller to its maximum Y position and create another state. Put Morpher value to 100 and output value value to 1 .
DONE .

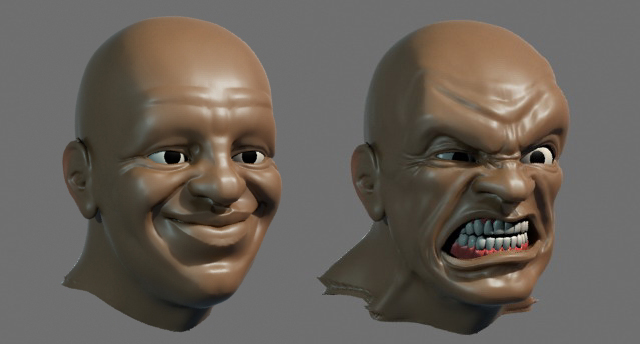
 . Not sure if thats because i added a 3rd Displacement (corresponding to Smiling shape), maybe its causing an interpollation issue. Or maybe its due to the fact that i reexported/remplaced the neutral and afraid displacements (maybe i did a small mod on the way i exported disp maps):
