ZBrushCentral

big problem!

hi im tight on a deadline and ive just encountered a big problem, i have no idea how to resolve. basically iv been modelling my face with 3d max and zbrush iv just done the base texture and at uni today ive now been told that the face needs to be able to talk for our next module. the big problem is that my lips are stuck together! iv tried hiding it and deleting hidden but for some reason it re-appers. iv been trying to erase that small central line of the lip. how on earth can i open this mouth up for lip sinking?? please please help

mesh.jpg

Attachments

small font.jpg

just hide the part you don’t want and press delete hidden .
and fix the mouth with little more zbrushing .
or you can retopologize it again without the mouth close .

iv tried hiding it and hitting delete hidden but it re-appears, if i do the same on a larger area they delete, just not this. what do you mean by retopologize without the mouth?

Are you baking a normal map on to the lowest division of the head model to be used in max for animating? If so, what’s stopping you from simply breaking the verts along the edges where the polys meet, adjusting the mouth and re-welding the verts before animating/skinning???

sorry im new to zbrush so i havnt really looked at the process of getting this into max for hair and fur and render. are you saying that im able to take my model (textures as well) into max and sort this out in their much easier? im planning on puting more detail in my model using mask by intensity on the textures to gain pores etc and then its done to go into max, is it poss you could give me a quick run down on your idea??thanks

yeah just split the verts in max.
otherwise in zb to get delete hidden to work you must bring it to the highest level delete lower. then delete hiddden, then reconstruct. make a poly group for the piece you want to hide so it is easier to select.

i was scared for a second their. and this wont disrupt the texture, uvs, or displacement?

If I Did It The Zbrush Way Wouldn’t My Model Have To Many Polys To Take Into Max? Or For Animation?

splitting verts in max will not disrupt your uvs just make sure the uvs are merged after the split you will be fine.
if you reconstruct in zb yes your uvs will be killed. just bring the level one back into max and transfer your uvs from the old model back onto the new one. the topology should be the same minus the ones you deleted of course.
i do this every day in maya for game characters because its easier to sculpt the mouth closed i then then part the lips and add the mouthbag later. you could also re uv then transfer the color from one to the other. dont know the mak settings though.
pre planning your model before texturing is very important, but as for problems this is not a big one.

so let me just get this straight (sorry noob) i understand that i can take the finished model to max and the break verts and carry on working on it in their. its just are you also saying that if i wan to take it back to zbrush i can export low div model into max, break vertex’s, load old uvs onto this new modified model (ones of the joint lip model) then re-import it into zbrush and it will update my model without exploding??? sorry if im being stupid, its very late but i gotta keep working. thanks for the advice as well

no if all your maps are already generated and the uvs are good then just split the verts in max apply your textures displacement whatever. you will be fine.
if you take the zb route and want new ztool with the mouth un sealed your gunna want to do your uv transfer in max.

here is another trick wich might help. you dont actually need to cut a hole for the mouth a simple extrude will dofine. follow closely.

bring ur head tool with good uvs into zb. at level one in the tool menu under displacement turn it ip to 4096 turn on adaptive and press create displacement map. this will generate a map which will now be in your alpha palette. export this just so if zb crashes you dont have to redo this step.

now turn your model to 3/4 view and turn it up to the highest division hit ctl s to take a snapshot. you are going to use this as a comparison.

export level 1 bring into max. select the faces that you want gone then extrude them back into the head creating the inner mouth. add a couple of edge loops for support when it smooths.

this is an important step in preserving ur uvs select the new faces you just extruded and in your uv editor auto uv them then shrink them and place into an open area on your map. this is to avoid overlapping.

now import your new obj into zb. NOT INTO YOUR OLD TOOL!!!
this is a new model. divide it the same amount of times as your other model level 6 for example. leave model at highest level

now load the displacement u created into the alpha
go back to the displacement tab in the tool menu check adaptive
under intensity type 50
the button bellow. apply displacemnt will activate
press this and your displacement will apply. compare to your screenshot.
if bad undo (ctl z) and plug in another number (higer if disp is soft /lower if inlated) this will work if done right.

there will be a little sculpt clean up but not alot. if big chuncks appear then your uvs have overlap u need to fix these.
if your comp sucks like mine it will probably crash after a couple of undos so save your steps:)
hope this helps

ok, cheers. iv just finished the fine details and want to take it into max now, do i just create a displacement map then apply it in max? iv tried doing this but it just mangles the model

It sounds like messing with the UVS on your lowest sub model has messed up the vert order when you re-exported from Max. Max is notorious for doing a terrible job of exporting OBJ files, use the GuruWare obj importer/exporter instead.

http://www.guruware.at/main/objio/index.html

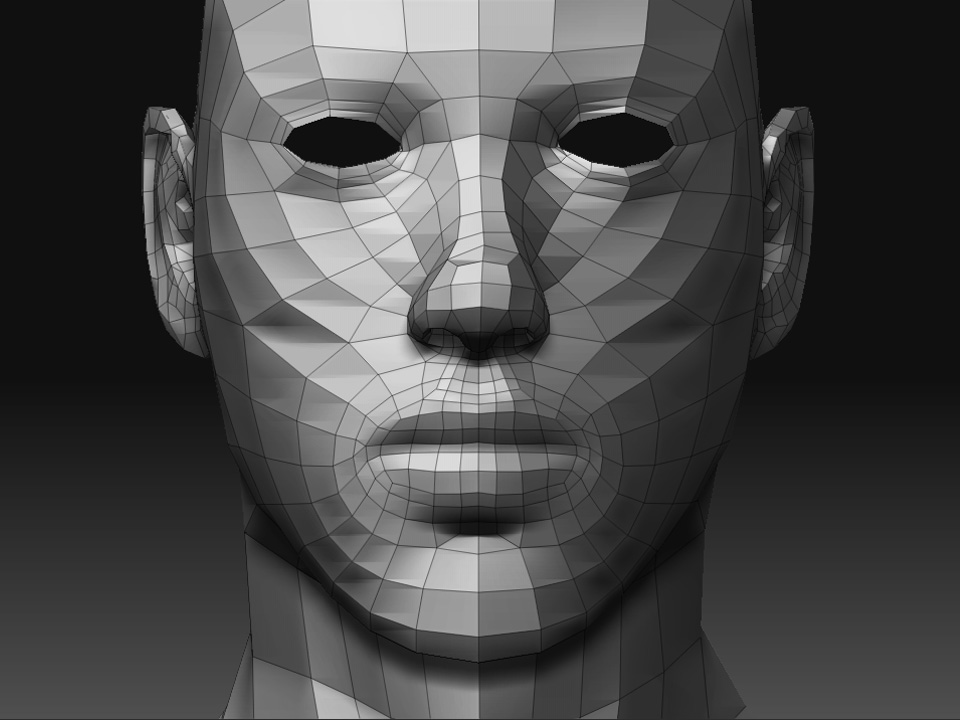
So your sculpt in ZB is now finished?

Here’s what I would do if the model is corrupting when you try and create your maps within ZB.

1)Export your head at the lowest subdivision back out as an obj. Import this into Max, add UV’s etc and then save.

2)Export your head out from ZB again at its high detail level, again as an obj. Import this into Max, (make sure you don’t have show wireframes on in your viewport!). Max can get a bit twitchy with very high poly stuff, so save often. If you find that Max is freezing or crashing a lot, either export your head out again at a lower subdivision or use a third-party program like PolyCrunch to get the poly count down. Select the head polys and make sure the all share the same smoothing group, either using the Smooth Modifier or by clicking just one smoothing group slot.Collapse your modifier stack and save the head out again from Max.

3)Reset Max and load in your lowpoly head model that you saved in step 1.
Merge in your highpoly head that you saved out in step 2. You will now have both high and low detail heads in the same scene.

4)With your lowpoly head selected go to “Rendering” at the top of the Max GUI and select “Render To Texture”

5)In the Render To Texture pop-up window, choose a path where you want to save your texture maps to and click the button marked “setup” next to “RenderSettings”

6)In the Render Scene pop-up window that appears, click the Renderer tab and then choose “Mitchell-Netravali” as your filter type and “Hammersley” in the drop down menu underneath the “Enable Global Supersampler” tick box…making sure that box is ticked! Close the Render Scene window.

7)Back in the Render To Texture window, click the “Enabled” tick box under Projection Mapping, click on options and make sure Use cage is selected. Click the “Pick” button and choose your high-detail model from the list.
In the viewport tick “Shade” under the cage options and using the selection tools and the Push amount sliders try and get your projection cage to cover your hipoly model, parts that are not covered will show up as red in your rendered textures. Take your time, its worth getting right (means less touch-up work in Photoshop!).

8)Under “Mapping Coordinates” make sure you have the right mapping channel selected for your low detail model (usually 1)

9)Under the “Output” section click the “Add” button and select “Normals Map”, choose your texture resolution from the click boxes, make sure the “Enable” box is ticked, and insert a name for your map in the File Name and Type box. Click “Render”

  1. In the Material editor, choose a new material slot and under Maps Select and adjust the Bump slider to 100, click on the empty slot next to it and choose “normal bump” from the options. Under the Normal Bump options, click the empty slot next to “Normal” and select your newly created normal map.Click the uparrow to go up a stage in your material and under the section marked “DirectX Manager” make sure the “DX Display of standard Material” checkbox is checked. The little blue and white dice icon will turn to pink and white, make sure it is clicked on and your head, with normal map applied, should now show in your viewport.

Note-there are better ways of showing your normal maps etc in Max than the above options, but is the closest to a “default” way. Just make sure you are running Max under Direct 3D…your normal maps will not show up in the viewport under Open GL.

If its a displacement map you need, this tutorial should help you convert your normal maps to displacement maps…

http://wookieebuddha.com/?p=11

thanks very much i shal give that a try next time i get chance to. thanks all for your help