ZBrushCentral

Bas Relief & Other Works

Again something I did back in 2010. The detail on these was fantastic.

A bit of workflow:

  1. Sculpt

Falcon head sculpted in ZBrush from sphere. Eye’s, beak, separate subtools.

The cufflink finding (bit that goes through the shirt) is a solid imported from Rhino.


2. Export to Powermill

5 axis machining from solid block.


3. Photograph

Sorry its a pretty bad photo but gives you a good idea of the size.

4. Photograph

A photograph of a slightly different variation.

workflow-001.jpg

IMG_0384.JPG

Wow, those cufflinks turned out great. Beautiful work! Love things turn from sculpts to actual 3D real world objects.

fantastic

Chimz / BOATDUDEGUY: Thank’s a lot for the feedback guys, much appreciated :slight_smile:

Great work you have here…!

Thanks Sigmund :slight_smile:

Hi All,

Again something I did back in 2010 when Skulls were all the rage.

The sculpt was far from perfect but hey I still wear them to this day. The flat spot on the back of the skull is purely for balance when taking them off.

You can see the finding base is fairly chunky, this was to leave enough material for customisation per client.

Set with 4 x 10pt (3mm) RB White Diamonds (although the photograph shows a variation in pinks and a large diamond base).

workflow-001.jpg

Just rooting through some of my old files.

This is a mock up bas relief in the rough stage. Originally this was for his ‘100th test century’ but unfortunately the project never came off so all work stopped.

Maybe one day I’ll finish it off for fun. Test cut in aluminium:

sachin-001.jpg
IMG_4339.jpg

Beautiful works! :+1:small_orange_diamond:+1:small_orange_diamond:+1:

Thanks Lexxx69, I really enjoy looking at your work, keep it up :smiley:

super works ) can u add video tutorial to explain process? )

Hey thanks Brightori. I’ll try to post a video soon, but similar to how you would create a full 3d model each defining area is broken down into separate subtool. example: Face, Eyes, Hair, Stubble/Beard, Clothes. Then to make it 1 model I’ll use ZProject to a high res plane, refine then export.

A question if you don’t mind
say you finish a model in zbrush do you export it as a stl file? I dont see many export options

do you use a stl file in powermill? No surfaces
Im attempting learning 5 axis simultaneous but its a shot in the dark
way more difficult than any 4 axis work ive ever done without any direction
even more so with an stl file thats got no surfaces and it seems uncontrollable
at least to a scrub like me

Hey BOATDUDEGUY,

Good to hear from you.

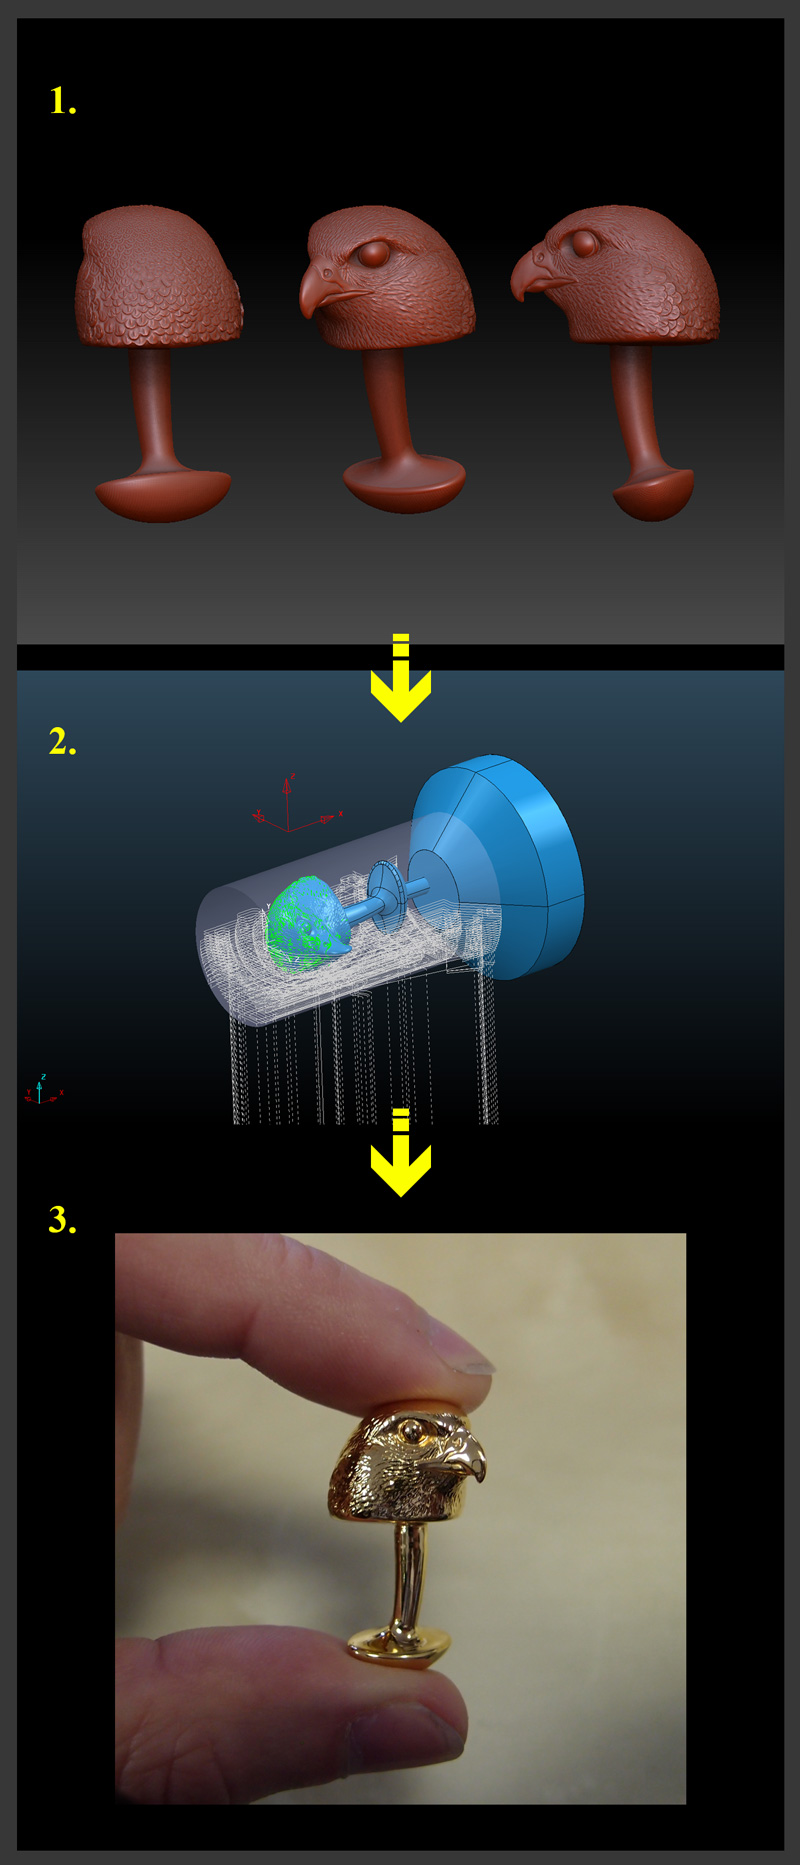
If you use Decimation Master and 3d Print Exporter from the ZPlugin menu you should be able to generate the STL you need. Failing that I would export the OBJ, scale, size and position in Rhino, then export the STL from there.

You can then import the STL directly into Powermill along with any IGES surfaces you may have created.

To rough out the piece I use 3+2 (2 axis position, 3 axis cut), or use 4 axis roughing strategies (turning).

There is no easy way to determine which simultaneous strategy works best on a model. You often and to create more than one to cover the whole piece.

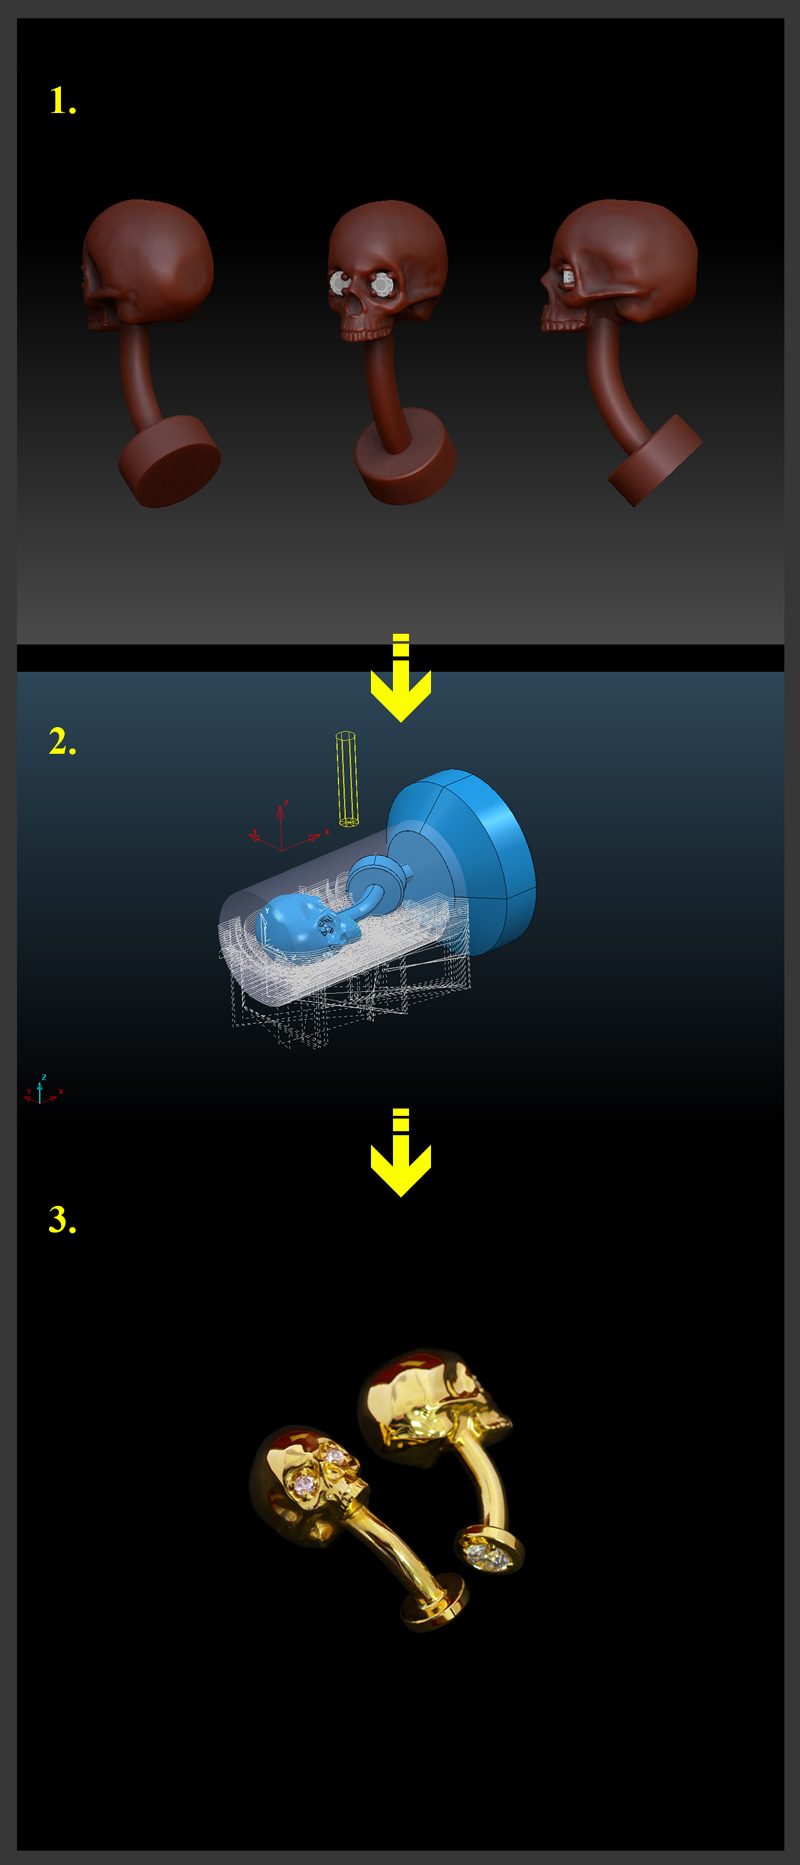
Take a look at and play around with point projection. This angles the cutter at a central point within the model. (you are able to move this point to a desired location, example: you may choose to place the point directly in the middle of the skull head).

As with all these things its trial and error,

Let me know how you get on,

All the best,

Angus

Thanks for the response I really appreciate it
from someone who is doing what I want to do
ive still got a way to go but im chipping away at it everyday
while developing my sculpting hand
I haven’t even drawn since I was a kid im kind of suprised ive rediscovered my artistic side

The rhinocam asks for boundary vectors for swarf and most of its other tool paths

I’m just lost how in the world are you supposed to have boundary lines on meshs
that’s the part that gets me with stl files no surfaces that have boundaries just 1 glob Of mesh
kind a wants to cut every where and ends up cutting the id while at the same time cutting through the outside destroying the ring

Excellent work

Nice Stuff!

I’m familiar with sculpting in Zbrush. Just got a job at an embossing shop. I want to explore sculpting in Zbrush, then importing directly to Artcam.

My question is: how do you figure out real-world sizes in Zbrush? For instance, I’d like to make a relief that will fit into a 1 1/2" area. Can Artcam do that? Can I figure it out in Zbrush before exporting?

Thanks for your info.

Wonderful reliefs! Nice to see a fellow user of Artcam along with Zbrush! The connection of the two programs is a window worth exploring for any jewelry designer. Going back and forth between the programs is also very beneficial when generating toolpaths for the CNC.

Hi all, thanks and sorry for the late replies. Works been pretty full on.

Thanks beneath_the_surface, much appreciated.

Thanks Germinate:

  • I almost always create both zbrush and artcam reliefs as a square (not rectangular) plane, it just makes it easier to align / import back to artcam. So no matter what the x/y size is in zbrush, import the model at set the size you want in artcam.

  • To gain an accurate z depth of a model I’ll do the initial sculpt in zbrush, import to artcam, scale the relief, take it back to zbrush and refine some more (and so on).

  • If you have an existing artcam relief you want to add to, 1) Export the relief either as an STL or BMP/TIFF and use as reference (settings accurate depths etc) 2) Create masks in artcam (add bitmap, fill the masking vectors with black or white) and export. 3) Add masks and sculpt on a separate subdivided plane.

Thanks camarafineart: Exactly, jumping between both applications is pretty seamless these days. I’m meeting more and more people using zbrush in the manufacturing world, especially jewellery.

Speak to you all soon,