ZBrushCentral

armor in zbrush

hope this is the right place for this. I’m trying to model some high poly armor in zbrush and i’m trying to acheive a certain look (ie. the armor in quake 4 or vahl’s dw2 entry (see below) is a good example).
I keep hearing that it’s best to do most armor things in maya or 3dsmax and just detail in zbrush but i can’t seem to get all the detail i’m after in maya yet i can’t get very smooth or accurate lines in zbrush and everything ends up all soft and lacking in form.

Are there any techniques or somthing anyone can recomend like using alphas or masks maybe to get this look in zbrush?

Attachments

32-game-3d-art-24-1174967358-Construction.jpg

People generally say that its easier in maya etc because you can define the edges of the armor with topology. In zbrush you sclupt the edge to be sharp using things like Pinch or other brushes with a small alpha and high zintensity, you can also change the focal shift. Flatten brush helps too. you should just do a bunch of experiments on a sphere to understand. however it all requires either a good edgeflow(like maya) or high poly counts, ideally you would have both and that would give you the best results. You can always make your new armor with the proper edges using retopolgy, thats if you don’t want to use maya etc.
Lastly you have a crease function in the Geometry palette, that helps very much as well, but crease’s are not exportable.

Jason has one armor tut here:
http://209.132.96.165/zbc/showthread.php?t=53087

thanks for the reply spaceboy412. I guess i’m just gonna have to keep practicing getting my topology right (in maya primarily) to get the results i’m after. I’ll keep playing around with the zbrush tools to see if i can get any better at it too.

and that jason welsh vid was awsome, only problem was it cut out the bit i’m really struggling with (subdividing and detailing the armor >_<)

Hey nizza_waaarg,

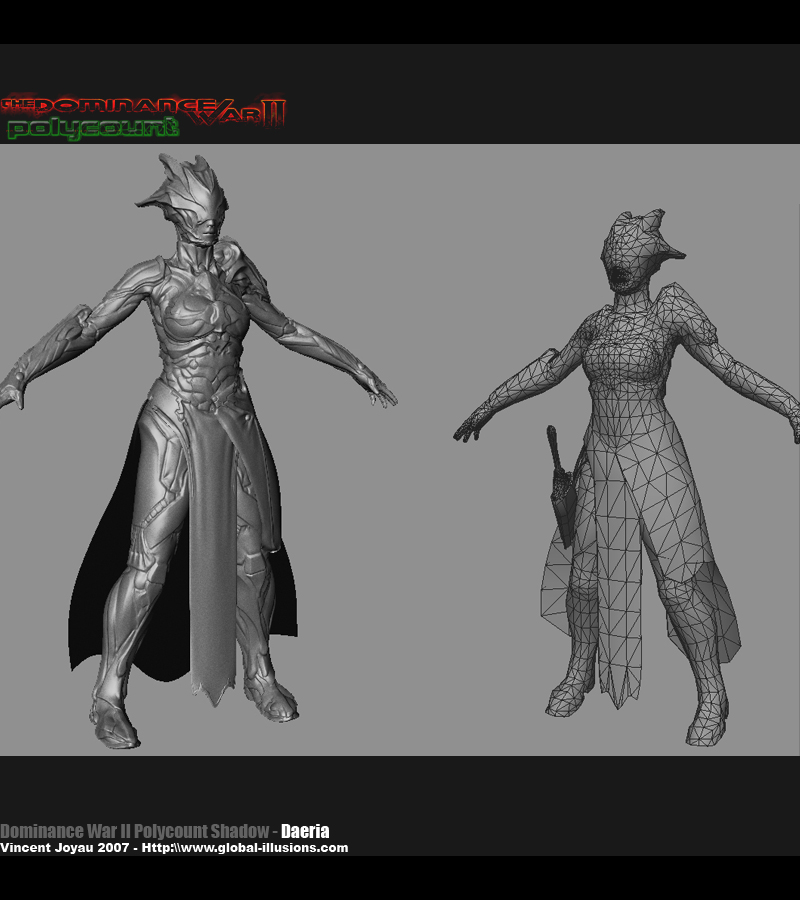
Here's a breakdown of how I've been approaching hard surface/semi rigid geometry in ZBrush. This may not be the right or best way to do it, but so far it's the best approach I've come up with.......

I do all my basemeshes in Max. In the case of armor/belts/boots, gear or anything not very clothlike, I tend to create basic subdivision geometry for them to hold the form/shape/edges. I’ll continue as if you aren’t totally up to speed with SubD’s, if you are, then maybe this post will help someone else…

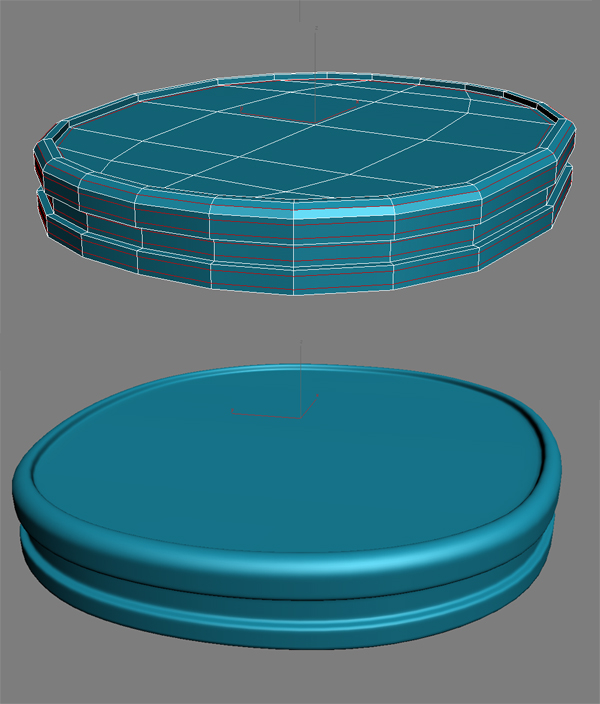
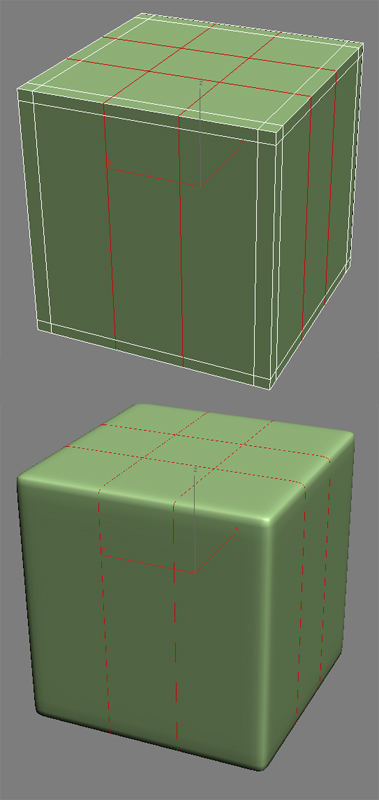
So for SubD’s I basically take my base geometry and then add “supporting” edges around the edges of the geometry. Those are the edges in red (Top, blue thing). Then when you do this and turn on SubDs, (level 2 usually), you’ll get nice smooth edges that hold their form (Bottom, blue thing). Adding additional edges or bringing the “supporting” edges closer to the primary edges can help tighten up the edge smoothing or crispness. I basically do enough to hold the form/edges/surfaces in place, and then export the model with SubDs turned on into ZBrush. There I’ll add seams/wrinkles/details etc. Also, make sure that if you add chamfered edges, add additional edges throughout the model to make sure that the topology/polygon distribution is relatively even for detailing in ZBrush, like the red lines on the cube below. Otherwise you might not be able to get enough polys in an area when you subdivide for detailing, while the chamfered edges wind up with an excessive amount of geometry. Hope this helps. Good luck.

Attachments

Z01.jpg

Z02.jpg