thank you gabo! happy to hear you like it
Really cool piece. At first I thought it was Bela Lugosi from the nose up. You nailed those piercing eyes. Great idea and execution!
awesome
Voices in the head… very cool sculpt !
Can you possibly show the Photoscan data you worked with ? Maybe what camera was used… etc ? How much effort was needed for cleaning up the mesh ?
Thanks for sharing… great works !
DougE
NJSculpter
Thanks a lot! It was loosely based on a photo scan data from my own face to start with, then with sculpting it changed a bit as it was never a goal to do a self-portrait, I was just the most easily available model around. Your comment made me curious about how Bela Lugosi looked when he was around my age. I guess we share a couple of similar features, but alas I’m still a far call from him 
Jhon_Erick
Thank you!
DougE
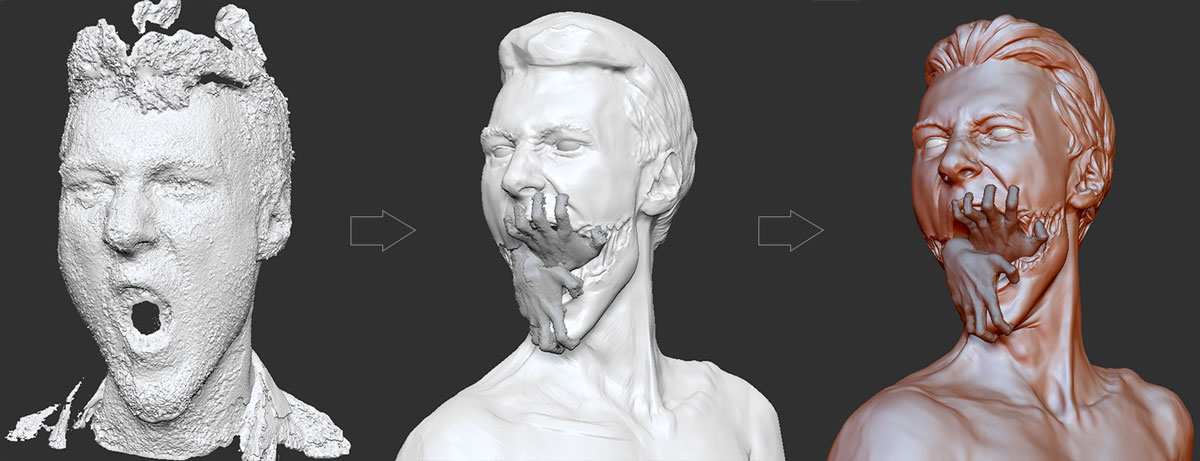
Thank you, yes sure, I’ve attached the image of the rough workflow. Unfortunately I haven’t been saving the progress very much as I went along, so only had a few screenshots, but you can see it more or less.
The first one is the data I got from scanning the photos. Then the other two are sculpting progress stages. So there was quite a bit of cleanup involved, but the scan data provided an awesome base to start with, so I only had to concern myself with actual fun part of adding the details, which sped things up considerably.
The photos were taken on a 500D Canon,18-55mm kit lens with autofocus off and set manually. Lighting was just an overcast daylight through a large window, and overhead fluorescent lights turned on to try and even out the shadows. Background was a white wall, camera set in one place on tripod, turned myself around in front of it taking photo roughly every 5-10 degrees. Main challenge was to try and keep the same facial expression and to stay relatively on the same spot centered to camera. Not easy
Attachments
Arianerocket,
Thank you for the images and information.
I was wondering if the Photoscan data came in all clumpy and gnarly (just like the first image you show on the left)… and that is confirmed now. Are you using the standard or pro version?
If you had ‘shiny’ skin when you took the photos that could have caused some problems (apply baby powder to faces before shooting,… just like in the movies). I do believe that trying to keep your pose (as you mentioned) caused most of the problem areas.
You might want to experiment with applying markers onto your face on your next bust photoshoot. (Take some stickers and cut into small 1/8" (3mm) squares. stick onto your face randomly in key areas, then take the photos. The stickers give the software some definitive locators to compare between camera angles. EG… helps the software figure things out much faster and with greater precision. **downside would be that you don’t get a usable texture. There are workarounds for textures, but I won’t get into that)
Please note that I’m not criticizing anything you’ve done.
Your clean-up on the model looks fantastic !
Thank you again for sharing and for your time.
DougE
Hi DougE,
Thank you so much for the information and taking time to share it, that could actually come in very handy for the future.
This was a personal project, so I used the free 30 day trial of the pro version. I had prior experience of cleaning up scan data in Zbrush on some jobs before, but I was always working with the models already provided by the client, and was really curious to see how the actual scanning process worked. Even without much knowledge of what I was doing or doing any of the things you mentioned I was really impressed with the quality of scan I got from the Photoscan software.
I’m now considering buying the full version for my future projects, so all the advice you gave will sure be useful, especially if I can get to work with some professional models rather than just using myself. Following up on your question, do you by chance know if there would be a difference in scan quality/model generation between pro and standard versions? Because for my needs Professional edition has a lot of things I wouldn’t use, and the price tags are fairly different too…
Thanks again for the tips!
As far as my knowledge of Photoscan goes; The algorythms used in Pro and Standard are supposed to be the same. The model ‘build’ is also the same (there was a difference previously where Standard did not have a ‘highest’ resolution solver and Pro did, but, that is no longer the case)
I believe the PRO version has some mesh editing and camera alignment tools that Standard does not have. (I think that these tools could be helpful to some degree, but, probably not so much with ‘busts’ or human objects. I think they are more intended for geo type applications) When applying your own markers(stickers) to objects(human faces etc) prior to photographing, the software has been given some very useful ques, thus eliminating the need to apply markers inside the software.
The export abilities are also the same in regards to base models in 'obj type formats. (Pro has further export abilities which seem to be more useful for DEM or geographical projects.)
Photgrametry is quite useful for general object creation. 3D scanners are very interesting, but, I don’t bother looking at things that fall well outside my monetary reaches.
Yes,… there’s quite a difference in price between pro and standard. In my opinion, for ‘artistic’ type uses, there’s no need to go into the pro realm.
There are a lot of things to experiment with using the standard or pro versions. Another useful tip is to take the photos into photoshop and apply filtering to them (high pass, levels… etc) Adjusting the photos can vastly help pre-clean what would have been noisy results in photoscan. **I don’t have any exact settings to share,… as I said,… experiment a little. Take photos of a shoe or something simple,… apply some markers,… adjust the photos in photoshop and then run through Photoscan. Run the original photos through photoscan and see if your changes made in photoshop helped or hurt and build from there. You can always let Photoscan go through the processing while you’re sculpting in Zbrush so you don’t have to be bored waiting for the results.
Good luck arianerocket !
Doug E
Wow thank you for so much info and further tips. Very interesting. I will definitely run some tests with simple objects in the future to see what works best in regards to photos. Good to know that the algorithms between standard and pro are the same. I couldn’t justify buying the pro version for my personal fun anyway, so it’s definitely a bonus knowing that standard version can do the same thing in regards to scanning and converting models. Thanks again and good luck to you too 
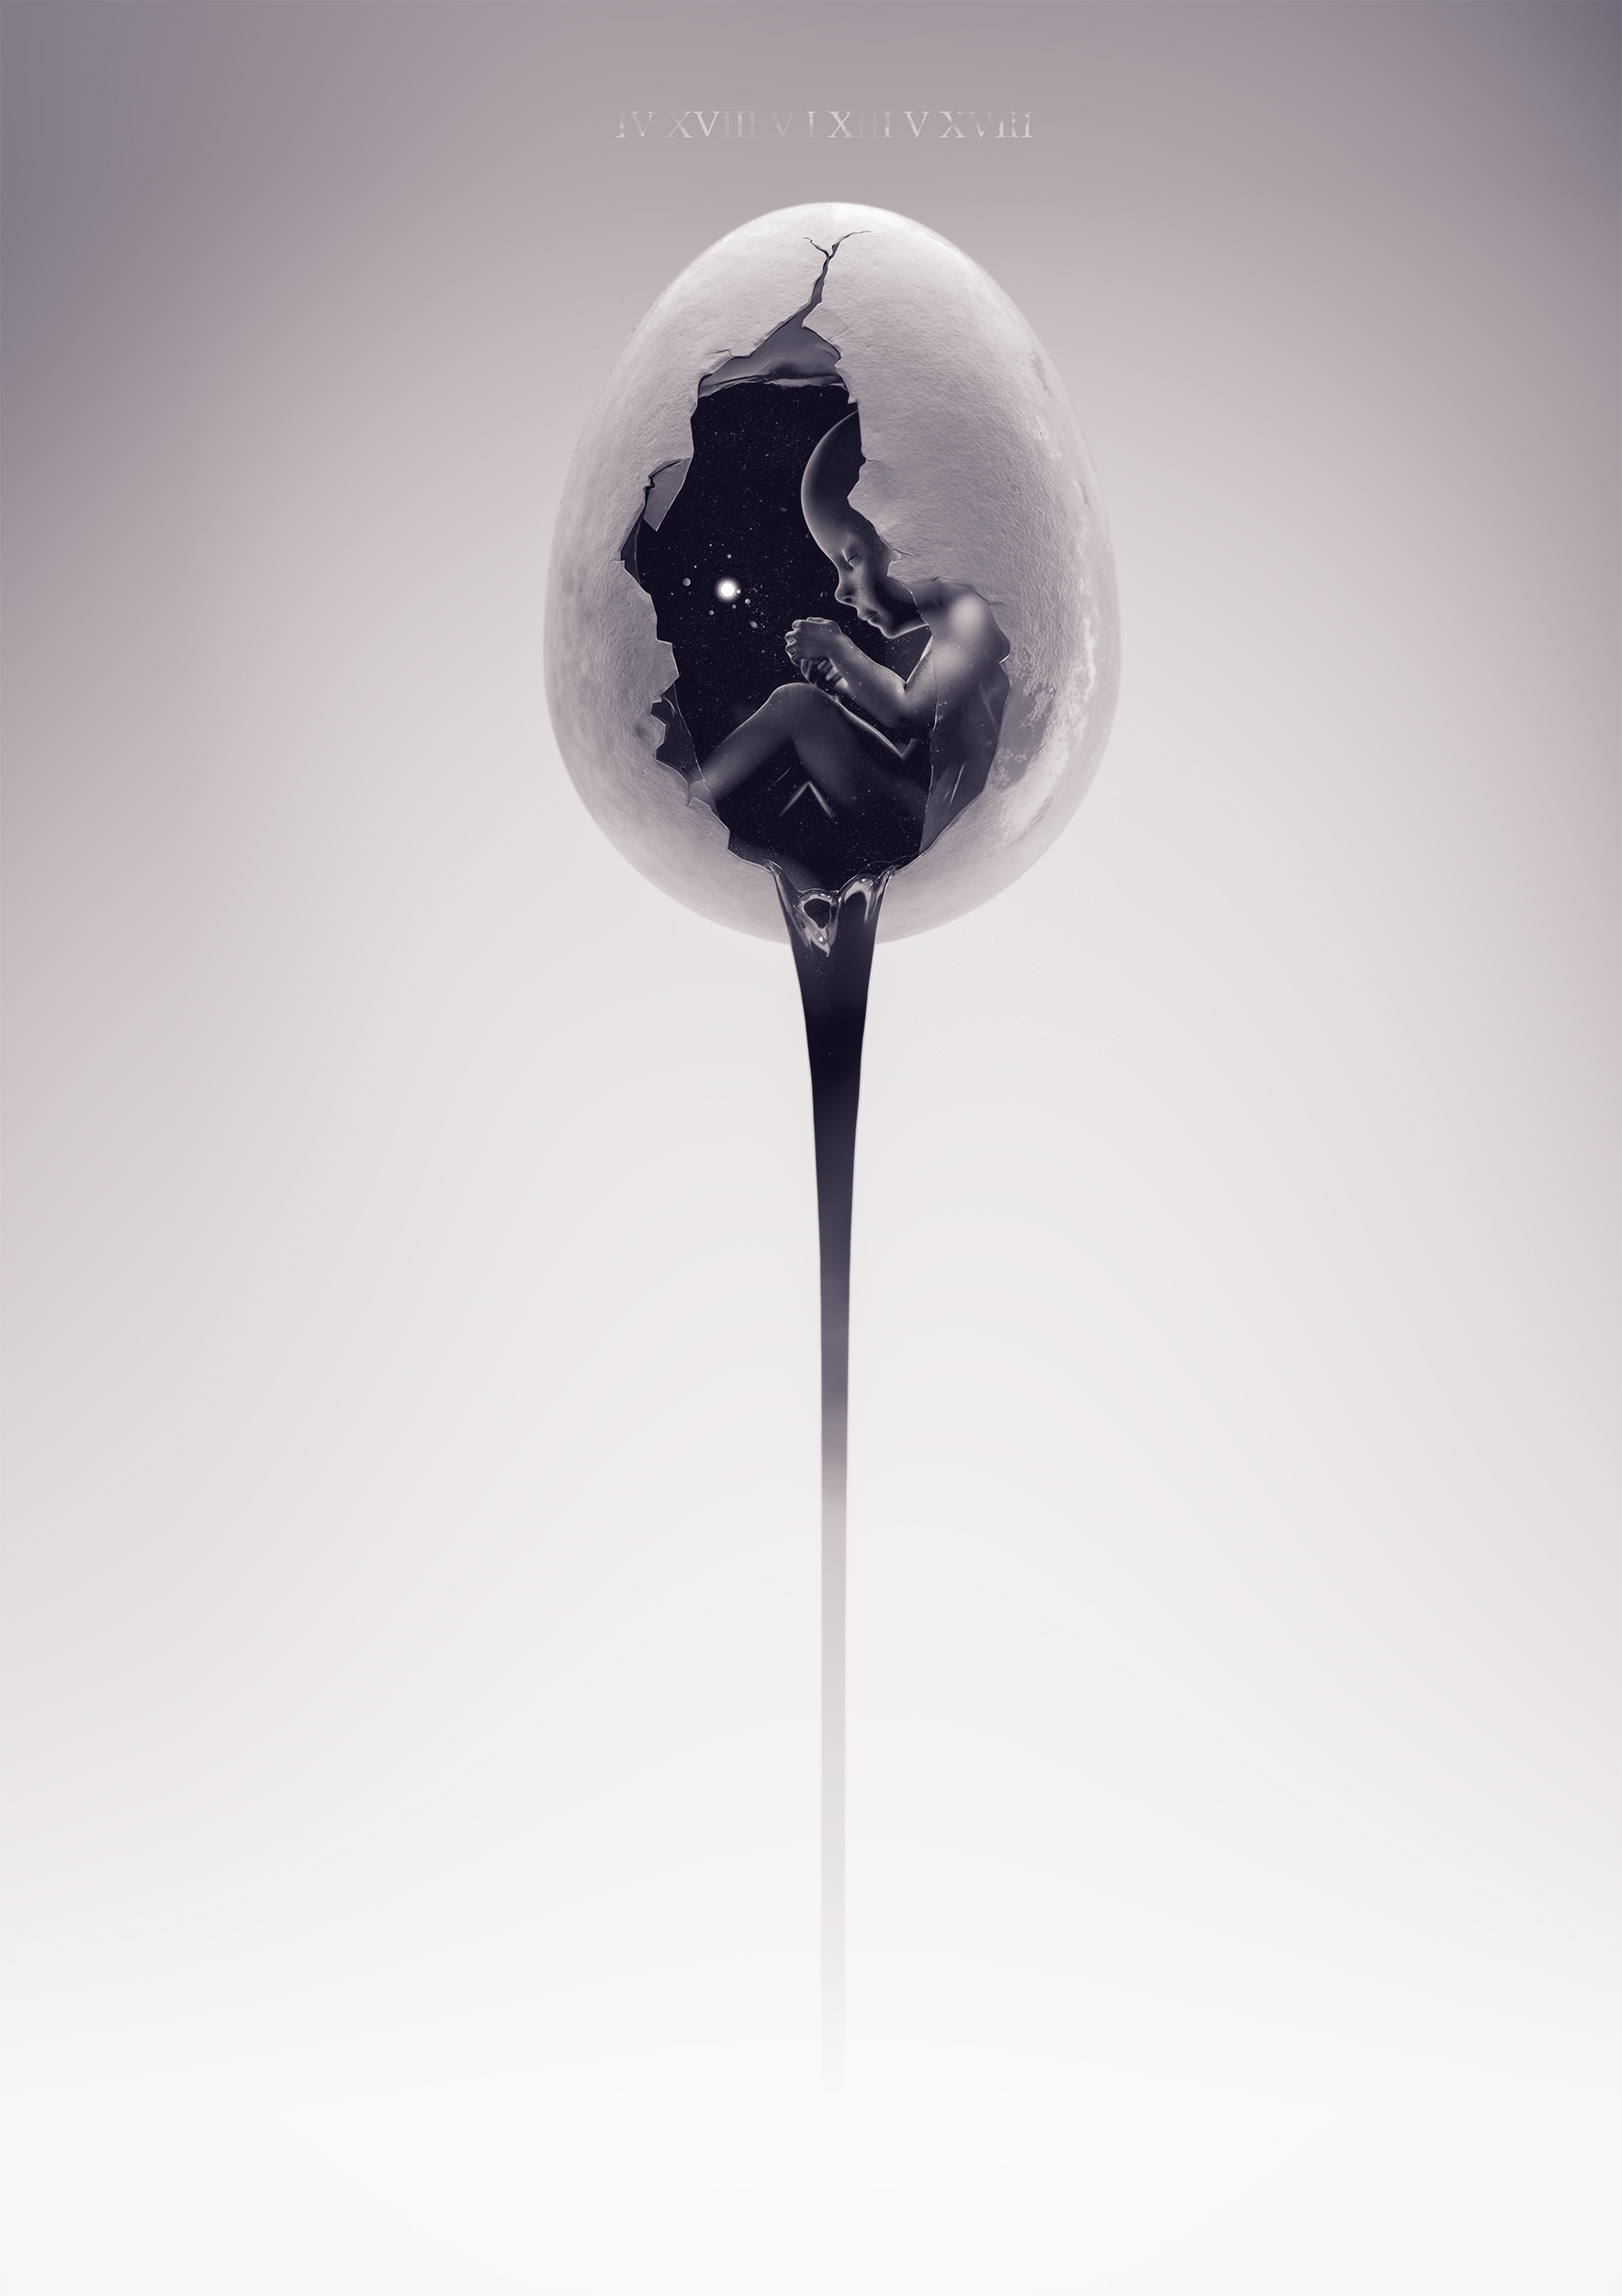
A new image I just finished.
A little dreamer imagining a new reality while his own one gets shattered.
Attachments

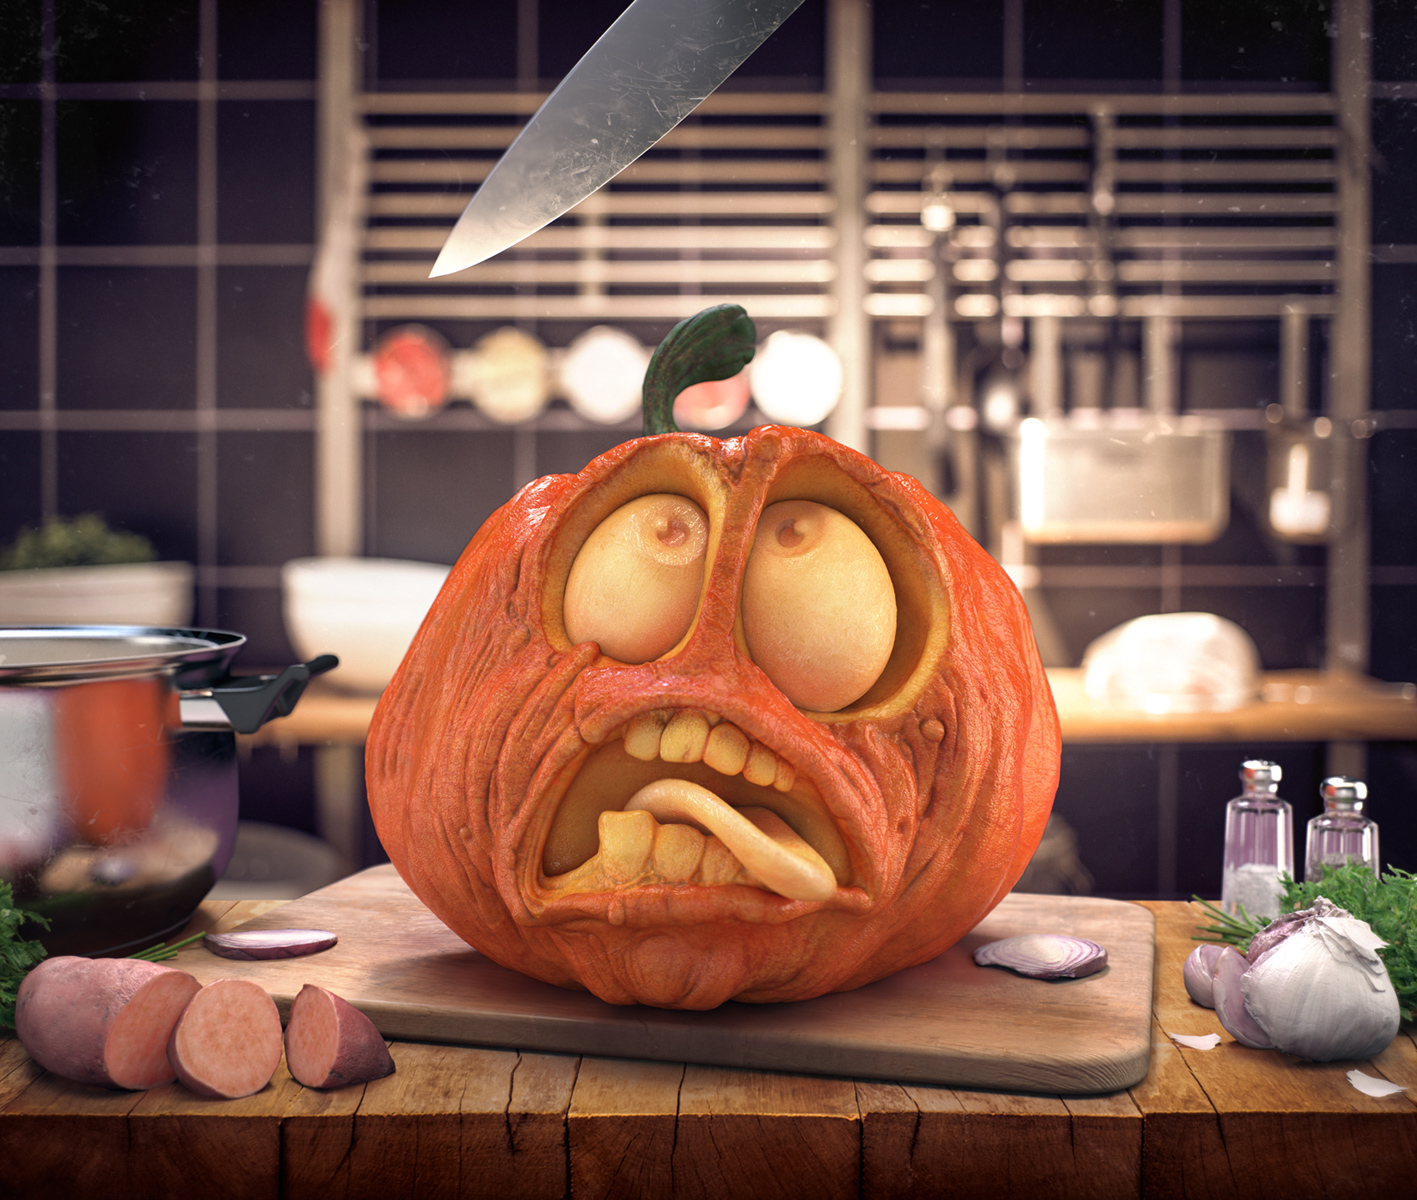
Happy Halloween!
Attachments
Happy Halloween fellow Zbrushers!
Attachments
Sorry I’m just seeing this one now. Don’t have much lurking time lately.
Very great Halloween image!
Haha, nice work!