Hi guys,
This is my first post here.
I’m working on a Lost&found Splicer From Bioshock 2.
Concept by Colin Fix.
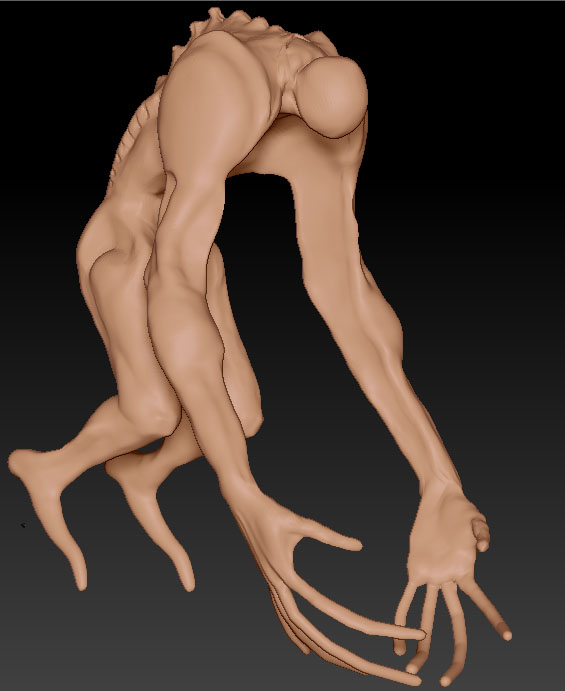
Here is some pics of the work done so far.

Current Wire.
More stuff will come.
Keep it frosty!
Attachments

Hi guys,
This is my first post here.
I’m working on a Lost&found Splicer From Bioshock 2.
Concept by Colin Fix.
Here is some pics of the work done so far.
Current Wire.
More stuff will come.
Keep it frosty!
I noticed that you might not know what I was going for from the earlier post so, this might help.
<table class=“fieldset” border=“0” cellpadding=“0” cellspacing=“1” height=“77” width=“320”><tbody><tr><td>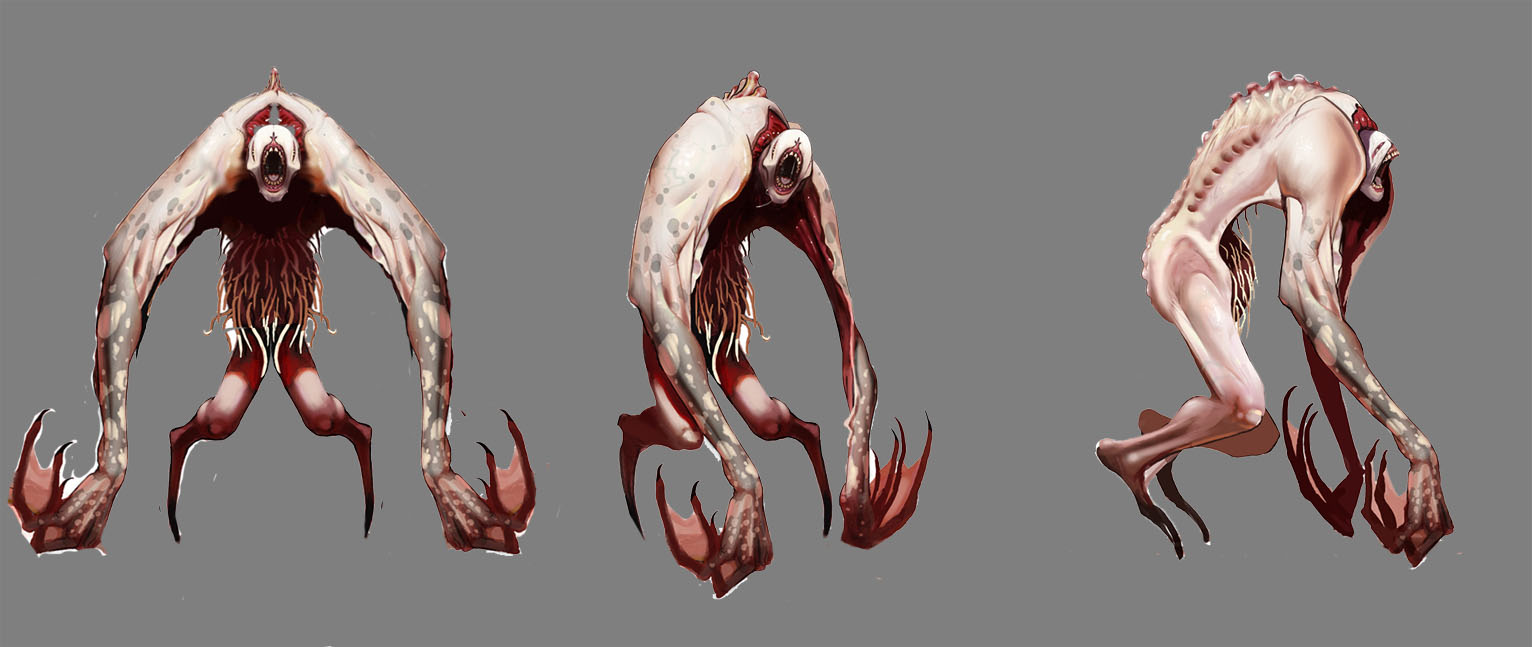

Its a start. Keep at it!
its way too early for you to retepo the thing, your proportions are still way off. Also your adaptive skin model has a way better poly distribution and edge flow than the one you retopolized, you actually are making a worse base for sculpting than you already got ;f
Im not sure how close you gonna stay to the concept, but you seem to be goiong way too high poly before establishing main shapes.
Anyway its a cool concept, and a good start, but you schcould just focus on the sculpting only part of it, and not bother with the topology or anyting else.
Try using the remesh all option in subtools if you are lacking polies on his back, its away faster the doing a retopo of whole thing, and you wont be afraid to totally mess up trhe topology.
Oh, and pose before sculpting ! not after !
yeah you’re going too high too soon, best establish form beforehand then progress up. Think of it like bluring a picture. establish general shapes, then deblur the pic. now establish smaller shapes. now deblur the pic, now establish even small shapes. soon the shapes you create will get so small we call these high frequency or just details  its a good rule of thumb and translates over to actual clay sculpting if you should ever consider it.
Hi Blackshore,
the 2D concept design is cool as well as the texturing and the red/grey gadient from his hands up to his arms. I think this is going to be a really cool monster if you work on it. My advice is to step a few levels back, like subdiv level 3 or something, so that you can see the polygon quads. This way you can easily establish the overall form without getting lost in the details. It’s all about shape and silhouette in the first place (you can check this example in the first pic of page 2 of my thread ). After establishing the primary form and large overall shapes,step one level up. You will still see smaller quads , but you can already lay down some initial lines regarding anatomy and musculature, like i.e. the transition of the forearm muscles to the upper arm (which looks quite cool in your concept).
You should go on like this step by step and finally when you have placed all volumes and masses where you think they should be, and when you are satisfied with the overall shape of your sculpt, you start with the details.
This is probably the most “secured” way to build up a character in order to make him look realistic. (Later when you’ll have the routine you could also do it like the Santa Monica guys in their lunchcrunch thread - They do quicksculpting with great results…)
I hope this helps and I’m looking forward to see your finished monster, which I think really has potential.
Cheers
Thank you guys! 
Really, I did not know that any forum did have this quick response.
Thanks!
I can not take credit for the concept! It’s made by Colin Fix. One of the main guys of Bioshock 2 development. I am however allowed to use the concept. 
I will, like Nasa, breakdown the impossible in to smaller tasks to reach the goal! got it!
The blur thing is actually a very good tip! I did that with oil paintings many years ago, this will come in handy.
Thats a really good tip! I shall save that for the future aswell!
I will be going back two levels and block out some more!
The end goal is to out it in a animated live shot. So, it will be as realistic as I can make it.
Could you say a couple of areas that are really failing regarding proportions?
Your links are bookmarked! Thank you so much!
I will be back with further adjustments!
dude, i love those designs so much i have decided to make one of them too ;D
Also hers a good idea how to approach it at low levels, i push the forms until i literally have no more polies to work with, only then i divide.
The great thing about this, when you have little polies to work with, your forms will always look better, also try to do his skin folds at the very end of the sculpt, get as much anatomy correct as you can, remeber he is a mutated human or something, so give him a human chest and human muscles, then hide them with skin folds and tenticles ;]
Alright, I’m back from my vacation!
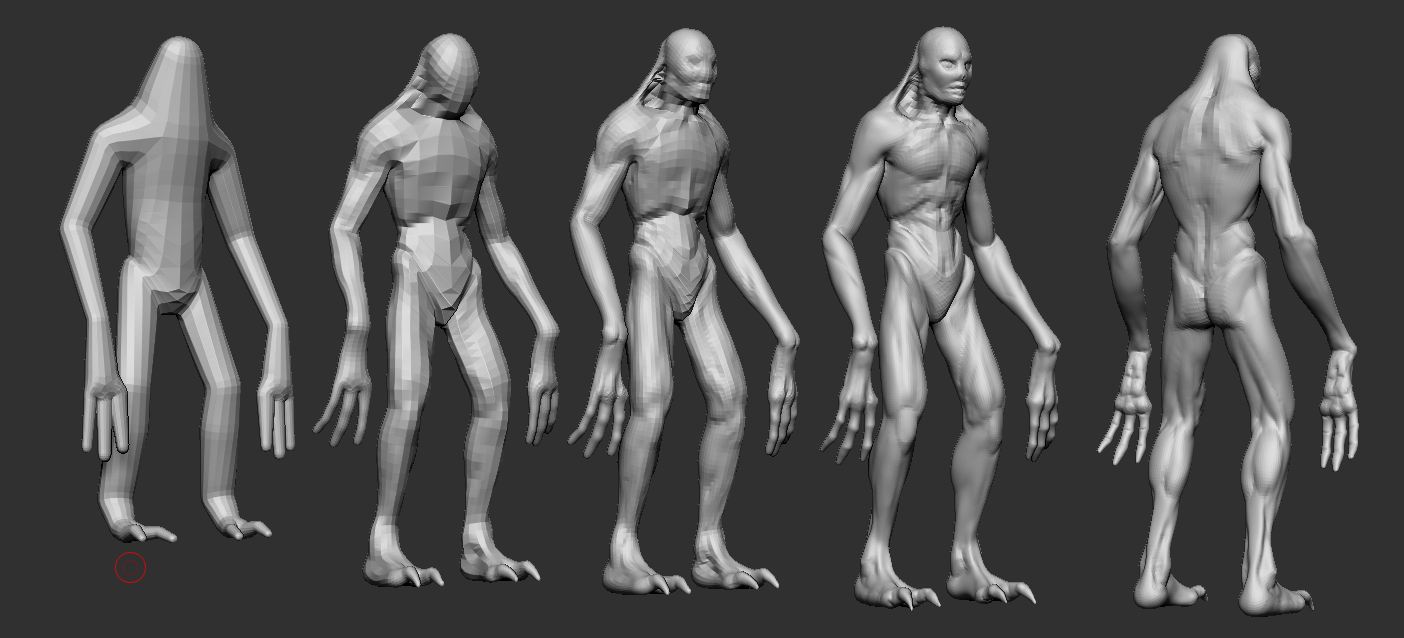
Here is some results.
I have studies some basic anatomy in order to make the front torso.
Whent for a “The Machinist - Christian Bale” Look for the chest.
The weed thingy that comes out from torso, I think that might be solved later.
[
All pictures above are at lvl 3.
Is there any major issues with the mesh?
I think that I have been able to “see” more and more for each day with the mesh but sometimes I get lost.
If anyone could comment on this I would be happy!
What am I not seeing?
Thanks!
@slocik: Happy to inspire! 


Alright I am at lvl4.
I checked with a couple of class mates for upcoming development of this character. I’m talking about skin textures, pores, nerves, etc etc.
There is apparently a HD mode in Z that I’m going to check out.
What are your experiance with this for 1080P closeups?
Here is the state, where it is right now.

I know that I need to do some more basic work on the back, feet and hands in the moment.
Is there anything else that I’m not seeing or that you think that I should pay extra attention to?
As said earlier, do not be afraid to give critique, I’m a beginner so I need all the help I can get to escalate as fast I can.
Give me useful critique doe.
Thanks for watching!


It’s an interesting concept with some potential, but go back to the basics for a second.
Turn on the Flat Color material and view the model in silhouette. Take a look at the proportions. I assume it’s intentional that the arms are the dominating feature of this character, but the legs look quite feeble and very unfinished.
Study up on human anatomy (as this is a humanoid kind of creature). For that matter, since this has some animalistic qualities, such as the legs, study up on animal anatomy as well. Never hurts to have this all stored in your mind’s library. The more familiar the muscle groups, the more believable this guy is gonna be.
Once you’ve gotten your muscle and skeletal structure set up, then you can start adding your skin textures. But always make sure that your proportions and anatomy are right first.
Also, present your work with a more interesting material. The Red Wax is sure doom, even for a heavily experienced digital sculptor. Check out some of the downloadable materials on Pixologic. Some of them are great for sculpting, others great for presenting, and some maybe for both. That’s my long-winded two cents. Hope it helps. Happy ZBrushing!
Thanks for the reply!
I will see what I can do.
I went with the concept drawings when I made the legs, I do not know how far I should mush anatomy from from the concept it self.
Is it something I’m not seeing?
I can change the matcap for next image upload
First off, I really like the new forum style! Great job!
now to it!
I have been studying some more anatomy. More muscles and compensations.
For human anatomy I got Artistic Anatomy by Dr. Pual Richer
And I think the books serves the purpose very well compared to my old anatomy book, the drawings look more accurate.
The quadrapet (four-legged animals) anatomy I was quite short on, but I did find some pics googling for echorche + dog.
It was very interesting I must say! Small and big diffrences mainly the hip area and neck (between humans and dogs).
So here is some results.
Legs, Calf, Back and allot more have been updated.
 I have uploaded a 360 Turnaround on vimeo
[vv]30157894[/vv]
Hopefully this will make it easier to see and critique further.
Additional to that some closeups.


I took the advice from the latest poster and changed the matcap to Krakens SculptingMaterial2PC with the new Wax preview render.
I thought of moving to detailing next.
By that I mean texture, teeth etc.
What do you think?
Am I ready or Am I missing/not seeing something?
Remember that I’m using the concept on 2nd Post and would like to stick as close as possible to it as long as it could move as “realistic” as possible.
Point out more specific problem areas if possible. 
Thanks for the help so far. Really!
I am very thankful! This community is awesome!
