sorry Marcus
Here’s is the pic after setting the deformation inflat to -5…(I have to type in the value -5 though, I cant use the slider, it goes all over the place)
and I get this pic…I dunno I think I’m doing something wrong here…
sorry Marcus
Here’s is the pic after setting the deformation inflat to -5…(I have to type in the value -5 though, I cant use the slider, it goes all over the place)
and I get this pic…I dunno I think I’m doing something wrong here…
Hey, just got back online after the long weekend and
saw your texture. It strikes me as very repetitive and
looks somewhat artificial. There is definitely a rectangular
repeat obvious. I would suggest adding a step to Marcus’s
workflow while you are in photoshop. Take your texture
and use Filter Other Offset with Horizontal
and vertical values that are exactly half of the texture
resolutions, with Wrap Around checked.
The only thing that occurs to me immediately, outside
of having them try scanning at different resolutions (higher
AND lower), is for some reason it is in my memory that
Zbrush prefers quads to triangles and use of tri’s can lead
to a rougher surfacing experience. Since this is clearly
a triangular mesh, you might ask them if they have the
capability to scan as quads instead of tri’s.
I think the problem is you simply haven’t got enough polygons to support the deformation detail. You’ve only got 28,000 polys whereas I think you’ll need at least a million to get the mesh to deform cleanly. So undo the deformation, clear the mask and then subdivide 2 or 3 times and try again.
Don’t be afraid to subdivide. Once you’ve got the detail you need you can use Deformation Master to reduce the polycount without loss of detail.
Thanks Marcus I’ll do that, I was kinda thinking it might be the subdivision…
and also thanks tbsy for your input…much appreciated guys
Hi again guys
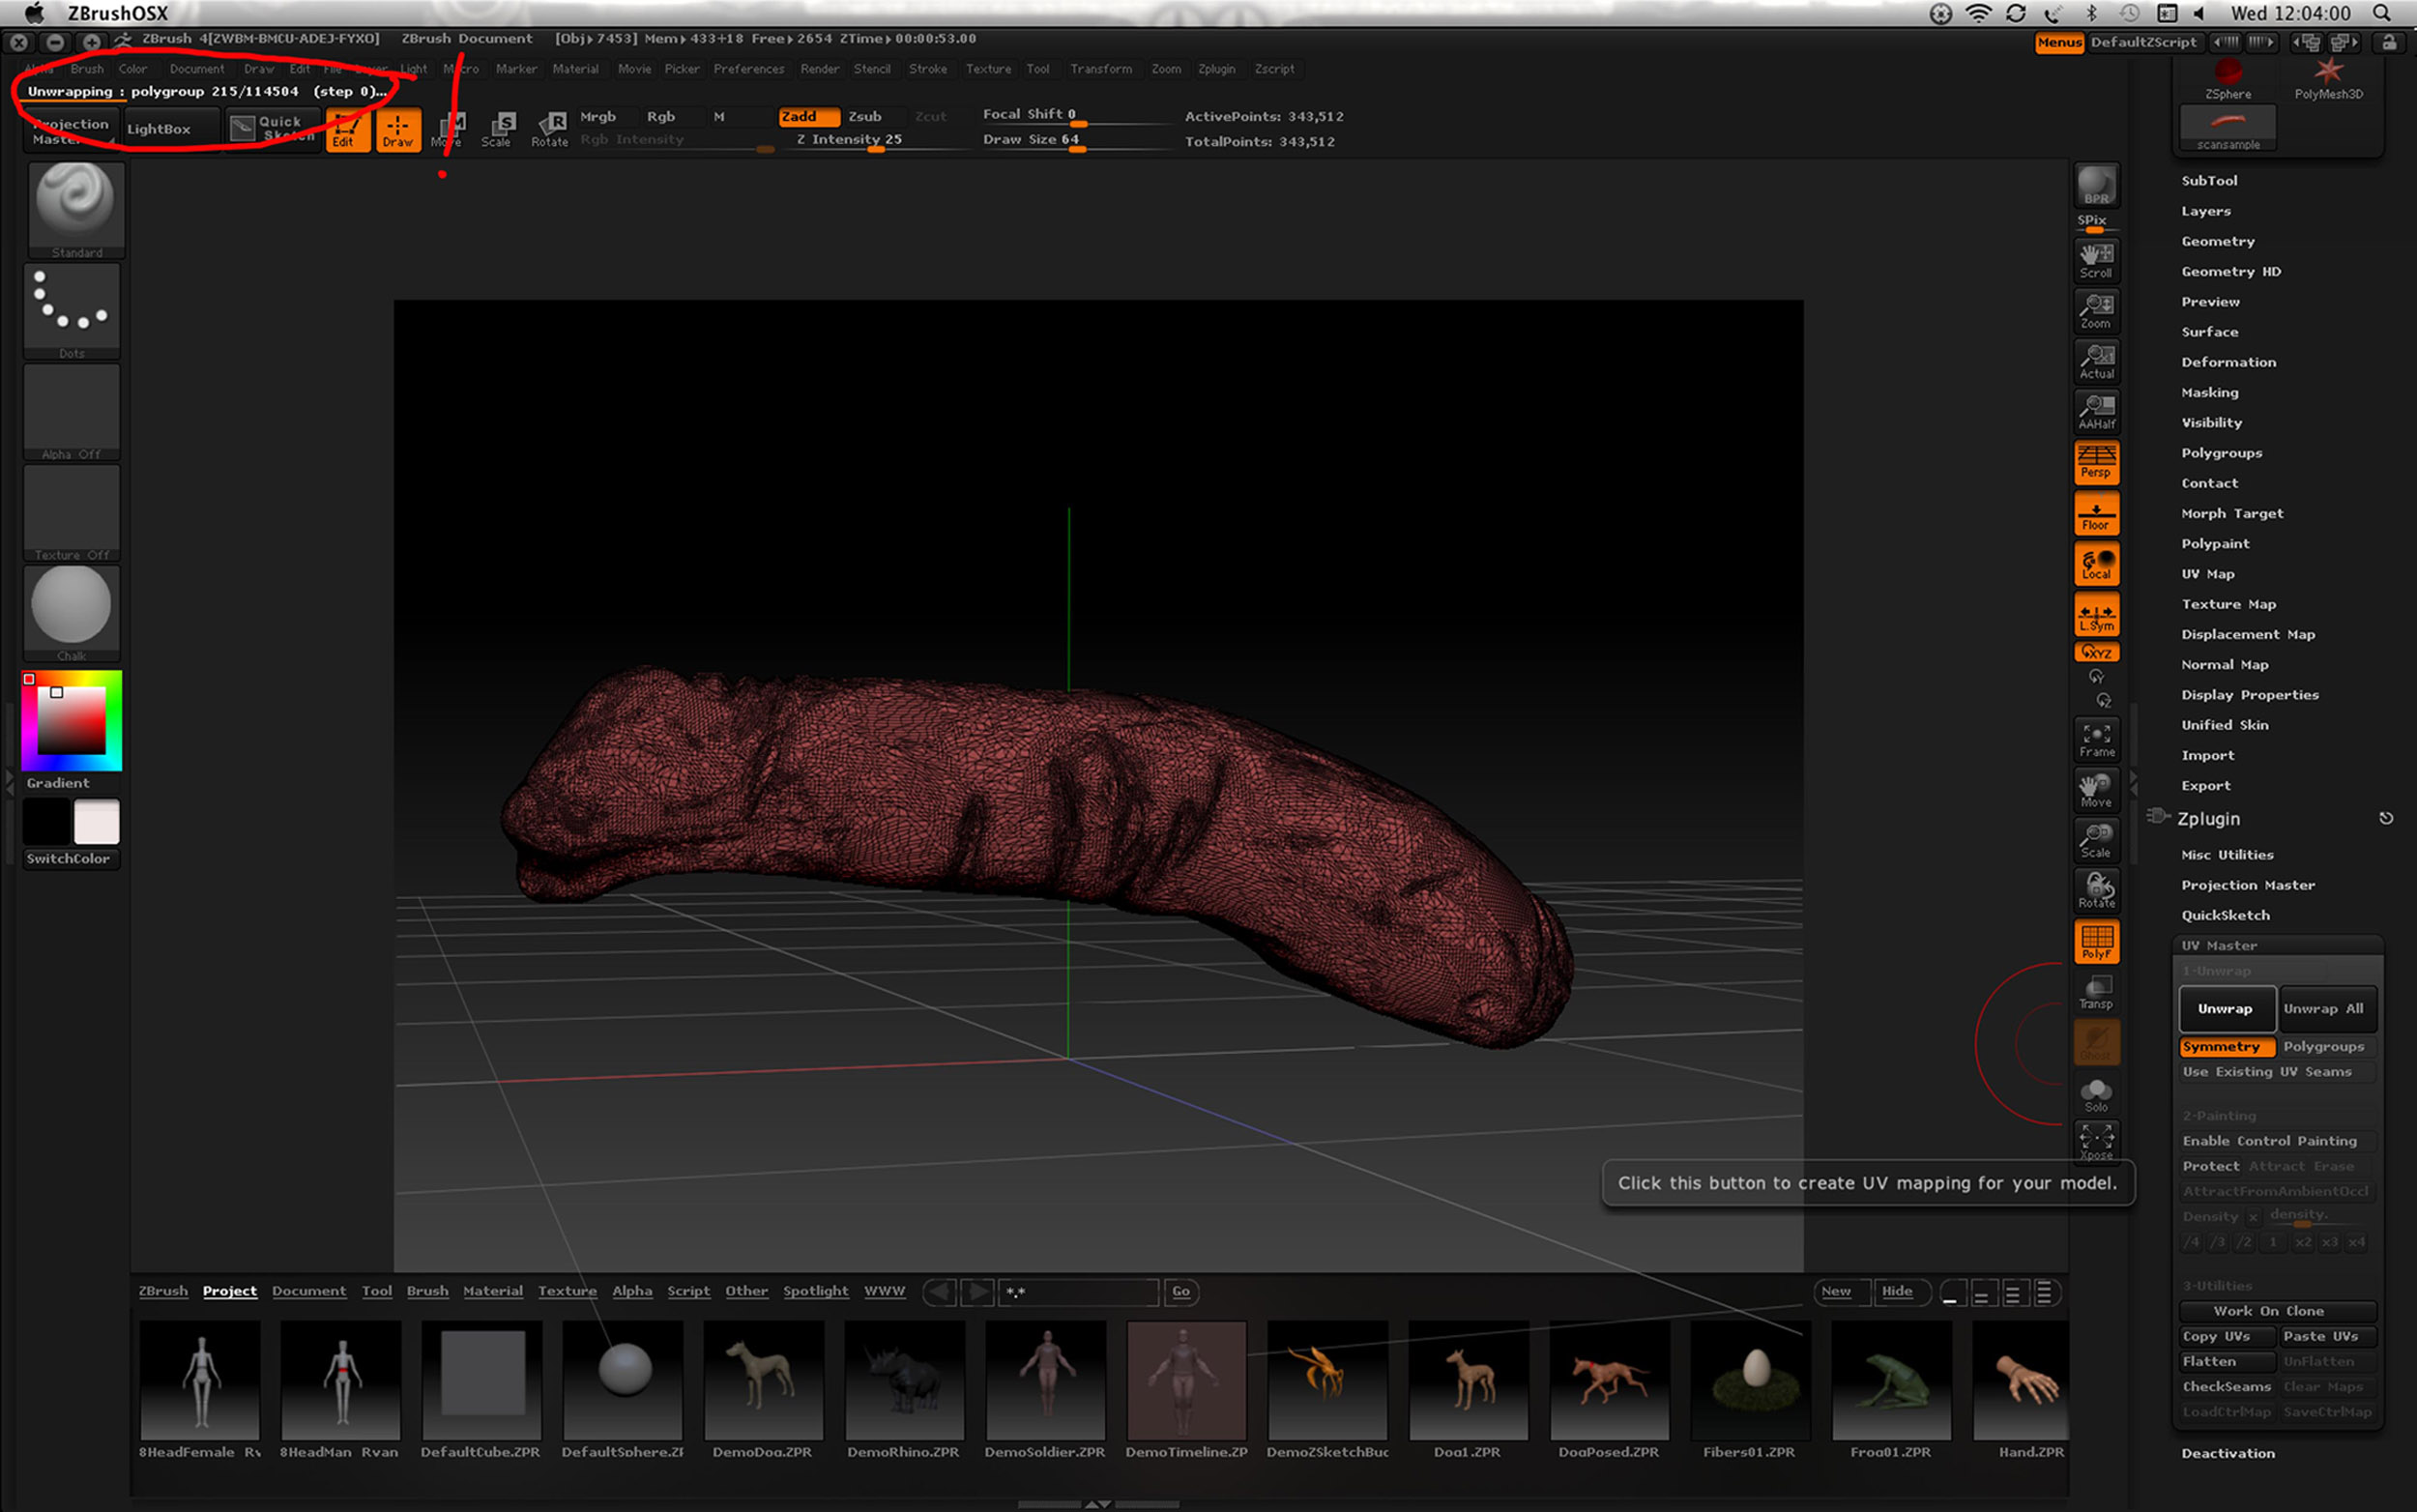
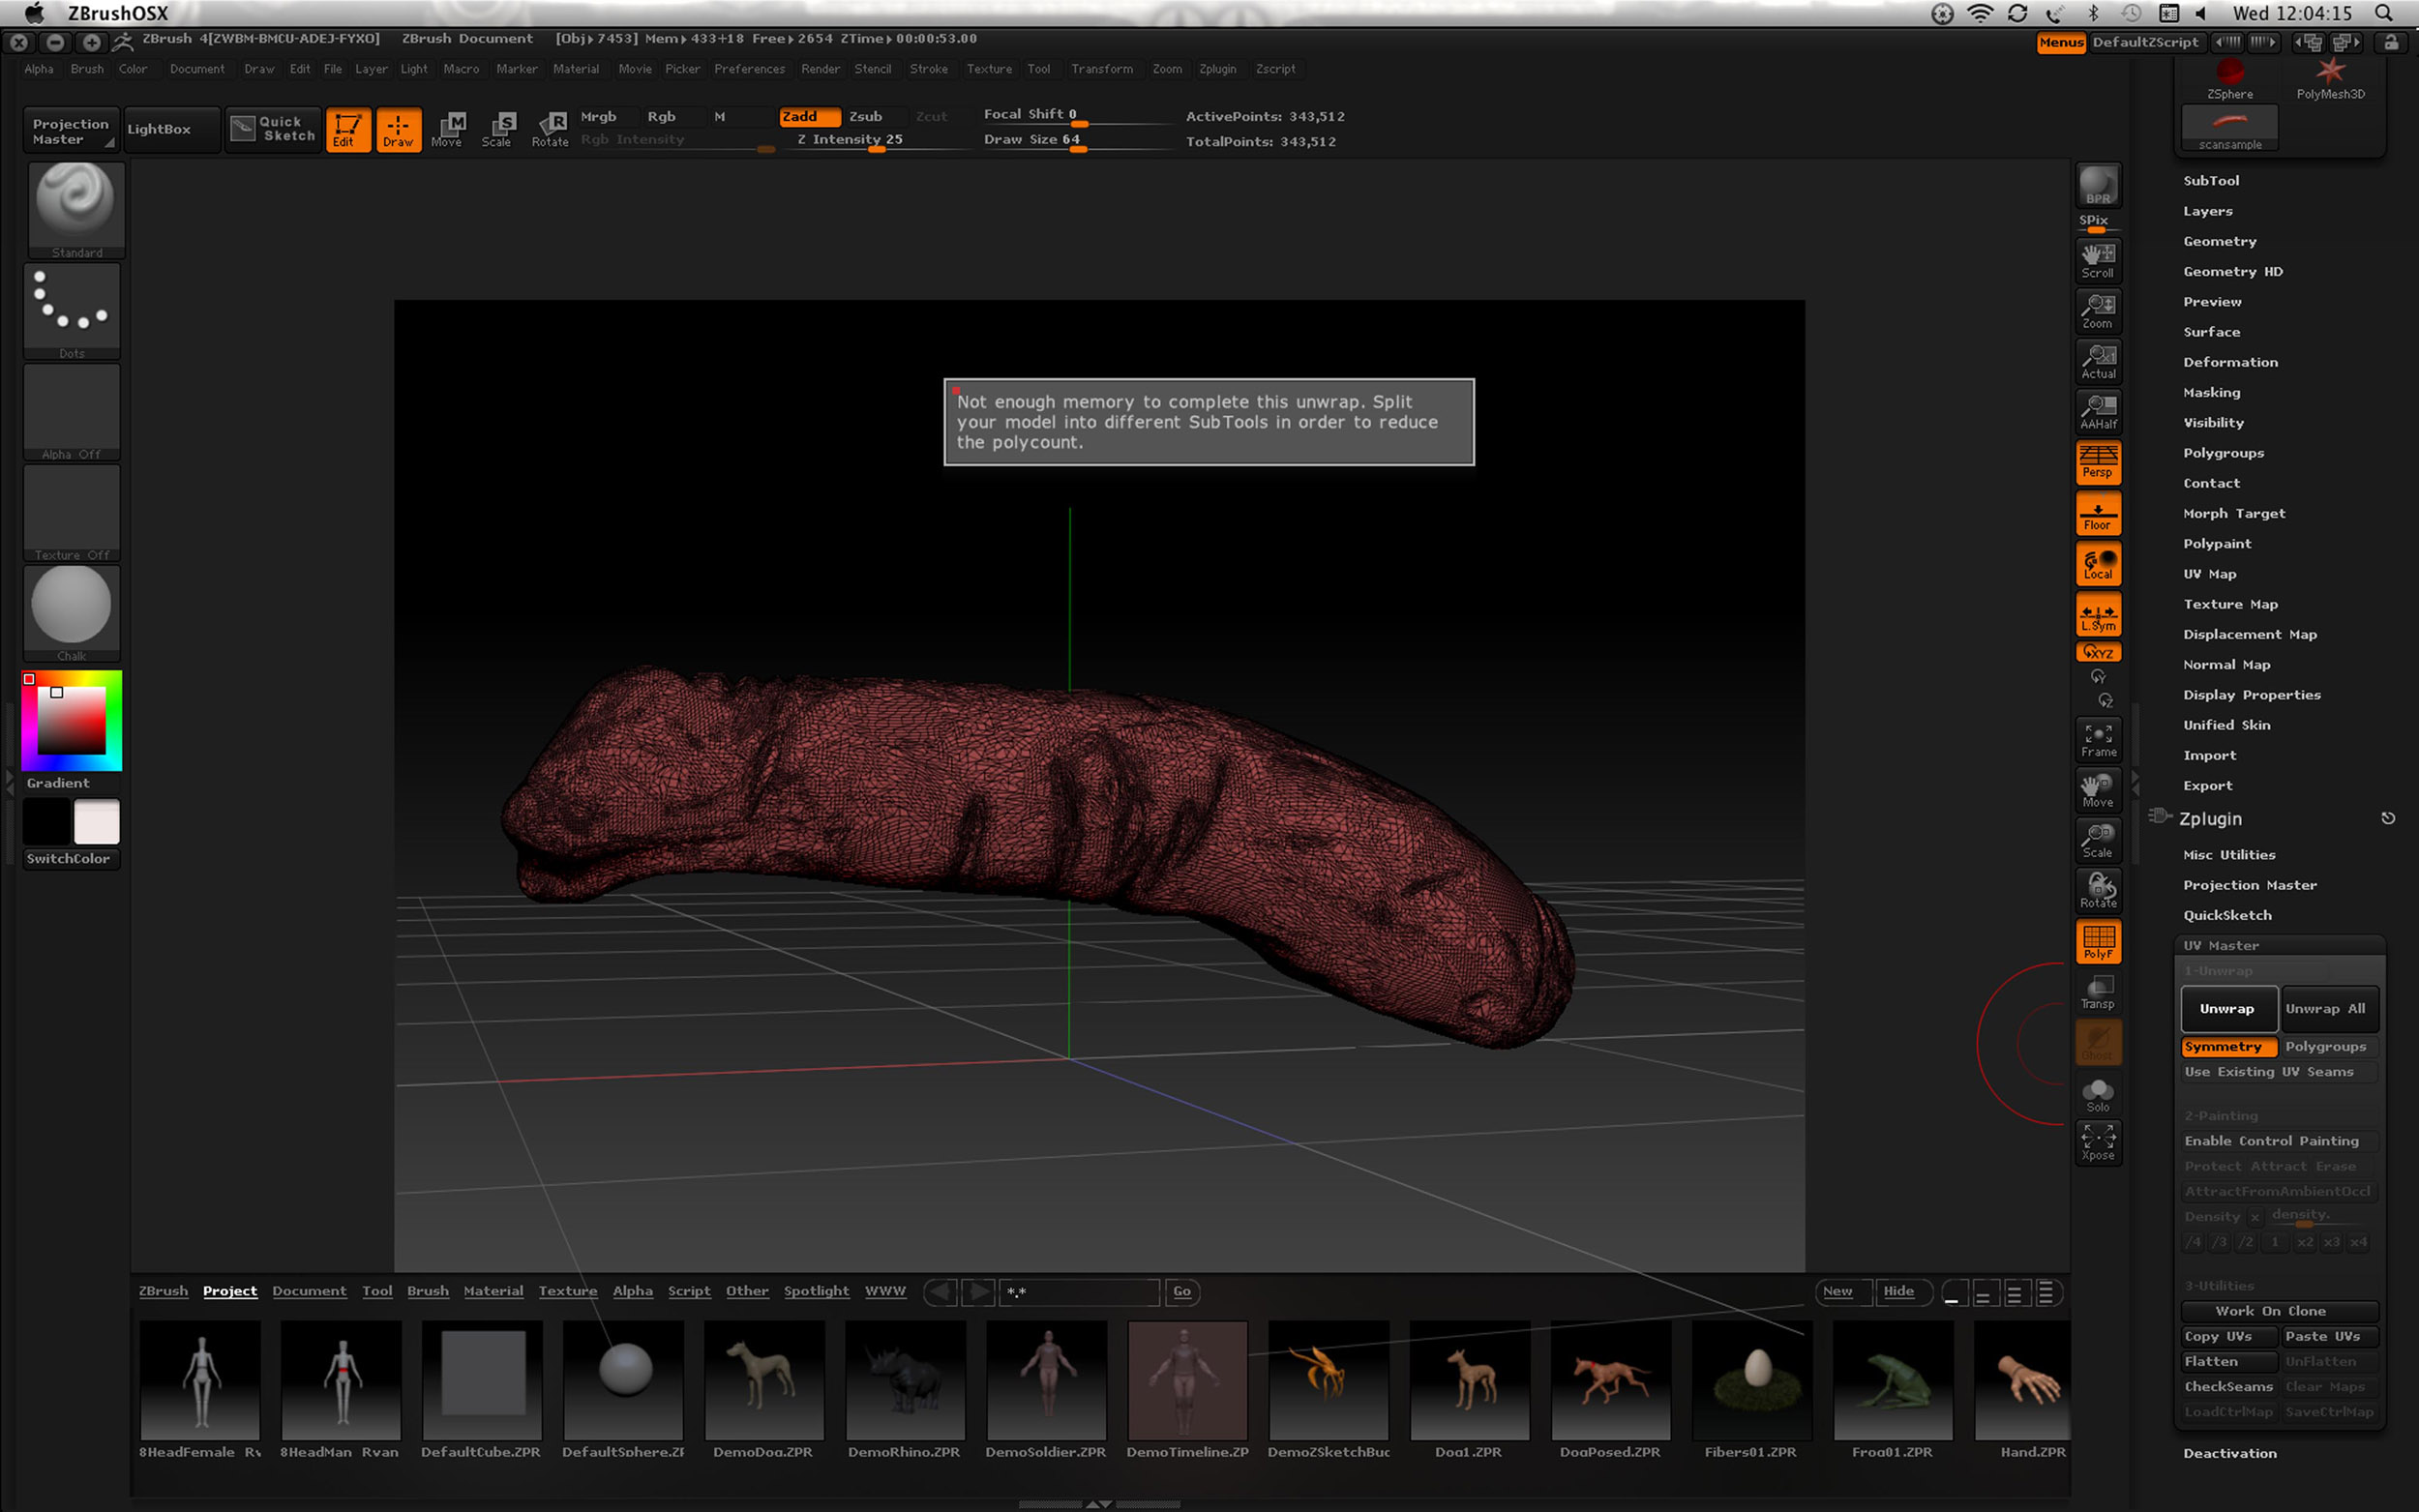
I got sent this leg as practise , and attempted the unwrapping of it with UV master, but got the following errors on these screenshots…at first I though the model’s polycount was too high but then I unwrapped another full model with way more polys than this one, no problem…
when attempting the unwrap it seems to read the polycount of the model (114504) as individual polygroups! and thus gives me the error…
This file was sent from a program using point clouds, that’s why, so thanks anyway I cleared it up…
Hi marcus, could you please tell me how to work the deformation>inflat slider? I am running into trouble controlling it and I can’t seem to slide it lower that -8, even if I type in the value -5, it seems like nothings happening…
Thank you again
The sliders can be difficult to adjust using a mouse/pen, especially small values. Click on the slider to select it then enter a value from the keyboard. To get the value to ‘take’, press the TAB or ENTER key.
With your mesh problems, you may find that it is worthwhile doing new topology. This will mean that the UVs are much easier to generate and control and give you an even mesh for subdivision and deformation. You can transfer the detail from your imported mesh using the Project All function.
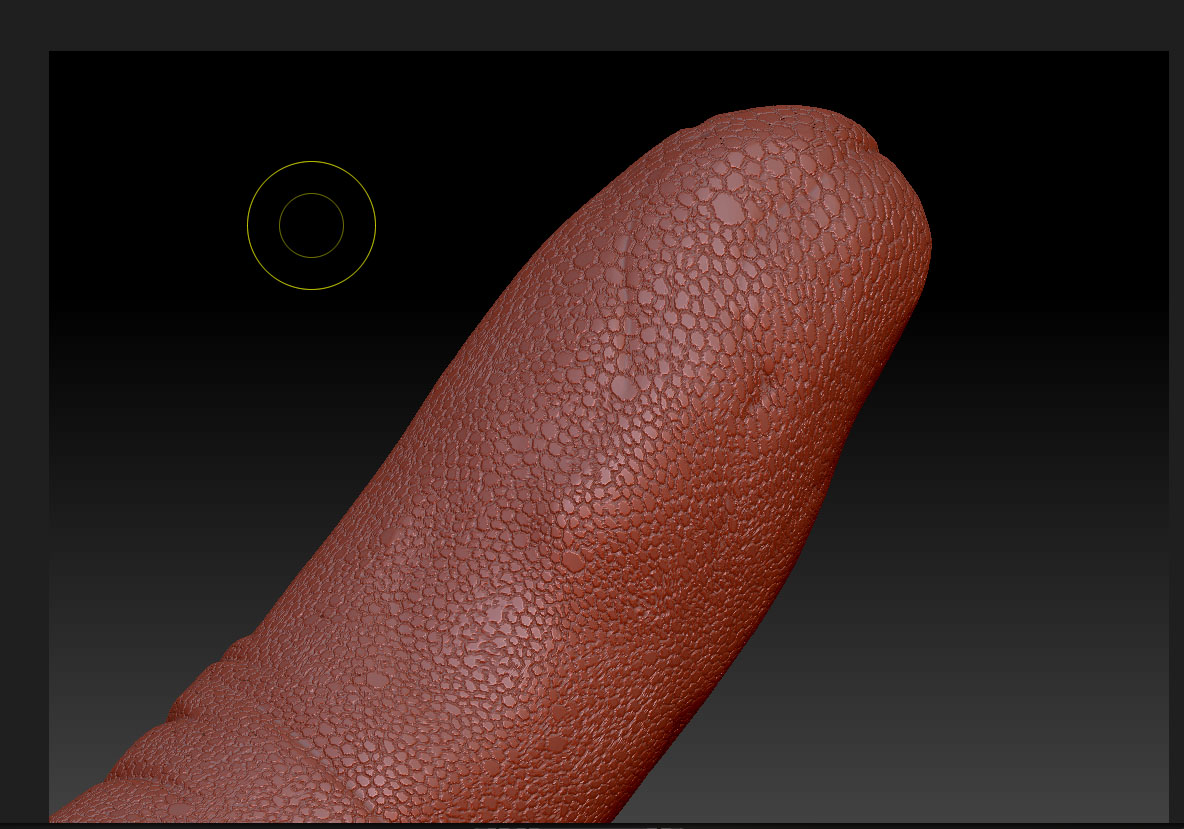
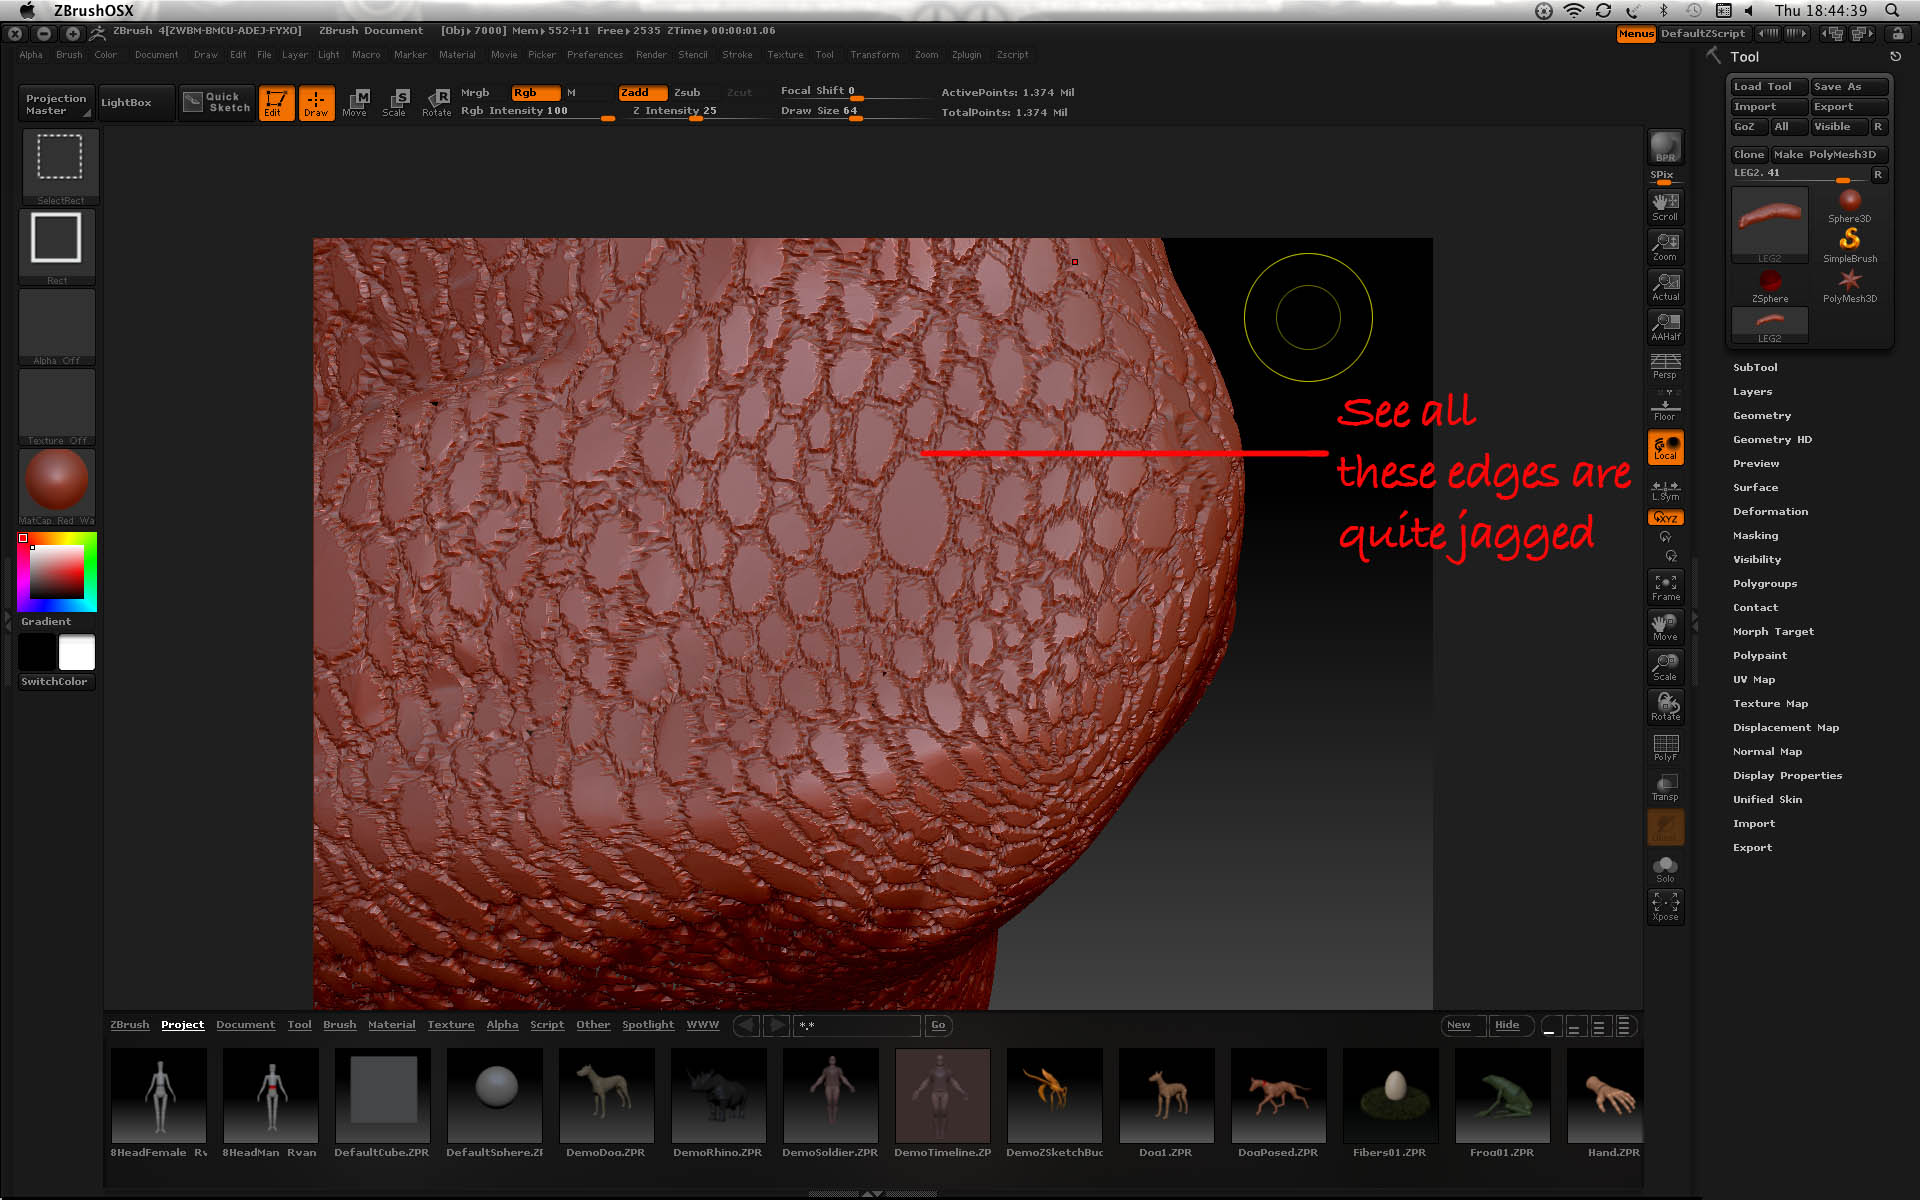
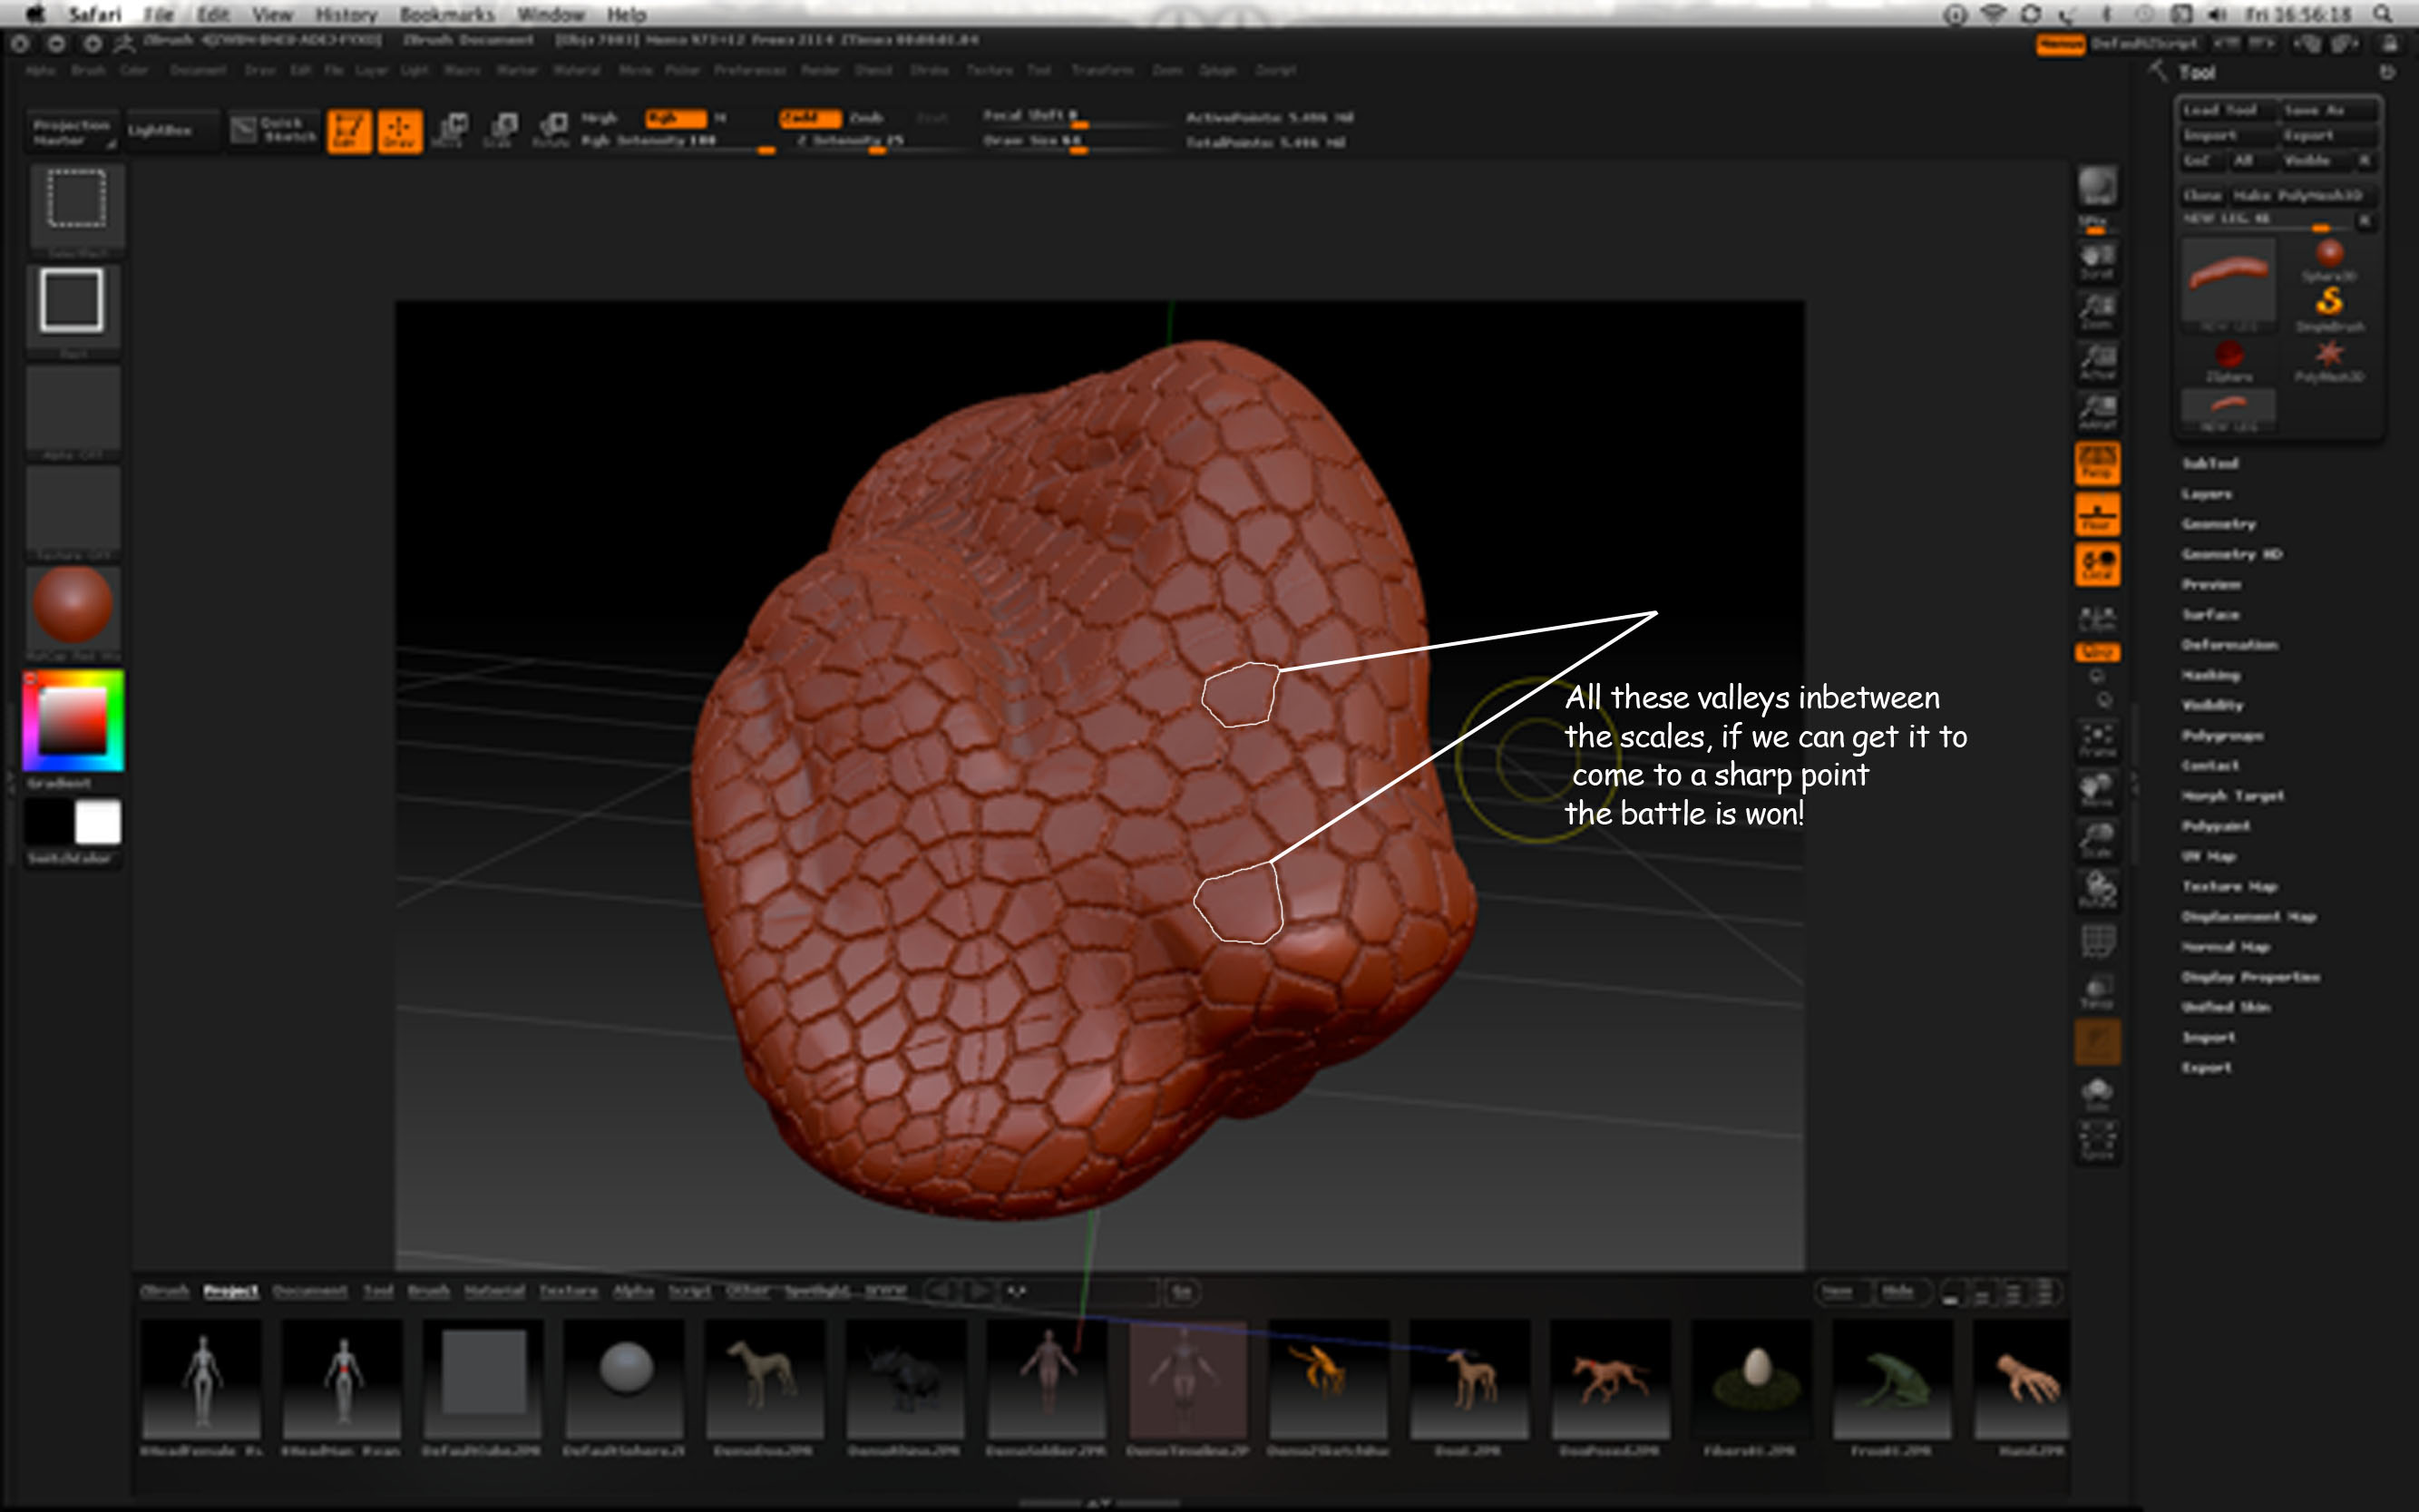
Hi Marcus, thanks a mill I tried the slider thingy u suggested and it worked great thanks mate…I sent the milling lads off a file I did that texture wrap on (see screenshot) and they were quite happy…one small glitch though the peaks and valleys of the scales look a bit jaggedy (even with some subdivision) and we are just concerned that it won’t come out smoothly when milled…Could this be because the tile I created in PSD was a jpg and was very small (256X256 pixels) should I rather do a vector in Photoshop or something?
Looks good! 
Using a jpg is not ideal because there may be loss of quality. You need your texture to be as crisp as possible. But more subdivision may also help. You’ll have to experiment - there’s no ‘one size fits all’ - it’s a case of balancing texture resolution and mesh resolution.
thanks Marcus, yeah i am gonna do a vector of that scale geometry now and try and make it as smooth as possible…should I rather save the tile pattern as another extension rather than jpeg? psd maybe?
PSD is the best.
RE: “With your mesh problems, you may find that it is worthwhile doing new topology. This will mean that the UVs are much easier to generate and control and give you an even mesh for subdivision and deformation. You can transfer the detail from your imported mesh using the Project All function.”
could you tell me a bit more about how the above works please Marcus? I have been subdividing like mad, but now my memory is suffering and everything sloooows dooown. Also is there away to create a vector texture tile in maybe adobe illustrator? maybe just to get smoother lines…
thanks!
Hi again Marcus / all
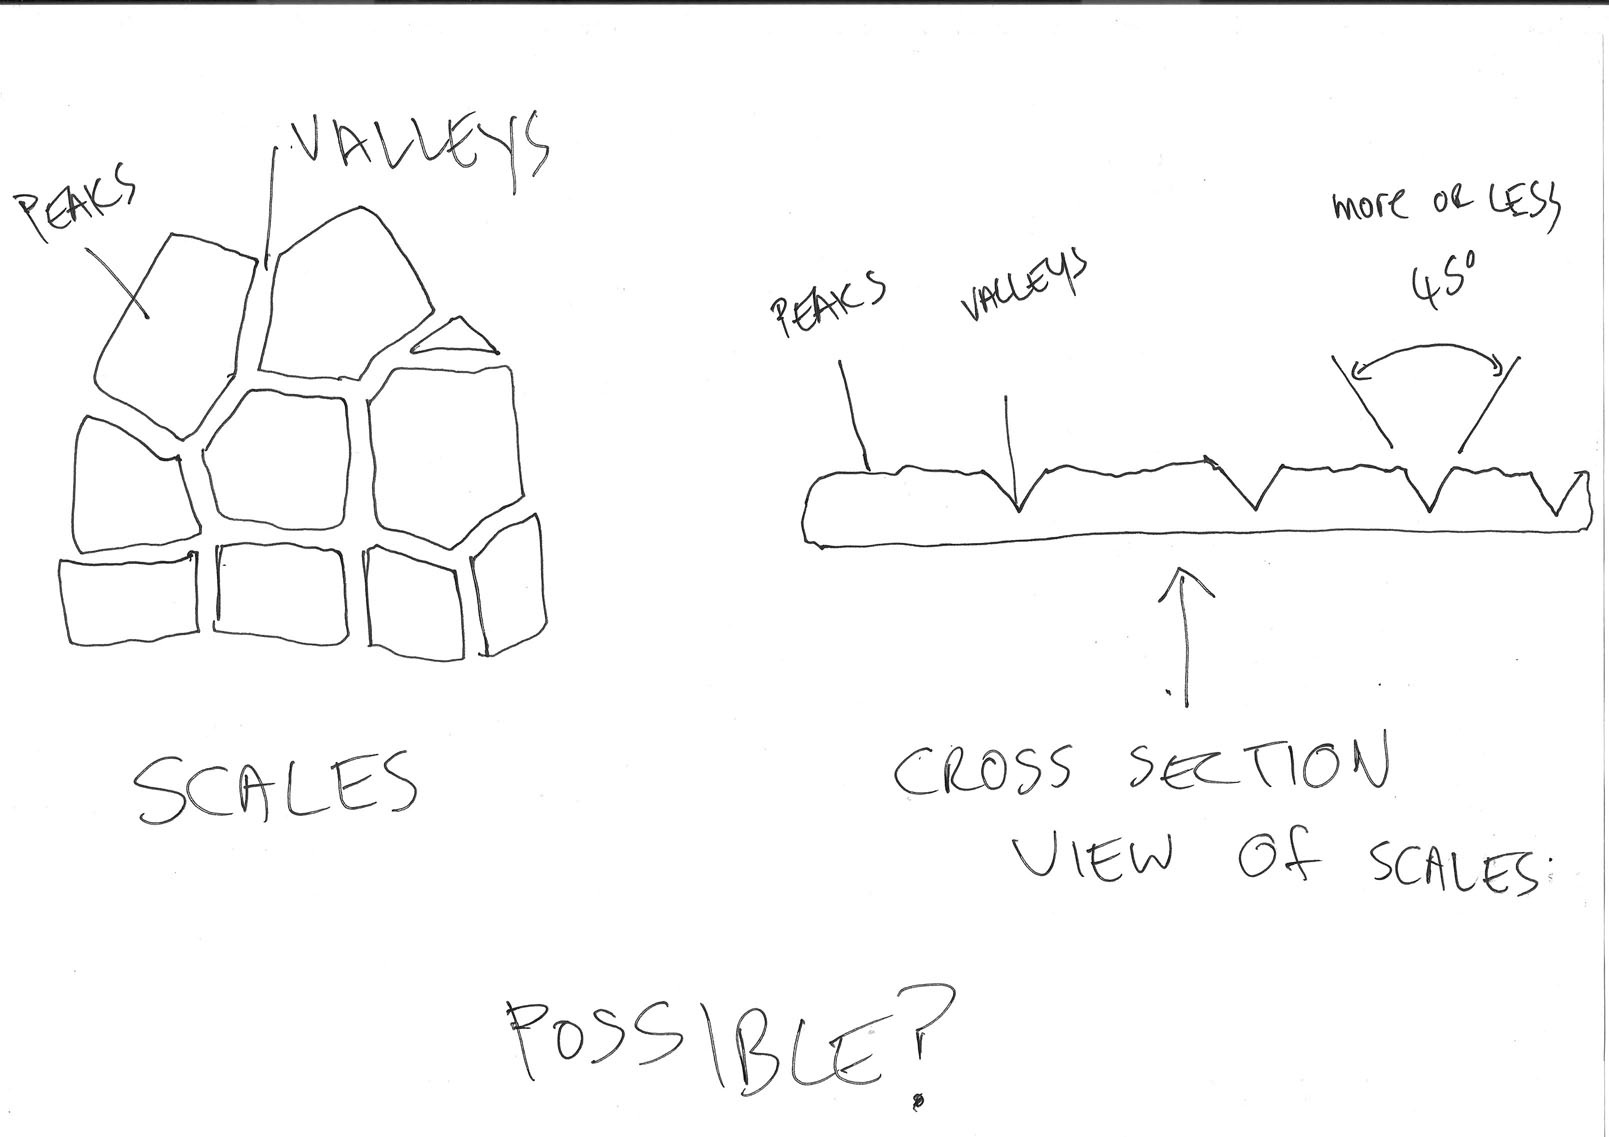
Attached please see the texture which is finally done, Thanks for all your help! I have one more question though, If ya don’t mind: In the image - specifically the peaks and valleys of the scales - would there be any way ( tool or brush or anything) to get the “valley” of the scale to look like the 2nd “DIAGRAM” picture attached here? See we are gonna be milling in the negative and if we can get the parts around the scales to a more or less 45 degree “indentation”…It would be awesome.
Thank you once again
On Topology:
If you were to create new topology for your model you could have a lower polygon mesh for creating UVs (making that easier) and a more even mesh for subdivision (so more even results). New topology would not remove the need for high subdivision in order to get the detail you need (and so wouldn’t help with any restrictions imposed by your system).
http://www.pixologic.com/docs/index.php/Topology
On peaks/valleys:
It would be difficult to get exactly what you are after. Ideally the texture you use to define the scales would not be pure white and black but have a gradient from white for the peaks to black at the lowest point of the valleys. However, that would be time-consuming to do I think.
Using as large a texture map as your system can handle will help, as will making sure that the subdivision is high enough to support the detail. The larger the texture map the small the pixels in relation to your model, so the smoother the results.
Also you can blur the mask before you do the inflate deformation - that will create a much smoother result, although the boundaries will not be sharp. Press Tool>Masking>Blur Mask one or two times after doing the Mask by Intensity.
Hi Marcus
Thanks a million once again, for your reply. Yeah everybodys happy with the results of the texturing, now it’s just a question of those damn valleys:)! I am quite interested in what you wrote here- “…texture you use to define the scales would not be pure white and black but have a gradient from white for the peaks to black at the lowest point of the valleys. However, that would be time-consuming to do I think”
Did you mean taking the black and white line drawing texture I had originally and putting a gradient on them or maybe colouring the peaks white and the valleys black? could you please explain this to me?
I don’t mind if it’s time consuming, if it’ll work I’ll do it!
Thanks

This is what I was meaning. The image shows the difference. However, I don’t think that the results will really justify the work involved. You are likely to get jsut as good results by blurring the mask in ZBrush.
Incidentally, I found that using Inflat Balloon with a small negative value produced a V shaped valley (though a little rounded). Also if you blur the mask then sharpen you can get rid of any noise introduced by the pixels of the texture, if the pixels are large compared to mesh density.
HTH,
Cool, I’ll give it a shot Marcus…So just the workflow re-cap:
. Imported map into ZBrush and applied to model.
. Divided model so that there was a good number of polygons then pressed
Tool>Masking>Mask by Intensity. Inverted Mask.
. Press Tool>masking>blur mask (1 or 2 times)
. Turned off View Mask and turned off Texture Map>Texture On.
. Tool>Deformation>Inflat set to -5.
. Deformation>Inflat balloon with a small neg value
You don’t need Inflat and Inflat balloon - it’s one or the other.

