I like where this is going. looks like it could be something out of a tim burton movie 
@hendrik F Hey thanks man Tim Burton is the reason I got into art back when I was a little kid, so that’s a huge compliment! I always look look back to your sketchbook to get some inspiration on getting really clean lines and creative designs too by the way, great stuff!
Hopefully I’ll have a bigger update tomorrow, I’ve been pushing myself to see it through to the end and not scrap it and start something new.
hehe, thanks man
I would like to see your tree in a nice render. maybe you could play a little with the BPR and add some AO, depth and some nice lighting. I do that sometimes to give my motivation a little kick, when no end is in sight, just to see how it may look once it’s done.
Does anybody have any tips on how to go about texturing it? I plan on rendering in Zbrush and can’t find any matcaps suitable to start painting on that don’t totally hide the details of the tree, and when I tried texturing it with images it just turned out horribly 
The zsphere base I made to start sculpting from. Ohhh the hours I put into this thing, haha… :o 
Very cool tree!!!
I have run into this problem in trying to create something grand with lots of geometry only to find that my machine cannot handle the subdivisions. I have settled for trees with less branches and try to focus on style. One thing that I’d be willing to try in this scenario is once you are comfortable with the details you can get at this subdivision maybe try HD sub-d to push it further. I know that you can render HD now, so you might get lucky. Don’t forget to back up your model before you try though.
Another thing that I have learned is that if you create multiple subtools you can explore more details and sub-d’s per subtool. So, if you create the center section of the tree as the main tool and all of the branch sections as separate subtools you can get better results. If you are going for the illustrative approach then that might the way to go.
Using Clay Tubes or Clay Build up brushes with long strokes in the volume section of the tree and to create wrinkles for the separation of the branches makes a cool effect. After you can use the Slash1 brush to add depth between the Clay strokes. To texture I would Mask Cavity and paint various lighter browns, grays and reds and then invert mask to paint crevices with darker browns and maybe some greens.
Just an idea.
@remvc8 thanks for your suggestion  I checked out your tree-face sculpts and they looked really cool man. I took your advice and started messing around with the cavity masking settings a little to get some moss-like painting going. Just a test so far but let me know what you guys think! I think it’s looking okay, not great though. And I can’t seem to get a proper fitting material for the tree

Also, anybody know of any really good Zbrush 4 lighting tutorials? I feel like all my renders are starting to look the same with the same light position and render settings :x
edit: sorry for taking up a second spot on the bottom row, I forgot the other image was still there :o
really nice tree there…
and i dont even want to think about the time spent pulling out all those tiny zspheres…
but one litlle critique: i liked it better when it didnt stand on something. without the plate or the little hill it has a more symbolic quality. and i like that more then the graveyard-scene.
i could even imagine the tree on an amulet or belt-buckle.
keep it up, good work!
edit/afterthought: you only show one perspective of it. it is hard to tell how deep it is - maybe thats why i perceive it as being “flat”?
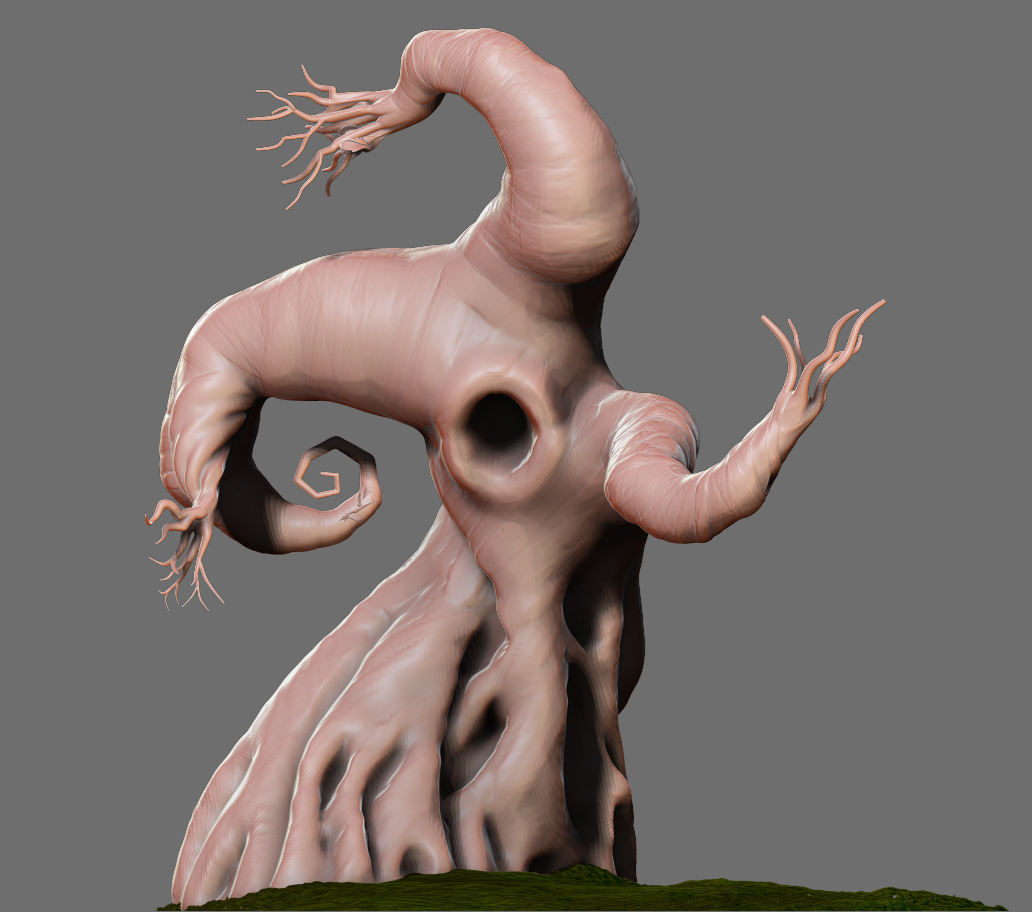
Hey guys, big-ish update from me here. I decided to take the scene in a little bit of a different direction. I agree that the tree was a little out of place with a more simple scene like that, so I decided to revamp it and start on a new less complex but just as spooky tree. I’d like to eventually print this scene and hand paint it once the tree is worked on and the rest is done. C&C would be much appreciated

Closeup of the start of the fence statues. The bricks took awhile but were really fun to paint and sculpt!

I think I’m finally making some progress not sure where to go from here on the tree though as far as detailing the upper half. Hope you guys like it so far

Very nice tree and so much to learn from this thread. I’ll tray today @remcv8 wrinkles tips on my tree that I started doing yesterday.
http://dl.dropbox.com/u/25774322/3h.jpg
Can’t wait to see the final scene.
@slowiak thank you let me know if you have any questions. It’s been a really long process so far but I’m learning a lot from it. Yours is looking good so far
Update from me, not sure where to go with the upper half now:

Finishing up some of the environmental stuff that’s going to be in the scene, and a small update of the tree also. Hopefully somebody can offer some comments or criticisms as I feel like I’m not really sure where to go next.

Attachments
I would love to see a face on this tree, eyes,nose, mouth. I’m not sure what’s your plans tho.
thats really cool bro! my question for you looking at your progress is I how did you give the whole tree that initial gentle twist in one of the first shots? 
@idlemind thanks man!
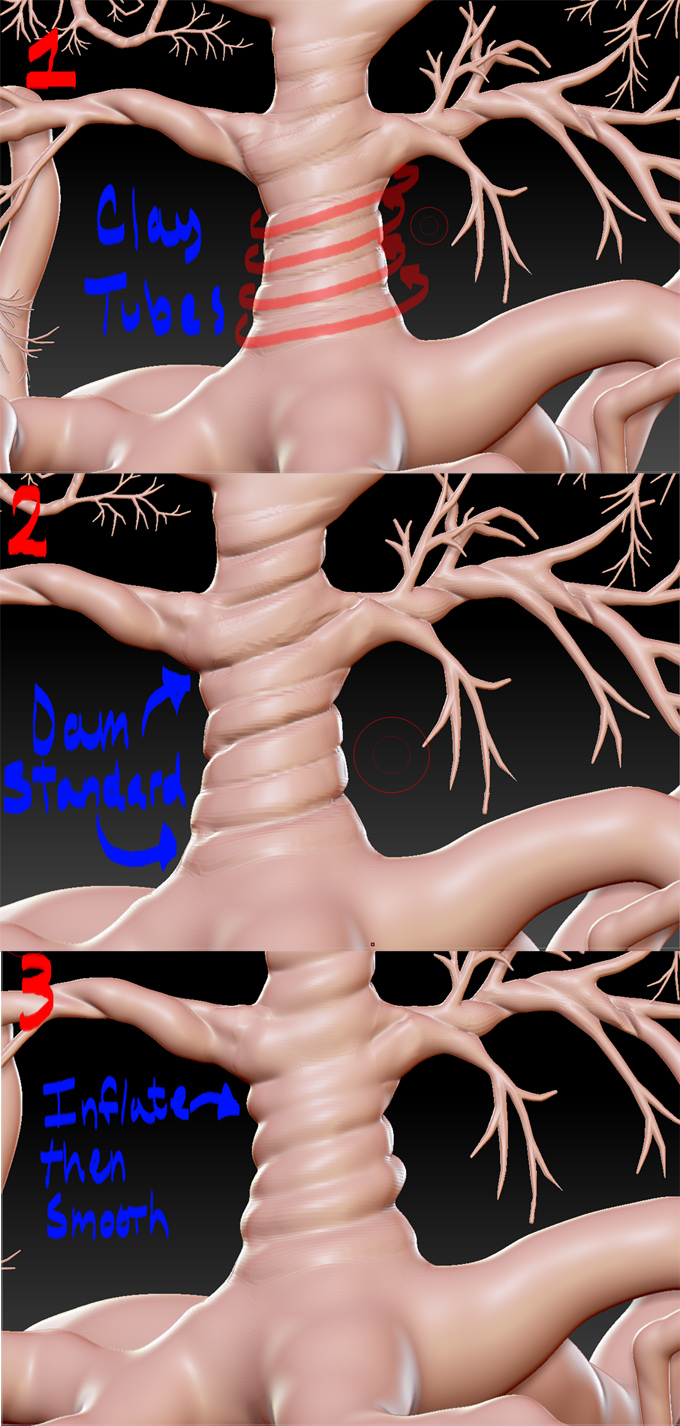
how I got the twisting was actually quite a long manual process, though I’m sure there are more simple ways in other packages. What I did was take the Clay Tubes brush to create a rough pathway for all of the twisting, then I took the Dam Standard brush with a slightly lowered intensity and traced the outsides of that pathway to create grooves. After that I smoothed inbetween the Dam Standard strokes to make it much cleaner and more subtle, and then used the Inflate brush with a very low intensity, around maybe 6 or so to puff up between the grooves. Hope that was clear enough, I’ll add some pictures a little later explaining the process better if necessary
Sorry it’s so quick and dirty, I only have an old file of this version of the tree so the topology is terrible :o
Hope it helps!
Attachments
Alright, I see thanks alot. I was just thinking if there was a way to do that with sliders and buttons I needed to know that! Your short tutorial there still taught me something. that was much appreciated. adding that little twist to the mesh at exactly that point in your process was a very cool move.
This is some really great tree work. creepy but approachable
I modeled a tree not long ago and I had the same problem as you do.
This is caused because ZSpheres have 8 divisions along their diameter no matter how big or small they are - so basically your stump has as many divisions along it’s diameter as the tiny branches do.
One thing you could do is go out of ZBrush to a polygonal modeling kit like Maya or Max or XSI, and maybe build the base mesh there. You could also import a ZSphere base mesh with only the larger parts (stump, main branches), and use extruding in maya/max/xsi to make the smaller ones. This should work, but it requires more software.
If you want to resolve this in ZBrush, what I recommend is using Remesh.
You can use Remesh on your existing tree, with all the details, and then project the details on the resulting mesh. You can also use unified skin instead of adaptive skin on your ZSphere model, which is what I would do, since projecting so much detail will probably just explode your mesh.
This is how I resolved the issue with my tree (unified skin, and then add detail). But keep in mind that in case you ever want to animate it, it won’t work. For that you’ll have to make a proper basemesh. A unified skin is a great mesh to sculpt on, but nothing else.
Hope this helps you in any way. Good luck!