A Brave New “Digital” World" <O:p</O:p
A traditional commercial sculptor point of view of the digital madness
<O:p</O:p
Ok my amigos - as probably most of you know - the digital world is upon us. As time goes by, more and more collectible/action figures companies are using the new technologies to do what until a few years back was done by hand. Now a day DCDirect, Mcfarlane toys, Sideshow toys, Hasbro, Bowen Designs to name a few are incorporating “digital” sculptors to their lines. Why? Well because is faster, art directors friendly when it comes to modifications; because of the use of the original movie models to get accuracy and so and so. And as the 3D printers evolve, it is getting cheaper and even faster and faster. And time is money! And Zbrush was, in my opnion the main reason allowing punks like me to get into this digital thing without any knowledge of 3D!
The path to the Dark Side!<O:p</O:p
I am a self taught sculptor; I have no artistic background…hell! I am a dentist! So when I decided to learn the digital way, I decided to do it on my own way! And the best way I found was to apply the same techniques <O:p</O:p
When doing a traditional full figure I started with a wire armature following a blue print of a human skeleton– zspheres with image planes –; and after that I gave the pose to the figure – moving and scaling the zspheres - . Then I covered the armature with epoxy to get the basic shapes and volumes – zspheres in zsketch mode with zsketch 3 or C brush - . With the drill and sanding papers I smoothed the main shape – unified skin, couple of subdivisons up and smooth brush -. Then came the anatomy; I used to draw with a pencil where the muscles supposed to be over the epoxy figure – fill with white color and in rgb mode just draw the lines over the mesh – and with the drill I just carved those lines – slash 3 brush, stroke with mouse Avg at 8, no lazy mouse and zintensity of 12-20 – a little sanding with sandpapers and a thin layer of fresh epoxy as a skin to cover the muscles and to smooth the piece– different setting of smooth brush, smooth peeks, smooth valleys and sometimes pinch brush - . Once epoxy settled, I added material where it was needed – standard brush, inflate brush, soft form brush, clay brush –; and more sanding with sand papers or drill – smooth brushes - . There it was, the figure had pose and anatomy; time to do the cuts and keys for molding and casting purposes and also to get to those hard to reach areas. With a pencil, I used to draw the cut lines and cut the pieces with a saw – if you are too picky, retopo the model keeping in mind where you or the print shop could do the cuts, and separate the mesh in polygroups <O:p</O:p
For accessories I could do some kitbash from hardware stuff, other sculpted pieces I did or everything I could use to get the shapes or effect I wanted – use of 3d scanned meshes, parts of other meshes, modified primitives, etc - . For suits or cowls, a thin layer of epoxy applied over the main figure would do the job – extract mesh following the retopo lines to get sharp edges for the new subtool or drawing new topology and adaptive skin to get a new subtool - . The final touches were done by adding thin tubes of epoxy for wrinkles or veins and smoothed with alcohol or water – different brushes with different settings and alphas, plus smooth brush touches – and to do the textures I just used stamps of silicon pushed into the fresh epoxy layers – alphas, stencils and brushes - . The piece was ready!!!<O:p</O:p
But - yes there is always a but – there were a lot of things in this digital world that got me lost: UV maps, displacement maps, normal maps, middle earth maps, topology, retopology, hypertopology, etc etc. Thanks to the help of those same guys that inspired me to do the jump plus the incredible help of Michael Pavlovich I was able to understand a little more this brave new world. Thing is modeling or sculpting or designing or zbrushing – or whatever you would like to call it – for animation, character design, Fx, illustration or rapid prototyping is not the same, and what is good for one field could be extremely bad for the other. Also, you have to consider the print shop needs or specifications, some of them will ask you for a decimated single obj, for several objs not decimated, the ztl, etc, etc, etc. And you have to consider also it is not the same to do a mesh for a single print than a mesh that it is gonna be used as a Master for molding, casting and mass production.<O:p</O:p
The Water-tight effect: <O:p</O:p
According to Wikipedia, water-tight is “So tightly made that water cannot enter or escape” and this characteristic is the most important rule to follow when doing a piece for printing. To achieve it there are a few ways to do it…<O:p</O:p
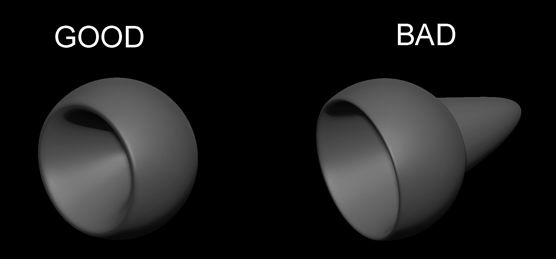
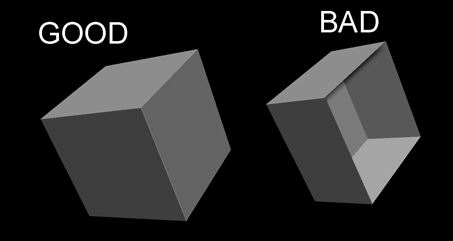
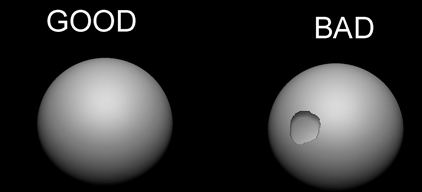
- No flipping of Normals: as the printer machine will go nuts with them. Of course there will be parts - mouth, eyes and armpits; and also back of the knee in a bent leg pose – that will be almost impossible to avoid. But you have to make sure you have as less intersection of the same mesh as possible. Of course, the guys at the print shop – most of the times – will be able to “sew” and correct it, but that implies more hour working, and it will be reflected in the final cost of the printing. Of course, always depends on the print shop policy
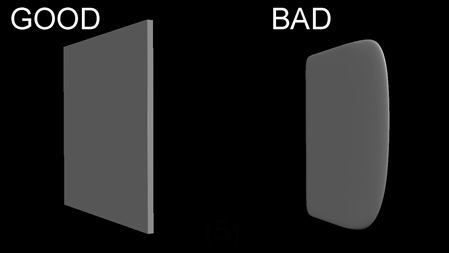
[font=Times New Roman]- Solids: you always work with solids. In illustration or game works most of the times this doesn’t matters, as the back part of let say armory won’t be seeing and it will take a lot of polygons when dividing. But you need that “back face” to have a solid. To reduce the number of polygons when dividing you can hide the back face and divide what you see; this will give you more polys in the sculpta-ble area and won’t increase them in the back.
- Subtools must intersect with each other. You have to make sure all the subtools aren’t “flying over” each other, they have to be immersed one in each other to avoid gaps or fracture lines. If they are not done this ways, subtools not intersected will fall when printing.
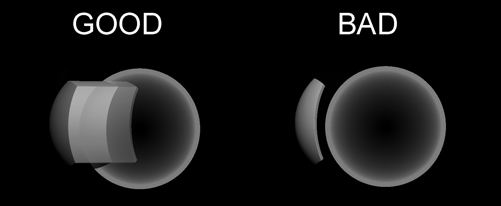
[font=Times New Roman]- When doing capes, hair or flying drapery, the mesh should have thickness, this way you will avoid the “No flipping of Normals” rule and the printer will have volume and mass to reproduce. If not, the machine will crash or it won’t print that part of the piece.
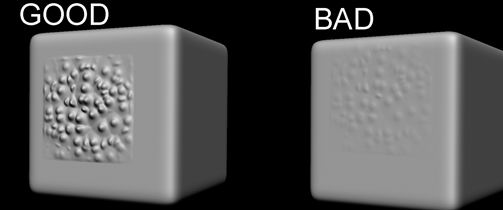
- Sculpt all the details and do them strong as you won’t have Uvs, the printed piece will have on it surface all the details you have sculpted, and keep in consideration you will loose details not only in the printing process but also in the molding and casting steps because of the silicon and the resin properties.
<O:p
Now, that was about the differences you need to take care when sculpting for printing, no matter if it is for a single piece or if it is for mass production. But there is a little more to have in consideration when modeling – or zbrushing as I like to call it – for mass production
<O:pNew materials and techniques, old tips
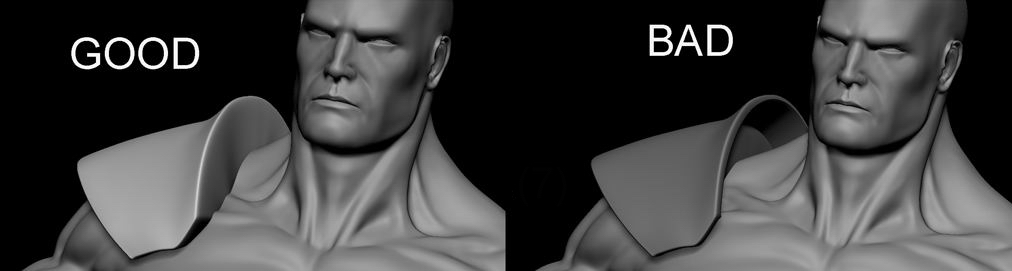
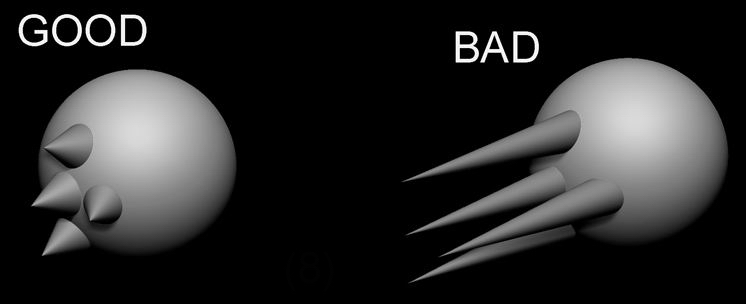
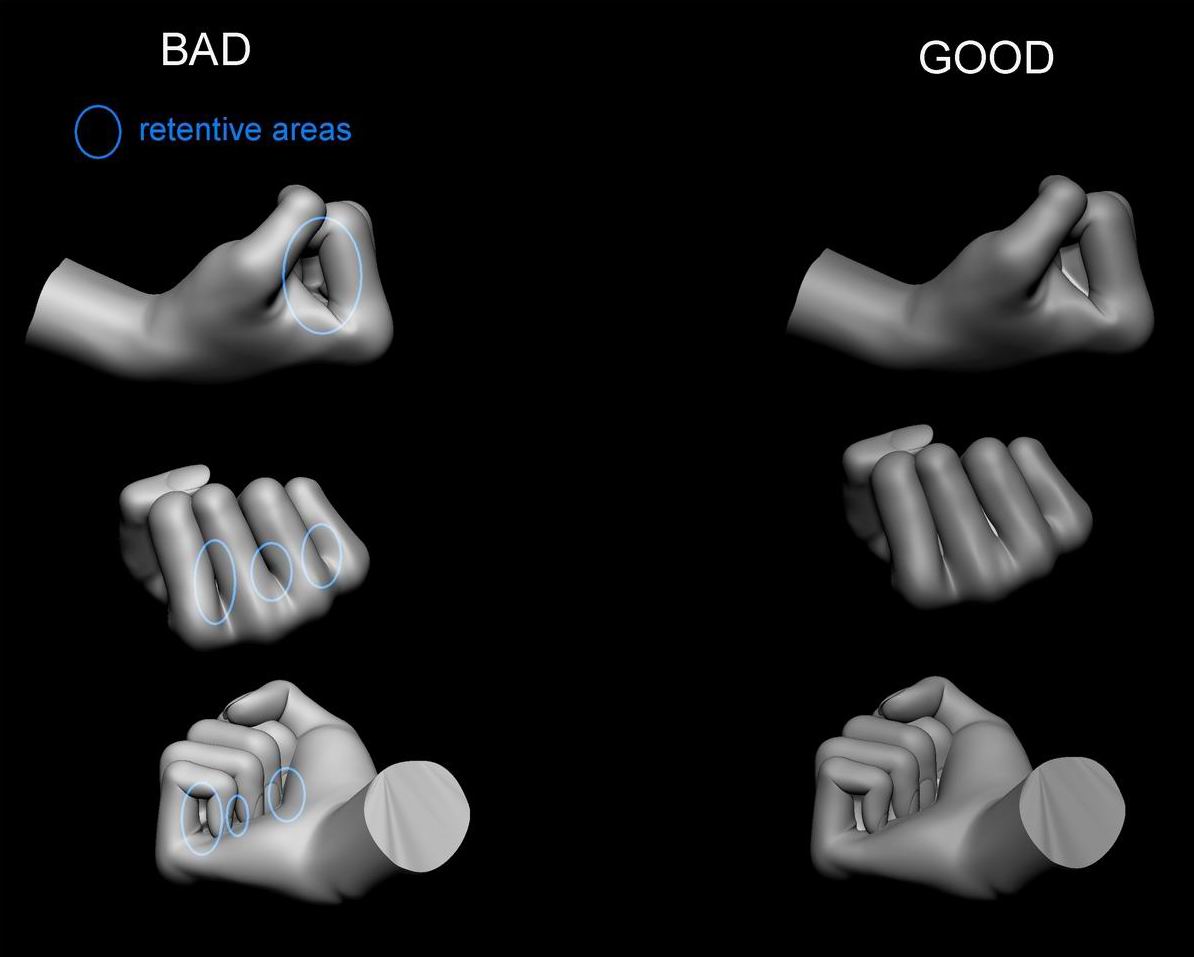
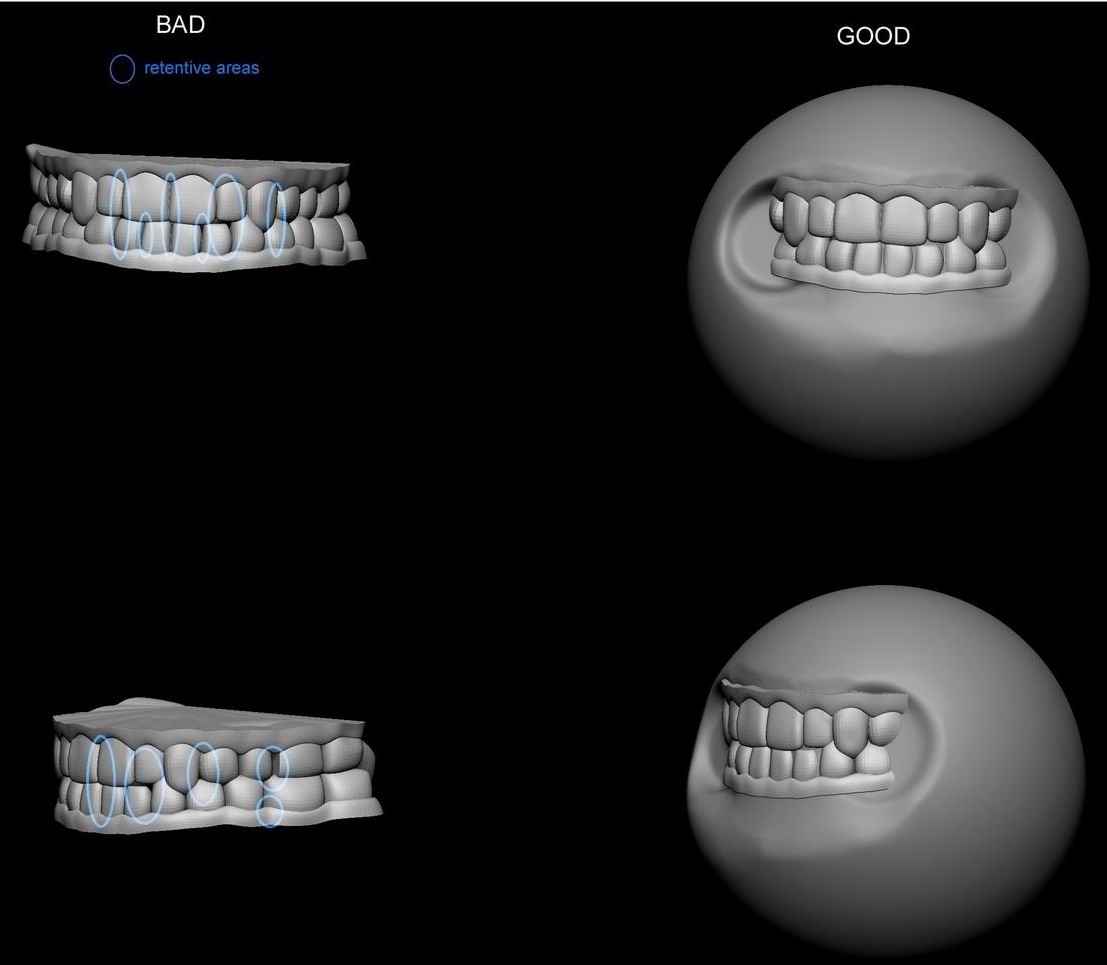
- Avoid retentive parts. This is something new, eh? Because when you have a physically sculpted piece you want to make a mold of it, you need to be care about cavities that will retain or grab the mold silicon material. Why? Because when you do the casting and you want to release the resin copy from the mold, those retentions will rip off and tear the silicon and all the hard work you did zbrushing – sculpting, modeling or whaetever – won’t be reproducible in the next casting.
-
No spikes, for the same reason of the relation between the mold-casting process, if you do spiky spikes, the resin copy will tear the silicon or will make the resin copy hard to release from the mold. This applies to all kind of ornamental or decorative motives.
</O:p</O:p
-
Thickness of the sculpture - same requirement for printing -. Because if the capes, hair or flying drapery are too thin, the resin material won’t fill the silicon mold when pouring and will retain air bubbles. You will end up with holes and gaps in the copy. Or it will be so thin that it will broke easily.
<O:p- Less pieces as possible. This is a cost relation, as much pieces, more molds of individual parts you will need. Do the pieces as thigh to the main body of the piece as you can.
-
The sculpture will be cut and keyed. For molding and casting purposes for mass production, all pieces will be cut in parts and will have interlocking keys. So you have to consider all of above said. This part is a little longer to explain and it will probably need its own tutorial. But there is a light at the end of the road because of the new “cutting” function of zb4.2
-
Filling retentive spaces. Now another good tip to avoid “retentive” areas would be to fill them in with another solid. Take for example a closed hand, you can see there are “empty spaces” between the fingers, so you can grab a zspehere - for example -, and scale it and position it to “fit into” the hand and shape it to fill those spaces. Another good example could be teeth and gums. In both cases you can avoid those “spaces” by using zspehers – or whatever basic shape you are comfortable with – and “carve” or “sculpt” the shapes of the fist or the teeth and gums directly in the solid. It is only a matter of preferences. In my case I like to use a lot of subtools and then I “fill the retentive spaces” with other solids.
<O:p</O:p
<O:p
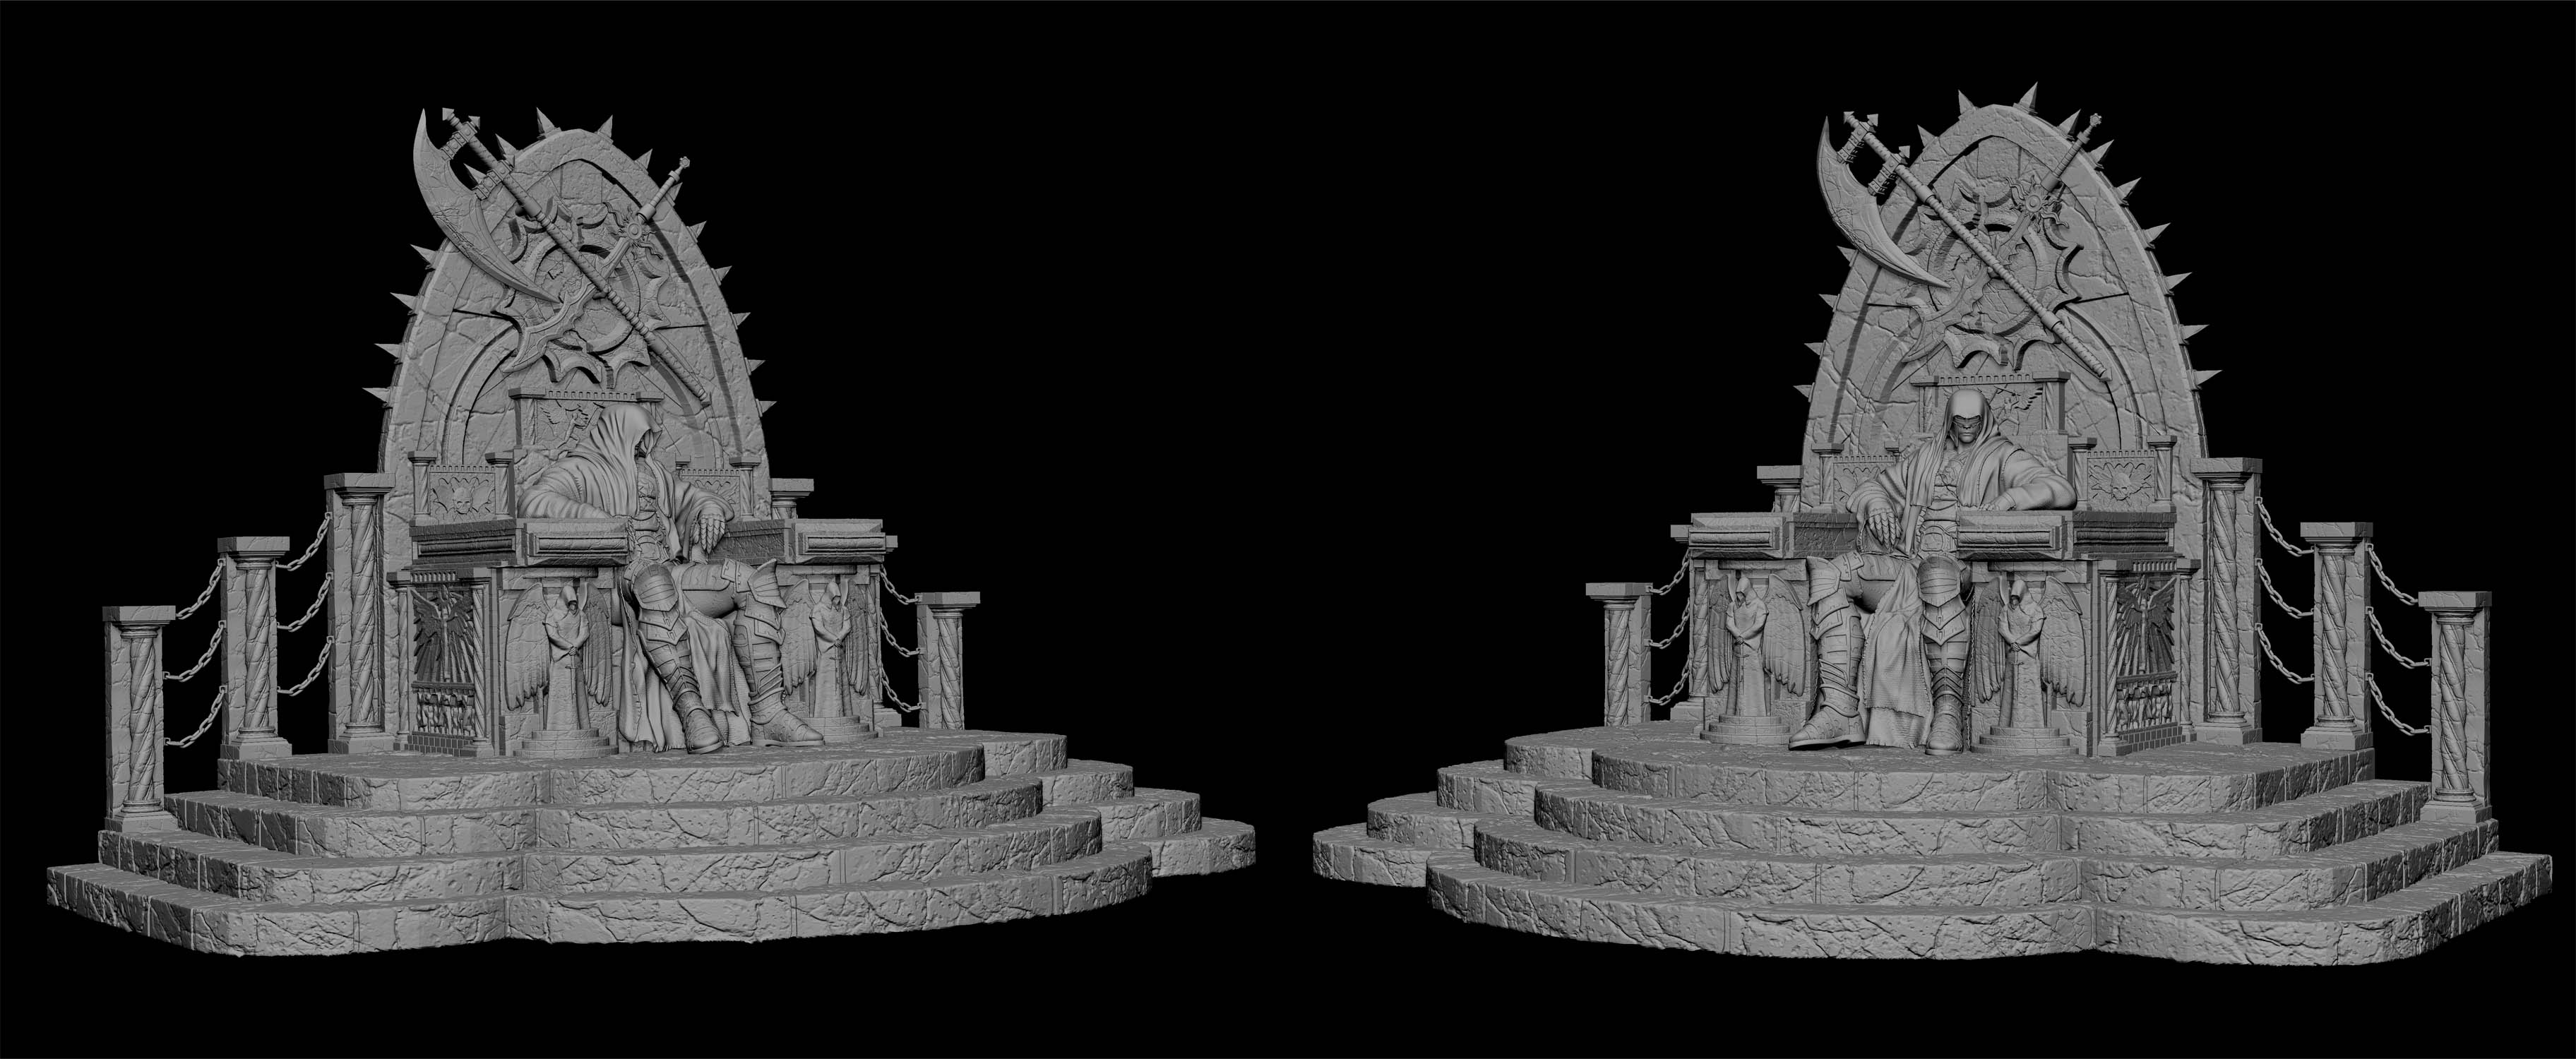
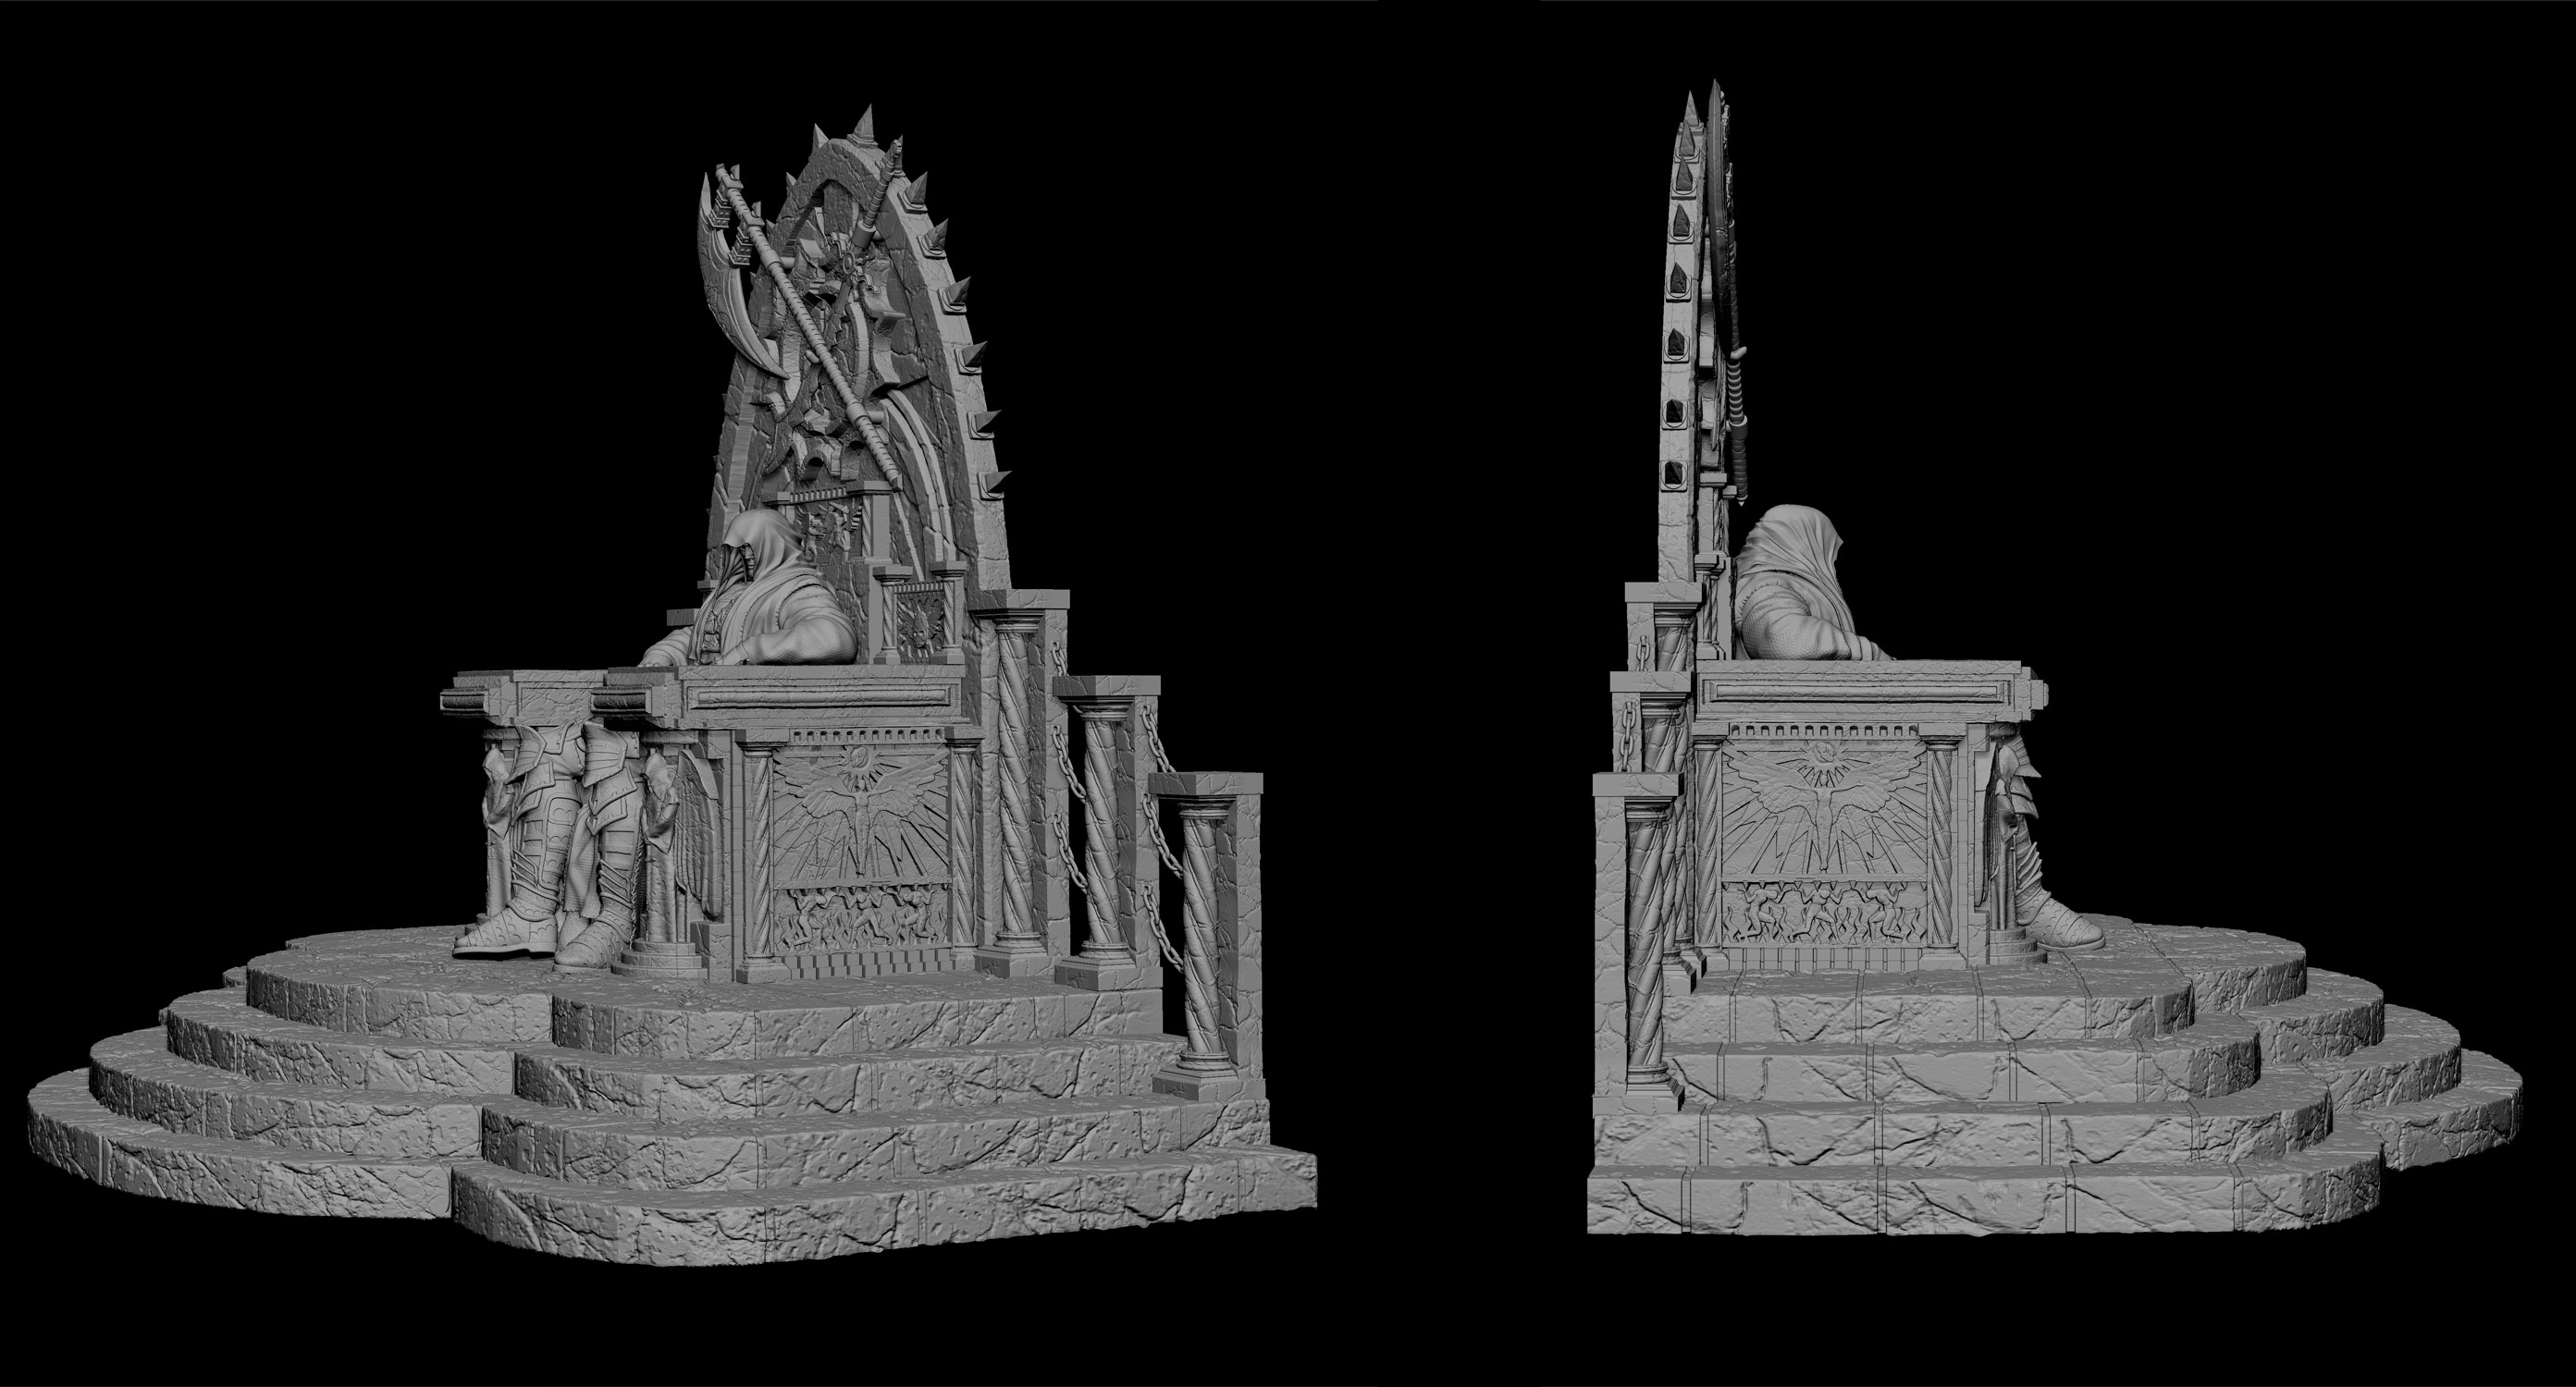
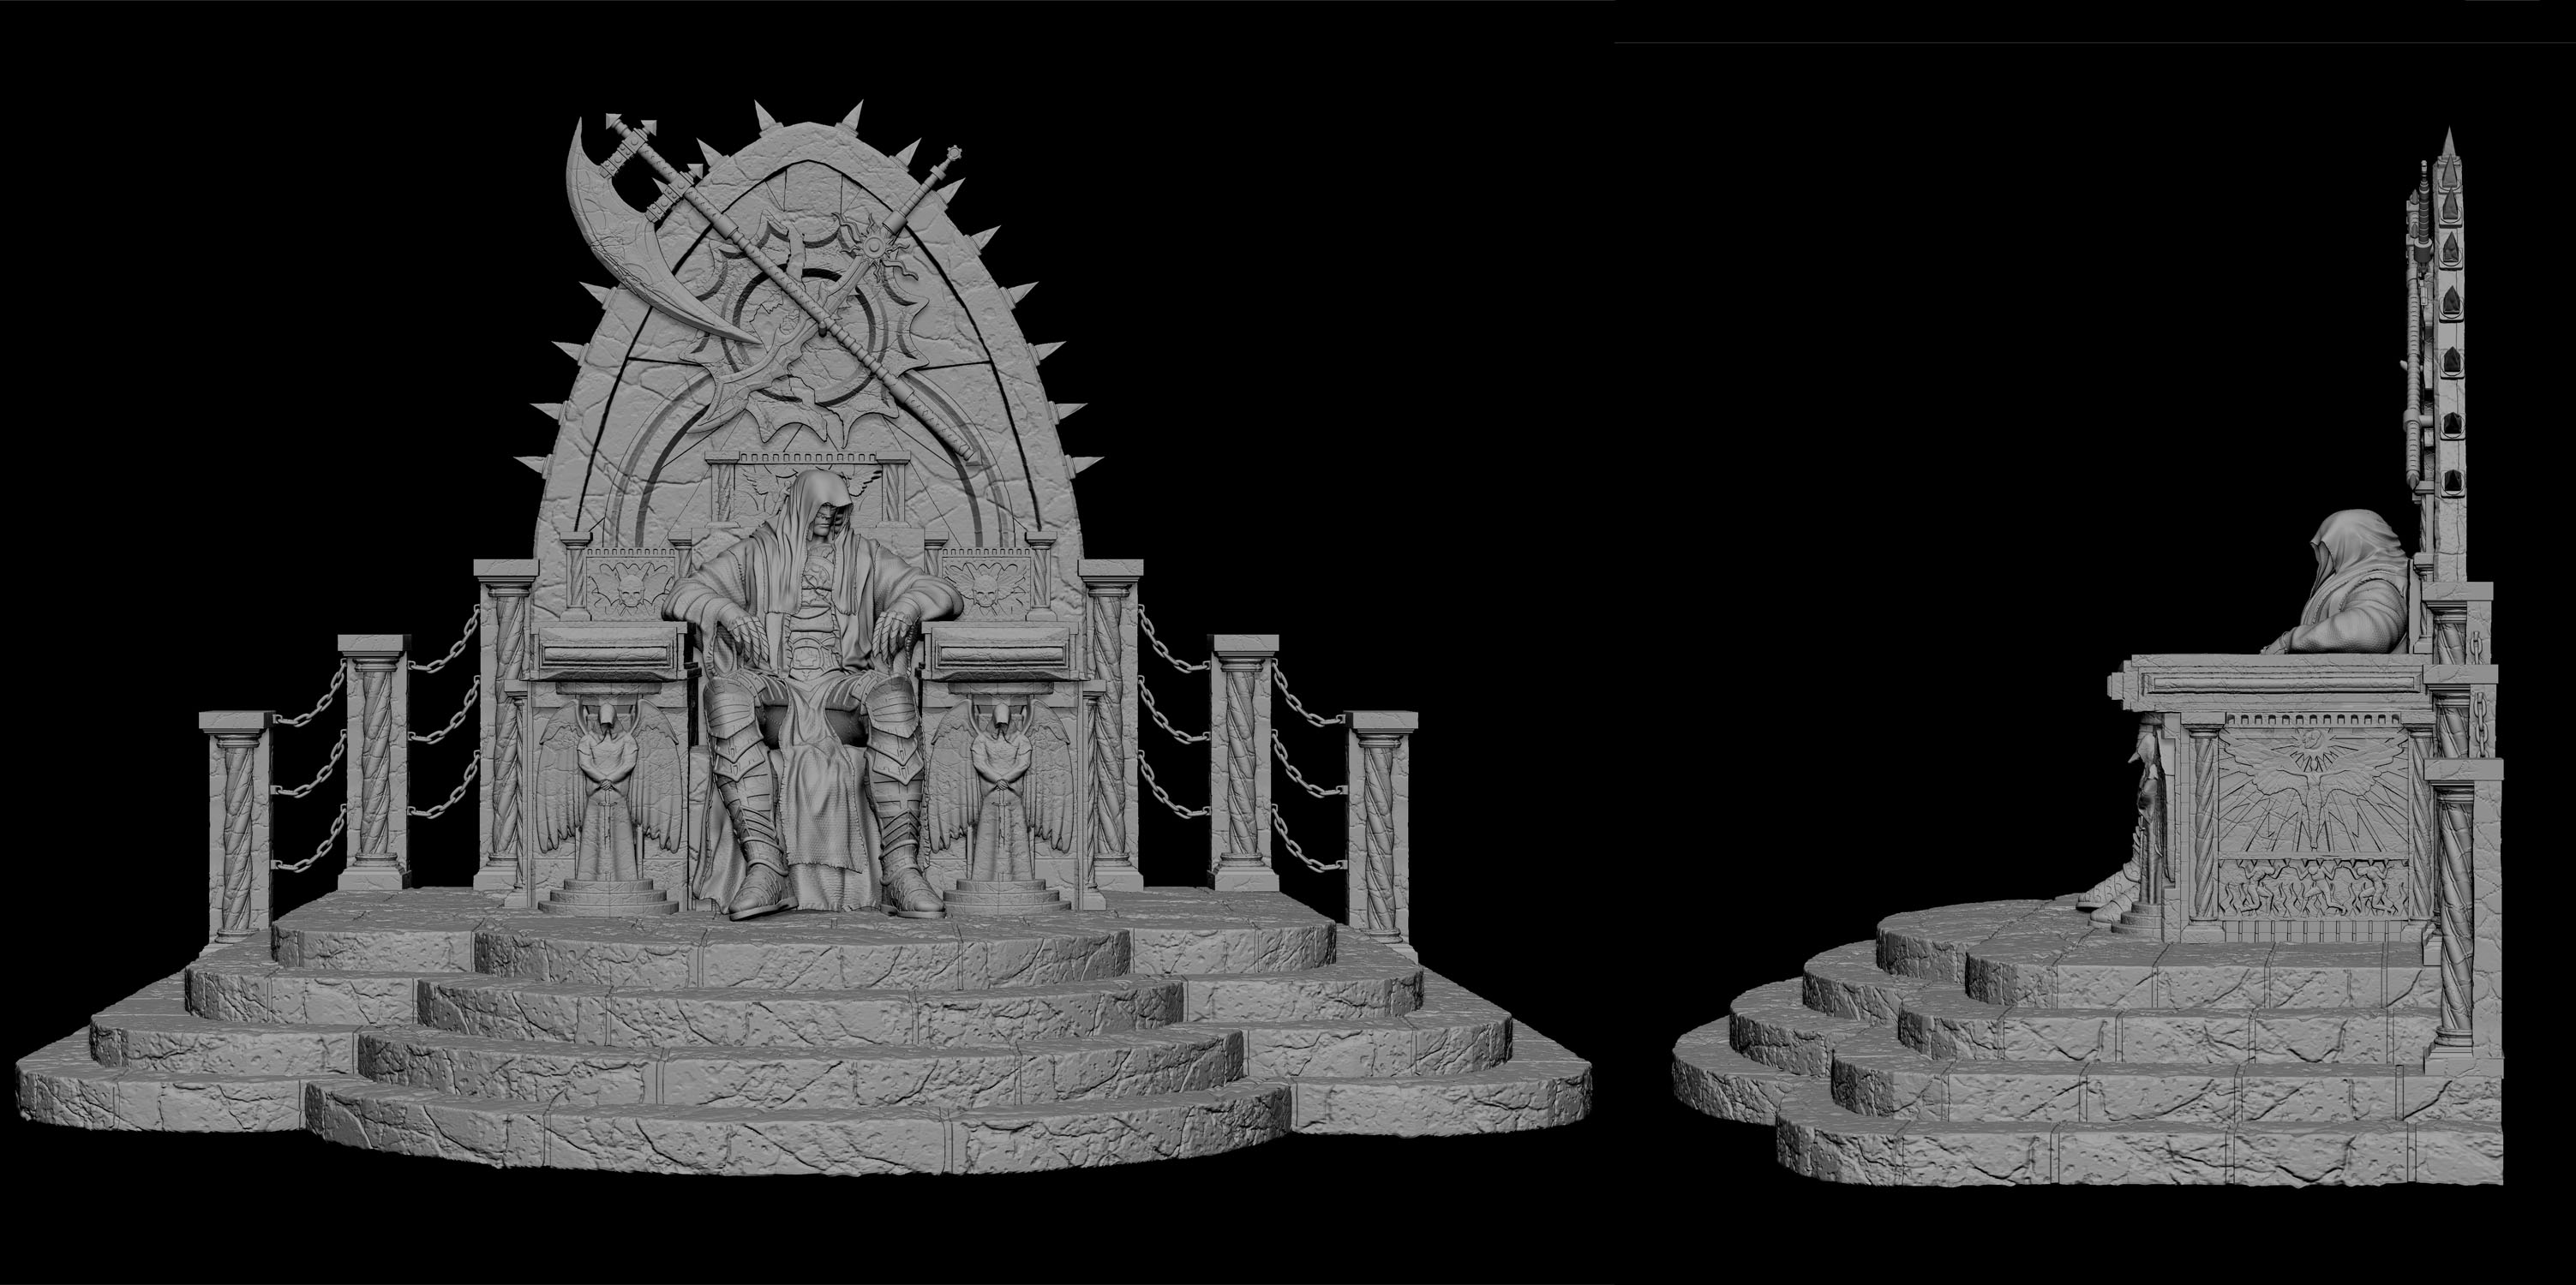
<O:pOk folks, I guess that is all or part of it. I really hope this was helpful.<O:p</O:p
Happy zbrushing.
Alterton
Attachments
 [TOP ROW] from me do you mind ansering this one question how did you make the wings on the god like soldger


 However you have clearly worked for this so you deserve the recognition.


