ZBrushCentral

Alien Plant sculpture Updated... update

How would you tackle the leaves? fiber? or subtool? I am looking for a ground-cover like cyclamen but with much smaller leaves. I am going to extend the branches a lot so that if this were sitting in the sun the leaves would get plenty of light (not in eye flower shadow). there will be a large bundle of thick roots underneath it too, but that will be mostly hidden in a rock crevice

I was thinking about adding toothy venus flytrap like plants with sappy material amidst the leaves too. I dunno… tell me whatcha think about it! What would you do to make this better. Also, I have not added texture or sculpted on the petals, stems, or roots… that is coming

Attachments

flower3.jpg

oops I guess I did do some sculpting and texture on the base. not a liar, just forgot

This is terrific!

What I would recommend for ALL of your questions is try all of them.

In the mean time that plant is splendid!
Keep it up your doing great!

Cheers!
Mealea

man this looks like a couple of brain synapses from the 60`s hangin out on the town after a couple of drinks, very flowing and lots of movement in this.:+1:small_orange_diamond:D keep going with this.

Thanks Mealea! Would you or anyone be able to point me to some good zbrush rendering tutorials?

Honestly I have not seen much about that. ZBrush rendering is an odd thing and I dont Franky understand it.
However there are two main types, one is BPR and the other is Best, neither are what most people expect and both have idiosyncrasies and things they depend on.
For example:
Best will allow you to use things like Glow and Fog BPR will not
BPR will give you better (sort of) shadows and let you use BPR filters, I have no clue why those dont work in Best but they do not.
Best will let you render 2.5D stuff, BPR ignores (this is infuriating) 2.5D stuff.
Depth Cue is a total mystery, it used to be very cool.

The list goes on and on and then you hit differences like matcaps vs. lightcaps, I dont understand that stuff at all, you cant use both at the same time though as near as I can tell and that is another weird thing.

What I would suggest is trying stuff out.
What I do since I am totally baffled by how this stuff works and why it works that way is I turn on lots of stuff and see what happens, like this:

renderpallet.jpg

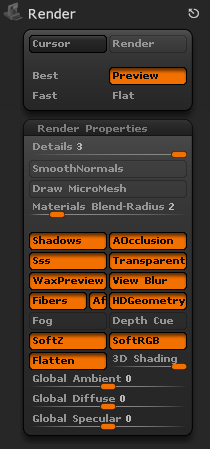
That is the setup I use for doing BPR renders, I think a lot of it often doesn’t need to be on because I’m not using things like HD Geometry, but I figure if I’m not using it ZBrush will ignore it, like if I turn on Fog or Depth Cue which do nothing at all.
Also in the render Menu in the BPR Shadow pallet I usually change the Angle slider to something higher, the last couple of ZBrush releases changed something and made shadows sort of harsh and low resolution and this slider helps soften that up a lot, I usually use somewhere like 11 or 22 cause they are easy to type and seem to get the job done.

I dont know if this is helpful or not and I am not the person to ask but I do know WHERE to ask and get far better (and possibly totally baffling) information:

http://www.zbrushcentral.com/forumdisplay.php?101-Other-Questions-And-Troubleshooting-Forum

I hope this is helpful!
Good Luck!

Thank you so much Mealea! You are very kind and helpful. When I press render it does not seem to do anything, or puts it somewhere unknown to me. I will check out the other questions forum and ask there.

I will ask my professor about it. I was just hoping to fire off some renders before class on Friday (when this sculpt is due) :stuck_out_tongue:

Thank you very much for your kind words and encouragement Pixolicious. I think we must have posted at the same time earlier.

Ohhhhh…
I think I see where you are at now, I am very sorry.

Ok.
In the screenshot I’m posting (down at the bottom) you will see three arrows, one is pointed at the render menu where all the stuff I showed you before is. (and a little icon, more on that in a moment)

The second one is pointed at the BPR button Very important button.

The BPR button will render what ever is in the canvas (if its 3D), in your case those wonderful plants, however it will be a bit flat with out a bit of a kick from the render pallet.

The third arrow is just to show you that Angle thing I mentioned before.


  • At the top click on the Render Menu.
  • See that little tiny icon in the upper left of the menu? click it.
  • It should stick the WHOLE Render menu into the right side of your screen turning into a pallet. Now you can get at stuff with ease.
  • Set up your Render Properties like I have them (leave it on Preview like I have, BPR doesn’t like Best sometimes).
  • Now hit the BPR button and watch as ZBrush redraws your image (you will see an orange stripe doing things near the top its a progress bar, and its a bit spastic but cool to watch).

Once your done rendering and you like what you have come up with and want to save the image you would do this:
(here I am going to assume that you do NOT have Photoshop and we will saveyour image as a JPEG file)

Ok your render is done and hopefully you like it.


  • Click on the Document Menu at the top of the ZBrush window.
  • Now click the Export Button.
  • Set the file type to what ever you like (normally), but for now use JPEG and give your image a name and decide where you want it.
  • Hit the Save button.
  • In the next window that pops up you can set various nifty things but for now just hit the OK button at the bottom.
  • TADA! All done.

Something that can improve a BPR render is turning on the Floor, all it does is put shadows under your object keeping it from looking like its bobbing about in the void.
Look on the right side next to all the pallets its just under PERSP.
Its a nice thing and is a good reference while sculpting as well.

I hope this is helpful, and sorry that the screenshot has a bunch of crap in the background!

Cheers!
Mealea

about the best I could find on lighting and rendering , still it covers some fundamentals. they cost.

materials and rendering in zbrush 3.1
http://www.digitaltutors.com/11/training.php?pid=3405

rendering enhancements in zbrush 4
http://www.digitaltutors.com/11/training.php?pid=477

for alternative rendering use the paintstop painting plugin for zbrush
http://www.digitaltutors.com/11/training.php?pid=197

older texturing fundamentals
http://www.digitaltutors.com/11/training.php?pid=3385

they cost but again as I said about as good as I could find.

eat3d have some zbrush dvds, if your into morbid characters as tutorials,
http://www.eat3d.com/training_videos

Pixologic free tutorial on lighting (not very comprehensive).
http://www.pixologic.com/zclassroom/homeroom/lesson/lighting/

Ah-Ha!! You are so helpful Mealea! Thank you!! I really like that texture you have on the sculpt in the last example

I made that texture by screwing with another from BioDesigner. (he makes amazing things!)
It occurred to me after seeing what Pixolicious posted that you might be having trouble
with giving your model color and materiel and stuff and not just rendering.

If that is the case I might be able to save you a lot of money and whip up another tutorial.
As I said about rendering I do not fully understand it, and the same applies to texturing
and painting stuff in ZBrush but understanding it is less important then being able to do
it, and that is something I can do.

I like making tutorials, making them helps me too and gives me new ideas about how to do things.

I have not tried to paint it. I would like a tutorial on how to make your own materials though. I have not really looked for those either. I am just not there yet. What I will eventually really really need :smiley: is a tutorial on how to make a realistic eye, but I have not really looked for those either

I only touched the paint once and it was before I started on an actual sculpture, you know when you just see what you can make out of a ball… it turned out okay. need more practice with it

updated sculpture. Now to add some textures and bugs

flower5.jpg

I lied apparently. Only bugs coming soon. Teach doesn’t want to see colors/textures on this one. I hope that means that after spring break he will be going over how to paint and make materials in depth. :smiley:

Also the online documents do not get used nearly enough I think. Even though its broken up into little bites, pretty much anything you need is in them.

I’ve found that when I want to do something new, I can go to Online Docs after laying out a step by step of what I need to know and then printing each relevant item and putting them in order. That gives me a defacto tutorial.

There seems to be a step by step for most anything. Also a lot of folks miss the fact there are good items in the documents folder inside the ZBrush program folder.

That and of course the people here are the best on the Internet at helping out.

Almost forgot, I love the plant. :+1:small_orange_diamond:+1:

http://www.pixologic.com/docs/index.php/Main_Page

Nice work really cool plant sculptings!:+1:

added some bugs!

<iframe src=“http://player.vimeo.com/video/38339513?title=0&byline=0&portrait=0” width=“590” height=“435” frameborder=“0” webkitAllowFullScreen mozallowfullscreen allowFullScreen></iframe>

Here is a turntable :slight_smile:

WOW!!!
I think you have a good teacher, how long have you been doing 3D stuff?

Thanks! Jesse Sandifer is my teacher. He teaches locally in Dallas but he does online courses too. It is nice to have an industry professional critique and teach their techniques. http://www.cgnuggets.com/

http://www.chickwalker.com/ these are some of his works

I have little over 3 years of experience with Maya (check out my site if you want http://2to3d.net) and I have been working in Zbrush for a few weeks now. I have traditional painting and drawing skills but not very much sculpting. I must admit should have been using zbrush a long time ago, it is sooooo artist friendly, and super easy to use. I think it works well with my brain :smiley: