thnx a lot hd for ur advice…i have taken all of them into accont
kursad my man this is for u
the head is the one which kursad gave me…
tried my level best to get it similar…
thannk u…
[attach=109343]ZBrush Document.jpg[/attach]
Attachments
thnx a lot hd for ur advice…i have taken all of them into accont
kursad my man this is for u
the head is the one which kursad gave me…
tried my level best to get it similar…
thannk u…
[attach=109343]ZBrush Document.jpg[/attach]
Why is it for me? It is for you 
Can you please take screenshot that has the same angle as the photo. I can explain you better then.
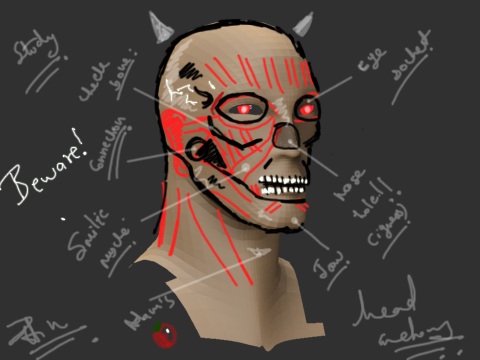
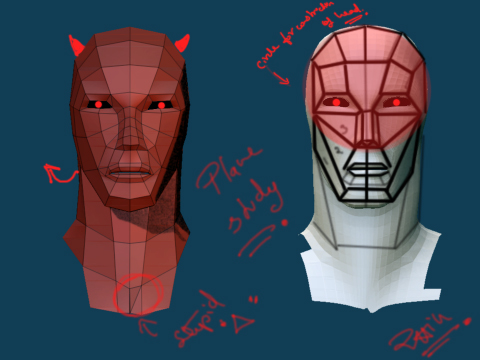
The biggest mistake you made is having eye sockets-holes. In the original image there is no such a thing
Very good start thou
hey thanks kursad…
wel…this the render of the female as u wanted and
even tried a male…
 …its sad though!!!
AND IF U COULD TEL ME WAT TO DO…ITS WOULD HAVE BEEN GREAT!!!
have done study of hand…
this is the hand
Whenever you make a head you need to be aware of planes of the face. I am attaching a page from Loomis`s book about facial planes. This is the real stuff. Whatever kind of head you would model, whatever application you use, it does not matter you need to apply these planes to any head model.
You face model based on the picture is a good start. However the whole point of the picture was to keep you away from working on eyes, but yet you have managed to open the eye holes in the mode No eyes for a while. Just work on the planes and basic shapes. And everytime you work on a picture please do nto make up stuff and try to match the picture. This is good study because
[attach=109513]PDFXCview_Yakala_09-26-2008_13-59-08.JPG[/attach]

Neo I am not commenting on the hand model because that is nto a hand it is the whole arm You have discipline issues here. Keep yourself away from going berserk and just focus on the task itself. Now you have spent most of the time on the arm instead of the hand.
You should spend at least 3 DAYS on modelling a hand or a head, not less if you want to learn something while you go.
wel…
as brother kursad told me study planes of face for the perfrection of a pefect face…
i have skteched a lot of face planes and have evn tried to do it zbrush…
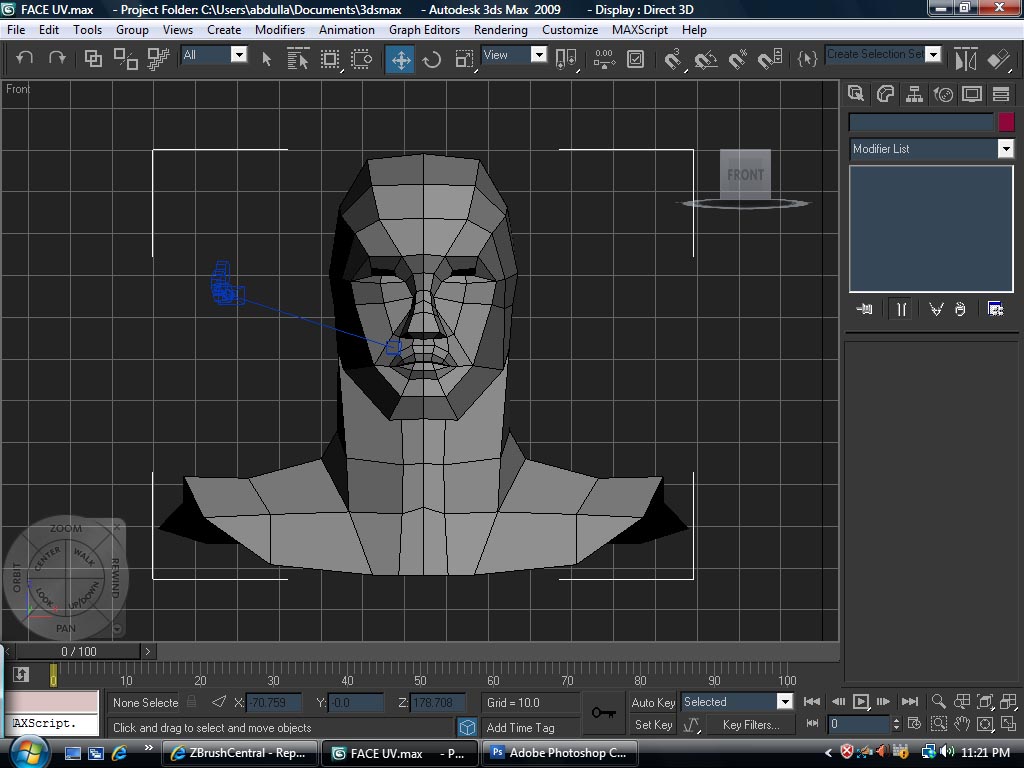
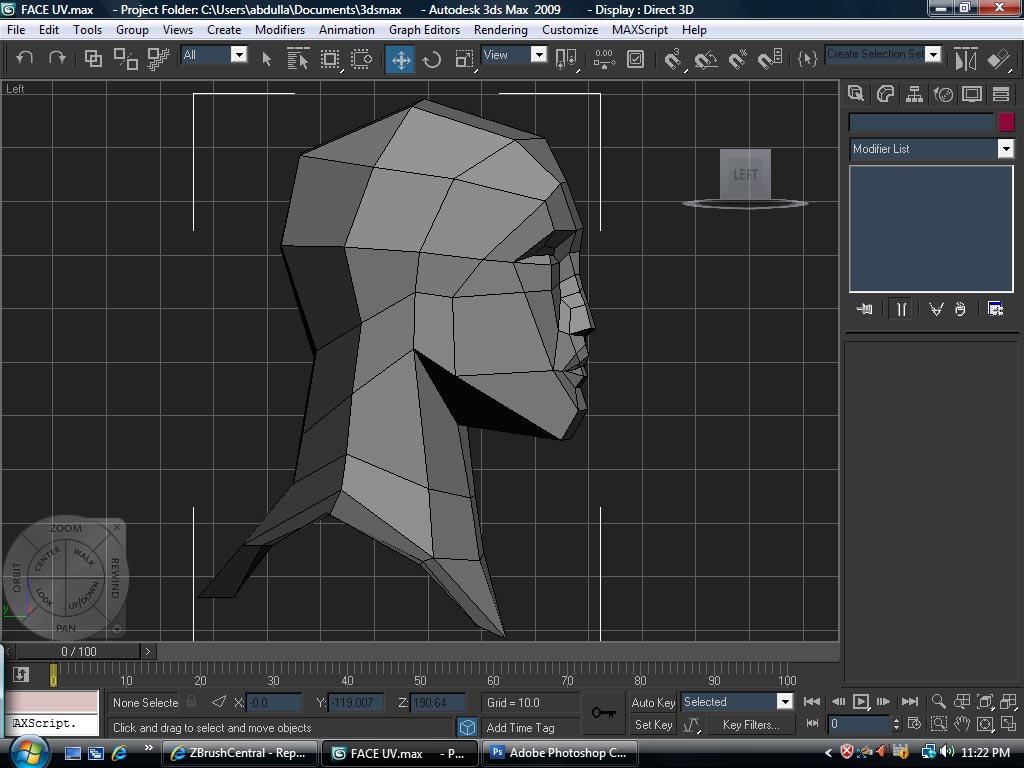
pls ignore the eye socket…my base mesh had it…
is it fine…
…
-Zain-
(working hard to become the best):evil: .
dedicated to sir .KURSAD.
thank u HD ADDICT for ur kind advice…pls keep it coming so tht i can imprve…

Looks like a well constructed base mesh 
only thing I would say is the two edge loops on the neck and chin next to the central loop running down the middle of the model, aren’t all that necessary as at higher sub levels you will have a high concentration of polys, with no real need for them.
other than that well done, try giving it some character at that level (or 1-2 more at the most) just to get used to addressing the basic form.
Neo,
Your face has planes but they do not convey the same planes as real face.:rolleyes: You really need to study the picture I have attached. Trust me if you get this right you will save 5 years of your life. One thing you can do is actually use some kind of sculpting material like plaster to make a small head that has these planes. This is better for you to do it at this point. If I were you I would try to draw this head planes picture at least 20 times without rushing.
ok…
so i know brother KURSAD IS HELPING me a lot,…but its not illegal for u guys
to comment on my thread(u can even abuse)!!!
KURSAD-i have tried the planes in 3ds max…and i guess its easier there…
i hve removed a lots of loops so tht it tallies with the planes…
but i m no geting just one plane…which i have illustrated in the below imaje…
but i m getting the hang of it…
so check it out…

this just the planes-------

The base mesh seems fine to me. You can define the planes at a higher subD level, which might be a good idea, because then you won’t be fighting a lack of polies. What I would do is jump up quite a few levels, and then with the clay brush, very specifically define the planes, using Zadd to build them up, then increasing their…planarity…by shaving them down with Zsub. Then, if you like you can drop down to a more basic mesh and your anatomically correct details will be reflected in that level of detail.
You shouldn’t go to higher subD levels until the mesh has been refined at the lower levels, but I personally will work with it at higher levels in order to delete them and attain a more appropriate base mesh.
Hope some of that helps.
Oh come on ! It is not fine at all ! I see many triangles there . I know it is so annoying but you will hate yourself because of these mistakes .
I advice you to download this base mesh and study its structure . At least I did so
It is up to you Just wanted to help
http://www.3dworldmag.com/page/3dworld?entry=3d_world_105_s_sculpting
There are two links . Your is “Download bonus files”
thank a lot twitch for ur help!!!
i m tring the way u told me and m goin to post the update soon
and
athiandr-those triagles…i dont how did it come but was not ther when it was in max,…
and when i reimported the same thing it was not ther…so thats not a probs for now…
thnx a million for the download link…i wil ofcouse check it out…
pls keep in touch u guys nd check the thread whenever u have time
soon update wil come(like now)
thanku
!!
Guys, he is studying something else here. Do not get me wrong but if you can read previous messages before replying that would be great. He is studying planes of the face. Triangles, subdiivision etc are all irrelevant at the moment.
Neo this s getting way way better. I think you are getting it slowly. Right now do not worrry about the triangles. You wont sculpt over this model anyways. Use this model to get the proportion and planes properly. Once you understand this stuff you can use a good base mesh to sculpt in ZB.
It is going well, you just had a quantum leap here Keep going, now refine the proportions and planes more!
Btw you seem to rush again. You should spend more time. Doing it zillion times in short amount of time wont teach you much. You should rather do it slowly but consistently.
k
Did u use symmetry on zbrush?
It seems your right and left shape are different.
If u model your base mesh in max, u can mirror it.
Keep going , I’m also still learning ZBrush… 
peopleeeeeeeeeee!!!
i dont have triangles…wait i il show u…
c!!!
[attach=109696]Untitled-1.jpg[/attach]
[attach=109697]SSS.jpg[/attach]
I M NOT SUCH A NOOB AS U PEOPLE EXPECT!!!:lol:
wel sum study…
i know the thread is very boring…but still since posting our work and wip is free…
this is a study of a head in photoshop i usaualy sketch it in paper(boringggggg)
but today sumthing innovative.
and a plane study…
ZAIN
(triangles bug me alot)
@kursadk: I think either you’re misunderstanding me, or I’m misunderstanding you, but there is certainly a misunderstanding. What I was saying was that these planes of the face, that is, where the basic form of the face changes direction and elevation, which I believe is what you’re referring to, can be sculpted in at later stages and don’t have to be present in the base mesh. Obviously, if they are, great, less work to be done later, but the ultimate goal of both methods seems to be identical.
Personally, I don’t see how you can do too much more with your base mesh without increasing the amount of faces you have to work with. I would divide the mesh once and then once you have more geometry, finesse the verts where they should be.
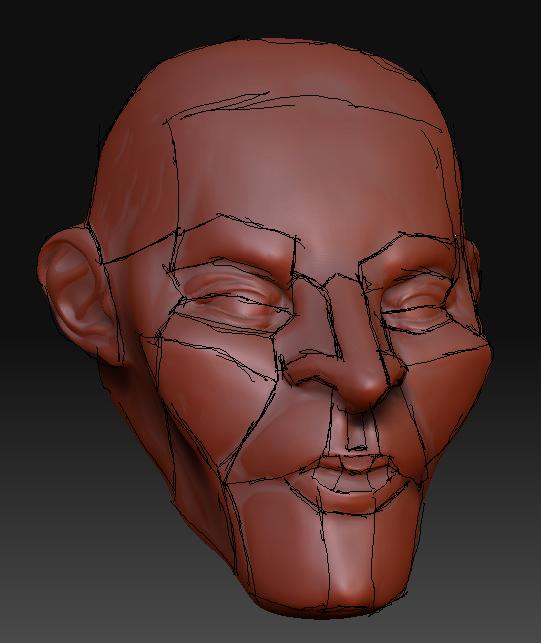
This is an early WIP of a model I just worked on, I know I am no great sculptor, but hopefully you can see how I acheived what I consider to be fairly decent planes on my head:
[attach=109835]sketchoverdn0.jpg[/attach]
Sorry about the sketchy lines, Photoshop suddenly stopped working and I have to use Paint at the moment.
I simply started from a sphere, so there were obviously no planes to begin with, and I had to form them with the clay brush. It is obviously very exaggerated to enhance the planarity, but if you’d like the ztool to reference, I can provide it.