Just posting here some photos that i uploaded at my blog from the amazing piece done by Ownage of my Hellboy model.


Take care all!
Just posting here some photos that i uploaded at my blog from the amazing piece done by Ownage of my Hellboy model.
Take care all!
Thanks Raf! 
Here’s one I did for ZBC’er jbuck (Joshua Buck). He was nice and gave me this WarGaming Orc so I could perfect printing models at 32mm (we’re almost there!). But I did a bigger one for him as a gift for helping me out. This one is four inches tall. Although normally it would have cost $189-ish to print it because it was so fat (more expensive than some 10 inch tall models!). Paints like this “AO Bake” are free if you want it. I’m not even sure I charge for full color paints at the moment  . I just type a random low price in really~
[attach=137058]plains_Orc_front_01.jpg[/attach]
[[attach=137055]jbuck_1.jpg[/attach]]
[[attach=137056]jbuck_2.jpg[/attach]]
[[attach=137057]jbuck_3.jpg[/attach]]
Gimme one more week to finish that other freebie. I’m making 4 copies, printing it flexible-ish and adding articulation.
Thx guys~ Apologies for the huge resolution pictures.
better pictures cause i used tripod.  i kept the resolution at like 3000 pixels in the attachments below so you can see that I’ve basically destroyed rapid prototyping stairstepping now.
[[color=#9A9A9A][attach=137060]front_lo.jpg[/attach]](javascript:zb_insimg(‘137060’,‘front_lo.jpg’,1,0))
[[color=#9A9A9A][attach=137061]back_lo.jpg[/attach]](javascript:zb_insimg(‘137061’,‘back_lo.jpg’,1,0))
[[color=#9A9A9A][attach=137062]face_lo.jpg[/attach]](javascript:zb_insimg(‘137062’,‘face_lo.jpg’,1,0))


you’re doing great work with those prints Desmoda! 
this is a great update!
i’m curious though as to the inflation on the belt buckles on the arm, they seem to have doubled in size, the metal parts not the leather. i’m guessing they were separate subtools or something, could you explain why this happened?
Good eyes! I printed this at 50mm and the belt buckles and chains on armor plates all turned out like fishing wire. It was all there, but way too thin. So, to make it look better we inflated the belt buckles and chains for the 50mm. And for the sake of not having to fix the file for printing again, we just printed the inflated version for the large size as well. (attached bad print) when i have a good 32mm-50mm print. I’ll primer it and show you guys.
[[attach=137224]worst_case_scenario.jpg[/attach]]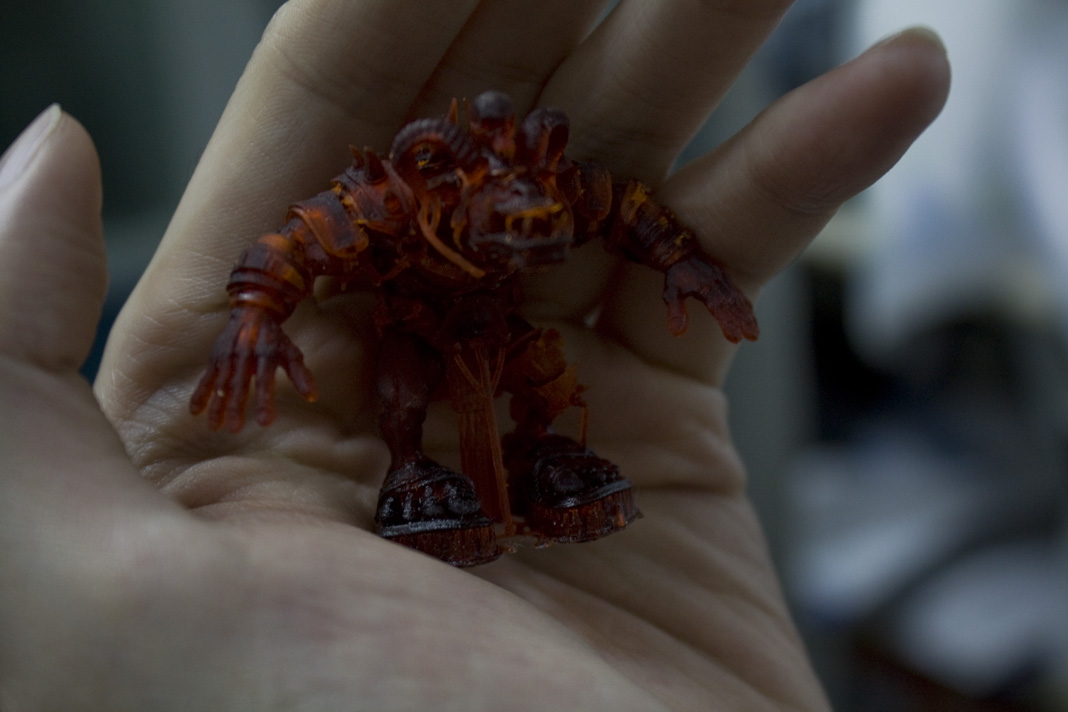
Btw thanks Magda, spaceboy 
great work man 
how long does this kind of ao finish take you?
AO finish like that takes about 15-30 minutes. In toy painting, it’s called ‘washing.’ So it’s not a true AO bake. Washing is the technique that you cover the entire model in a diluted ink, and then use a cloth to wipe it off before it dries. All the recessed areas will be darker making the model really pop. Sometimes washing is better than a true AO Bake, especially on wargaming figures such as this. I used a lacquer basecoat so that Joshua can do a full paint on top of it later if he wants to :).
To paint a true AO Bake, you'd have to use an enamel based paint (because it dries really slow) and then dab a few drops of paint in the recess area. Before the paint starts to dry, use a brush to sweep out the ink into a nice gradient. It's a lot cleaner finish, but it takes more time. It's possible to do this with a wash as well but you'd have to pick a very subtle wash color and do a very good job wiping up the slop.
Another trick is that you can go out and buy some cheapo Artist’s Oils like Windsor & Newton. Dillute it down with turpentine. And you got one of the best AO Bake oils available =P. Very smooth finish. But will tint/alter your base color slightly. Which in itself is another trick that some artists use on skintones to give skin that two-tone SSS/flushed look.
Here's a picture of unpainted ownage print to show the difference washing/AO Baking can make.
[[attach=137401]lightbox1.jpg[/attach]</span>]
[[attach=137402]front_lo.jpg[/attach]]
Gonna fix up the ownage website eventually. In the process of hiring a full time web designer to the team. Will put a bunch of painting tutorials up so you guys can rock some models at home too. Will buy lacquer & enamel paints for you guys if you need them from Japan because they're not selling those directly in the US and Europe anymore. Acrylics are a good place to start too but they require a whole different set of tutorials that I will put up as well.washing makes total sense
Actually you could use a acrylic based paint as well… there are products you can mix in with acrylics to slow down the drying time.
after using enamel paints for a long time i much prefer acrylic paints, no fumes, wash your brushes in water, Vallejo makes some really great ones in cool little dropper bottles www.acrylicosvallejo.com
im loosing brain cells just thinking about paint thinner ;p
were talking china here… waters 50 percent paint thinner there hahah
na just kidding i must say i always prefer the toxic paints when painting.
I probably lost a year of my life to them already but acrylics just feel wrong
and i find the colours just dont pop
i prefer a stranger method, i prime white with acrylic, then i do watercolor washes over the surface, sometimes i then cover those with a clearcoat flat(for tooth) and continue with more washes, and finalize with approriate clearcoats.
btw desmoda, i loved your two blog entries about the zcorp and the wood polishing. can’t wait to read more about other printers.
also, are you able to print purely clear parts?
HAHA! dude… its so not 50% thinner here. Get it right. It’s 30% thinner. 30% sewage. 70% panda pee. (my math is gud)
so many painters and figure artists! love it guys! :Dsmall_orange_diamondsmall_orange_diamond
There’s no one way to paint definitely. That’s what I’ve learned. I was over at the EnterBay factory the other day trying to pick up some tips from them and they do some CRAZY stuff over there that I’m not allowed to talk about.
Acrylics are good, Enamels are good, Lacquers are good, even ZCorp is good. Like spaceboy stated from my wood-planing article… what did we learn from the Japanese wood carving masters? You can use any technique and material as long as you are creative with how you use it and make sure you consider its natural properties when putting it in place for your piece.
There could be an encyclopedia written about toy painting. Not to mention Liquitex Acrylic paints, Artist Oils, and even Pastels and Chalks.
There is one thing I don’t like about acrylics… In particular tamiya acrylics is that you cannot use them for a base color coat because they chip… even if you finish them with future floor polish, dullcote, or glosscote. That’s just the rule. Also tamiya acrylics don’t brush well (unlike testors, vallejo, and games workshop).
Yup… can print crystal clear. I had to pick that up because there are some World of Warcraft characters, like shadowform priests that I’m trying to do that need a transparent printing as the base before I put the transparent smoke painting on top. Plus printing diamond-like swords is something I wanted to do.
Okay… really busy… will get back to you guys soon with some cool updates =)
For the sake of being thorough, and not leaving budding hobby painters with faulty information…
           Acrylic does not always chip.  It just has the weakest bond of all paints that people normally use.  So what figure artists that specialize in acrylics normally do is to water down their acrylics heavily.  The ratio is almost 50% water so its almost like a wash.  Then they put 20-30 coats on for a base coat.  That way if you knock the figure on a wall or drop it.. only 10 of the layers will chip off (haha :laughing:).  What are the benefits of acrylic?  Gorgeous matte finish (more matte than dullcoat).  Ease of use.. has a good 1-2 minute drying/play time.

           Professional hobby painters and Factories only use lacquer and enamel though.
           [color=black]
[color=DimGray][color=black][color=DimGray]Lacquer dries almost mid-air. It also eats into the plastic underneath and bonds into it. Meaning it sands perfectly without chipping or marring your painted surface. Lacquer also can be painted directly on t[color=DimGray]op with other lacquers, enamels, AND acrylics. Everything! Because it’s the strongest of all the paints. Painting (like 3d modelling) is all about planning. And the rule in painting is that you always put your weak paints over your stronger paints. Lacquer, then enamel, then acrylic. So at ownage, we try to do as much non-brushwork and basecoating with lacquer because I understand that you might want to repaint your model in the future yourself and don’t want you to mess up your model stripping it of paint. Just paint right on top of the exisiting paint. (Mojette and Grassetti… you guys have to watch out cause I was young and foolish early on. So if you repaint (I know grassetti did one already), you guys need to strip paint or stay with acrylics only).
Enamel has the longest drying time. It can take 1 hr to dry. 1 day to harden and set. And maybe even a week or a month to fully cure into the final hardness. I go to toy factories at least twice a week, they all use Enamel (but irradiate their models in ovens to quick-dry them). I also reverse engineer toys made by macfarlane and DC and they all use Enamel for the most part. It’s because enamel dries into a porcelain type hardness. It’s like indestrutable compared to Lacquer and Acrylic. So for transformers, pvc figures, etc… its the ideal paint. The gloss enamels are CRAZY glossy too… almost like the Polycarbonate paint used on RC cars. It can chip if you use it on RC cars though (because cars are smooth surfaced and don’t have enough grip for enamel paints to stick onto). So most RC manufacturer’s and hobby-ist prefer Polycarbonate paints because they scuff rather than chip.
        [color=DimGray]Toxicity wise, expensive, high-grade synthetic Lacquers and Enamels are not really toxic per se.  In the 1950's.. Testors and other hobby/paint companies mainly used Benzene as the quick-drying liquid element (solvent).  Benzene is proven to cause cancer/leukemia.   But today, the main component of the thinner is Toluene which the FDA claims is safe.  But if you really analyze it pathologically/metabolically.. DOES eventually break down into a form of Benzene or some type of carcinogen.  So its not a huge risk but its better to be safe than sorry and wear a respirator or open a window.  Why do you still itch when you use Toluene based thinners?  It's because Toluene has a fat cutting property that eats into the fat in your skin and causes localized Dermatitis and Folliculitis.  But don't go around rubbing it on your body if you're fat =P.  The only treatment for this is a topical corticosteroid and time.  If overused, Corticolsteroids </span>thin your skin (permanantly).  So wear gloves next time and open a window :sunglasses:small_orange_diamond:+1:.  If you feel like you killed brain cells or have a headache.. its cause you're actually getting high on the toluene.  haha.

       To kill an urban legend, Japan stopped importing toluene paints into the US not because it was toxic... it was because the business guys at GSI said that the US market wasn't selling enough paint for them to justify the logistic cost of exporting.  So it stopped selling.

I could keep going but I will save that for a painting wiki on Ownage or something!</span></span>Haha yeah i totally forgot about the other 2 ingredients
I heard some of the pandas are getting sick of being abused for water
purifiing ^^ http://clips.rofl.to/clip/the-great-panda-escape
And I gotta add… the orc print is looking down on me from my shelf at the moment and it looks awesome. Des did a great job on the wash and the resolution of the print is incredible.
just a quick note on the 32mm stuff. I’m a professional miniatures sculptor in my day job so if you need any help with what will and wont work at 32mm, thickness and detail wise then give me a shout and I will be more than happy to help 
love your prints by the way, very clean, very sharp.
edit 1 time cos seth cant spell
thanks josh! seth!
it’s a lot of work to print things like that.  especially at this price point. i would compare it to culturing mikimoto oysters. only the top 5% can make the cut, the rest we redo and redo and redo until it’s perfect. hoping to get this whole thing down to a solid, push-button process.
the 50mm is looking better and better. this is the model straight out of print with no sanding or primer or nuttin. now imagine if i get my artists to work on it a little bit. i’ve attached the high rez below so you can zoom in and see the stairstepping. but remember that the model is about the same size as your wacom stylus holder. and the stairstepping is barely visible. can probably make it better and go down to 15 micron but its not worth the cost because i can have artists do the same work in 10 minutes for like $5.
[[attach=139712]wip_sm1.jpg[/attach]]
here’s an anime girl I’m working on… i left one of the arms unpainted so spaceboy can see that we can print in transparent plastic too. but the transparent plastic doesn’t have the same crispness as the non-transparent kind so don’t request it unless you REALLY need something transparent and the object doesn’t have skin/cloth wrinkles… stuff like that.
[[color=#9A9A9A][attach=139716]mirai_front.jpg[/attach]](javascript:zb_insimg(‘139716’,‘mirai_front.jpg’,1,0))
[[attach=139715]mirai_back.jpg[/attach]]
sorry about the lack of updates. was doing some testing with our printing. and was moving offices so that really messed productivity up. back to normal now other than the print backlog i got to catch up on. so i’ll update something really cool in a week when the print is done and painted.
thanks as always guys. keep sending those questions and requests. happy to push the envelope. 


looking forwards to that maaaaasssive update


![[attach=137058]plains_Orc_front_01.jpg[/attach]](http://javascript%3Cb%3E%3C/b%3E:zb_insimg%28%27137058%27,%27plains_Orc_front_01.jpg%27,1,0%29)
![[color=#9A9A9A][attach=139716]mirai_front.jpg[/attach]](http://javascript%3cb%3e%3c/b%3E:zb_insimg%28%27139714%27,%27mirai.jpg%27,1,0%29)