To say what Jay said, “This is so cool” !!!
I’m hoping this looks a little less like Pix on crack…
[attach=7463]user_image-1001292264dzx[1].jpg[/attach]
-Muvlo (Having lots of fun, thanks Pix!)

Attachments
![user_image-1001292264dzx[1].jpg](/uploads/default/original/4X/d/3/b/d3b0faed49e7eabb4d4a30d0a5b70b0d71144172.jpeg)
To say what Jay said, “This is so cool” !!!
I’m hoping this looks a little less like Pix on crack…
[attach=7463]user_image-1001292264dzx[1].jpg[/attach]
-Muvlo (Having lots of fun, thanks Pix!)
VERY cool, Jay (welcome and thank you for bringing this up again!) and Muvlo! 
Thank you, Aurick, Muvlo, Juandel. You’re very kind.
I’ve just started learning the demo, and the felt material was the first one I’ve tried to make. Pixolator did not specify how to make ‘felt’, and it took me a while to get it right. I also noticed that Pixolator doesn’t seem to have a problem I have when using freehand: the pixels on edges tend to jag by two instead of one. This is not the case on the stencils. Given that this is simulating felt, it is not the end of the world to have a jagged edge. But it is noticeable between the stenciled pieces and the freehand pieces on my test picture. I do not see the same problem in Pixolator’s pics.
Pixolator or anyone else, is there some setting that would resolve this for me?
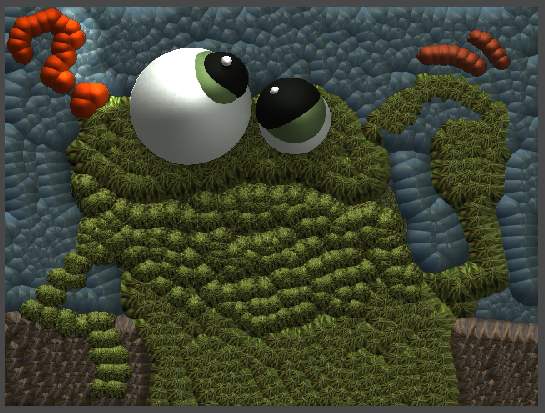
Muvlo’s texture looks like colored clay, pressed flat and cut-out to create the picture. The light on the sun area makes it really look like a physical creation and not a virtual piece. That is neat. The other thing that it looks like is colored leather pieces.
Muvlo, did you intend to have the dark edge around each piece? I had the same thing with the felt pieces originally, and it detracted from the realism of my virtual felt. Many tests with adjusting the Diffuse Curve resulted in just about the right amount of shadow and highlight along the edges. The actual adjustment ended up being very simple.
Thanks all,
Jay
Thanks for your comments Jay and Juandel. Jay, I’ll give that Diffuse tip a try, thanks! And welcome to ZBC, hope to see lots more from you.
I love this technique 
This tutorial is excelent 
Thanx Pixolator.
Here my first experience:
[attach=7464]user_image-1001419303uqq[1].gif[/attach]
[attach=7465]user_image-1001419339anr[1].jpg[/attach]
![user_image-1001419303uqq[1].gif](http://www.zbrushcentral.com/uploads/default/original/4X/d/1/e/d1e2d70ba424076209a449de8c811552db90b5f1.gif)
![user_image-1001419339anr[1].jpg](http://www.zbrushcentral.com/uploads/default/original/4X/b/5/7/b57fc501c3a77bb430a4fae873bb388e0fa96519.jpeg)
ah, brasil… wonderful! 
hi all and thx for yet another god tut…
but i cant get this part right cant find this
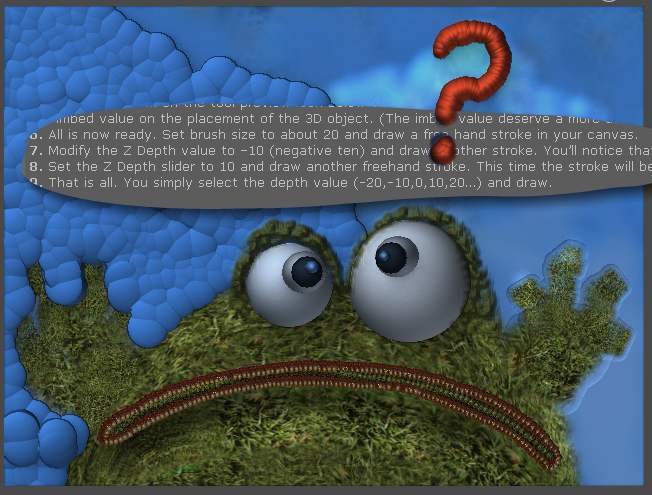
. By default, ZBrush will try to orient the 3D object based on the existing Pixols in the canvas. In this case, we want the Cylinder to be at the same orientation at all times, to do so,
this button
“we need to click on the orientation (pencil) icon that is located at the top-left of the Picker pallet”.
as u can see it works almost all the time but all of a suddeen it draws a cylinder instead of plane dot-stroke
[attach=7466]user_image-1041708567wfy[1].jpg[/attach]
![user_image-1041708567wfy[1].jpg](http://www.zbrushcentral.com/uploads/default/original/4X/e/b/2/eb20f9dcf926eb03ce0c79e1c9b73b7df010389c.jpeg)
I first wanted to say that I love this look. Its a whole bunch of fun!
I have been asked to make a shirt design for a camp in Japan and for what I have in mind…this is the perfect style. So, I have been practicing with cool results. I have a problem though. Everything works peachy with the 3D tools but when I try and use the simple brush…nothing happens…I see the color transfer in the layers palette but I see nothing in the actual artwork…same goes for the single layer brush…any help with this would be greatly appreciated.
Thanks
Isn’t this a case of the pixols being placed behind the clipping plane? They show up in the mini-picture in the Layers palette, so you know they are there, but you can’t see them in the document window. For example, if you do a fill, you create a layer of pixols of a given color in front of this plane, and then any painting affects or goes on top of these pixols. But without the fill, they can fall to the very back or bottom of the work volume depending on what tool you are using and your layer settings.
In short, do a fill.
I have…and I use the picker to pick my Z-Depth…still happens… 
Hi MtB
Maybe try once to “Bake” all !
Pilou
Nevermind yall…I figured out what was wrong.
Hmm, I’ve had problems of this sort with layers before - I think that it’s not a true layers per say for painting because it seems that the more layers you add the more displaced your painting becomes. I don’t typically use the create new layer option but just use Duplicate and clear. That seems to maintain the same depth of the layer without adjusting manually. Maybe that will help or try Frenchy’s baking suggestion. I haven’t tried that one myself.
Sounds ingenious.
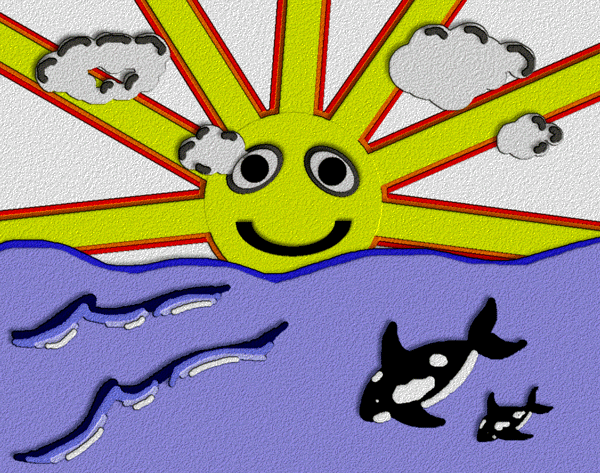
Ran accross this thread while perusing Pixolators threads :D. Thought Id play around with it. So I just kinda did something similar to what he did … plus I liked his killer whale  … so I made a baby one.
Dan
excelente metodo pero tengo problemas!!!no encuentro el comando Z DEPTH  :mad:…!!! alguien podria explicarme??
ademas el resultado para mi no es igual en cuanto a la calidad de la textura…
 :mad:
:mad:
press show actions and notes to see the steps.
hope this help
Andreseloy

Andreseloy 
Pilou