ZBrushCentral

Zmodeler Nanomesh, meshes are all twister

Hey there, I made a “shape” in 3ds Max and imported it into ZBrush and then did a ZRemesh. Now I made an Insert Mesh Brush and turned that into a Nano Mesh Brush which I would insert using ZModeler.

The weird thing is that each “mesh” is twisted and it does not follow the shape of the object. I tried various things to solve it but I am unable to solve it so far.

I hope someone can explain to me what I did wrong and how to fix it. I simply want to make a dragon “body” with scales on a portion of the body.

My image is included :slight_smile:

The effect that I would like to archive is something like this (got it from YouTube):

afbeelding

Hello @GroundZero

Yup, seen that, tried it, doesn’t work. Well… manually rotating them does work but rotating 100+ manually is nuts, there has to be a better way right? :wink:

Thanks for the link to YouTube though, useful information nevertheless!

If I use “align to normals” it doesn’t rotate the mesh properly. See the below screenshot:

afbeelding

I started again from scratch. Doesn’t work again :frowning:

But when I use a standard surface, it works flawless (doh :smiley: )

afbeelding

I just tried this on a curve tube. Default alignment wasn’t great. However I made it work by using the rotation options. Set Z rotation to 0 and make sure Z var(iance) is zero. All aligned along the snakey tube perfectly.

Also sping edges uses normal target types. So, for example, polygroup the oddly aligned scales and spin edges all at once with the Polygroup All target.

1 Like

Thanks for your suggestion Tobor8man, I will give that a try today and let you know the outcome!

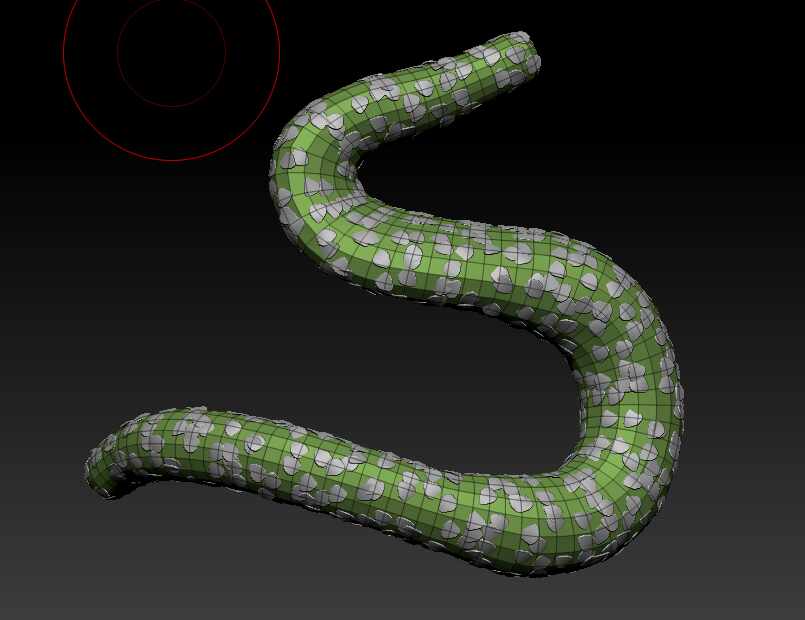
FYI I tried it without using my own insert brush and then it (at least seems to) works perfectly. See the screenshot.

Maybe the problem is in my insert mesh? not sure why though… I make a shape, set the camera to the default view, then choose create insert brush and after that crease nano mesh brush.

I started over AGAIN… and now it is working perfectly… and I really have no clue why. I did everything the exact same as the previous times in terms of steps not sculpting the “scale”.

afbeelding

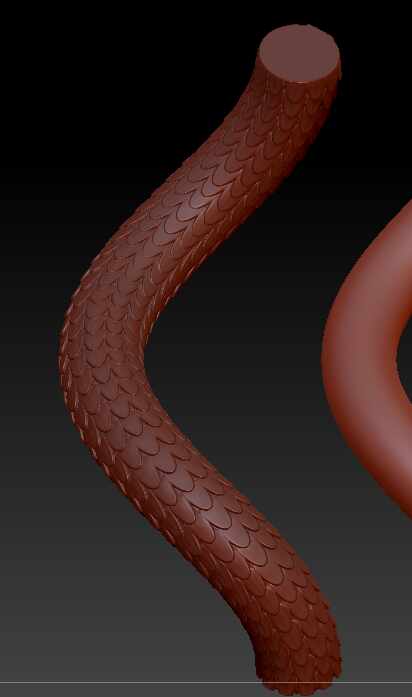
So most likely it has something to do with my scale rather then ZBrush calculating it wrong?

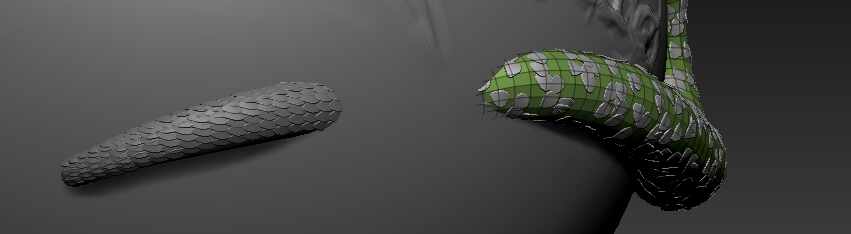
I did another try. I have two pieces, for one piece of the body it is working beautiful, for the other one it is very weird. From the start it is all around the place.

afbeelding

I have all the options on default (i.e. no scattering or random distribution).

But when I dont use my mesh but the standard cube that comes from ZModeler, it works perfect. But when I use my own insert mesh, it is scattered all around!?

So confused right now.

I did the exact same on a different piece of the body and there it works perfect (see screenshot).

Anyone knows what is happening? this is so weird and confusing :frowning:

afbeelding

I will try and record my screen and post that here… maybe that will show what I am doing wrong.

The image with the green body (polygrouip?) and grey scales looks like you’ve got a random distribution. Check that the Random Distribution slider a few rows below the Z-Rotation slider is set to 0.

Also solo the selected subtool just to make sure you’re not looking at multiple copies.

If that doesn’t help we’ll wait for the video.

I tried that, and they are all at zero, even random distribution. That’s the weird part. I made a new one and recorded it. This time (fortunately? lol) it seems to distribute correctly but as before they are all twisted and manually “twisting” each and everyone into place would be madness.

The standard squares seem to line up pretty good, its just the insert mesh that is not fine.
Weird thing is, if you look at my previous screenshot, the tail did work! if the tail works, I would expect the same result for the body.

Anyways, I recorded my process on how I went to it and where you can clearly see that the meshes are not following the bodies shape.

Hope this helps. The video is uploading right now so should be available soon.
Please let me know if there is anything else that I can do like adding my ZBrush project file.

Thanks for the help so far, really appreciated! been trying to fix this for 3 days now without any progress :frowning:

@Ometecuthli - I’ve watched the video a couple of times and unfortunately I can’t see what the problem is. All I can suggest is to Start a Conversation with Pixologic Support

Only thought that comes to mind it to remove the end caps, head and tail, before applying the nanomesh. Maybe there’s some internal logic based on poly/edge loops that is getting confused by poles or other weird geo at the ends. However that a complete guess.

If you are able to resolve this with Pixologic support please post the solution so we can learn something to avoid in the future.

Good Luck.

Tobor8man, thank you for your time and your reply. I will contact them and make sure I will update my post in case of any solution!