ZBrushCentral

ZBrush 4R2 Beta Testing By: Rudy Massar

For my project I started off with a SkinShade4 (adjusted settings) and used the LightCap Designer Window to lit the character.
There are really so many cool things you can do with the new LightCap system, and I will post images and my LightCap soon but here are a few things. You find the LightCap Designer Window under the Light menu.

Standard Materials and MapCap
With the new LightCaps Designer you create either a light set-up when using Standard Materials or you design a new MatCap using the same approach.
For creating a new Matcap you need to have a MatCap selected first. Once you place the a light in the LightCaps Designer Window, the Matcap changes to a default state and you can instantly see how the light affects the material.
Notice the dot in the upper left corner of the LighCap Designer Preview, this allows you to switch between the global- or panoramic view.
Remember, you have both Diffuse and Specular properties. For instance, if you place a light with a gobo alpha, you might want to use that as a reflection only and not to illuminate the material. In that case click the diffuse button and lower the opacity of that light to zero. Now the gobo appears as a reflection only.

Floor Shadow and Material Shadow
The overall strength of the shadows on the material is set under the Environment tab of the material properties. The strength of the floor shadow is set in the BPR Render Properties. When you turn on the grid than this act as the floor geometry and will receive the shadow. Make sure the grid size is big enough though, otherwise the shadow will cut off. When you move your model a bit below the floor grid, it will actually cut-off the model in the render.
Oh… this one is cool… in Display Properties (Tool) you can set your tool to BPR Invisible, so it will only renders the shadow. Unfortunately it won’t receive shadows though.

Placing lights manually or use import an image
You can either start by loading an HDRI probe image (jpegs are fine too) or as in my case place the lights manually.
The cool thing by using a light probe image is that the lights adopt color and intensity of that image. All the lights below the horizon automatically don’t cast shadows.
Because I wanted to create a sun and sky environment manually, I turned on the shadows for all the lights above the horizon and turned them of for all the bounce lights.

BPR
When test render the your model with the new material using BPR, you might want to set the SPix in BPR RenderPass to zero. This can slow you down quite a bit when you render lots of shadows. Set this back when you’re ready for the final render.
Play around with Rays and Angle for sharp or soft shadow results. When using a high Angle value then you need more Rays. Be careful with the Blur… can zzzzlow down ur machine a lot.
When you have a render and you don’t move it, you can change the material settings and it calculates the new settings really quick. However, this doesn’t work when changing the lights or render settings.

I’ve said it before but such an awesome sculpt and a great render Rudy! He has tons of character and the pose is great =D

Thanks for the information! LightCaps are throwing me for a loop. Every time I think I have it figured out, something completely bizarre and unpredictable happens. It is usually unfixable, meaning I have to start all over again from scratch. I believe I may have discovered a bug where the saturation slider will stop working, or works on and off intermittently. Strange things happen with shadows too. Deleting lights does nothing, and a restart is the only way to fix it. Anyways, thanks again. All I can do is keep at it. I’m not going to let it defeat me! :wink:

Edit: Now I think I’m getting the hang of it. MatCaps are much more predictable with LightCaps than materials are. I wanted to share these three in the Matcap repository thread, but my file was just a tiny bit over the 500 KB limit, so I can’t. The third one turned out fairly interesting I think. I used the new horizon feature and generated my LightCap from it, along with a few tweaks here and there. Now it’s time for bed as I’ve been at this non-stop for nearly 24 hours straight (and 18 hours yesterday). So easy to lose track of time while working in ZBrush lol. :lol:

Mike Thanks man, appreciate the compliment!

Zeddicus Unfortunately I cannot reproduce it. I’m sure tons of people are working out the new LightCap system and if this is really a bug it will definitely pop-up. Yeah don’t let it defeat you :slight_smile: 
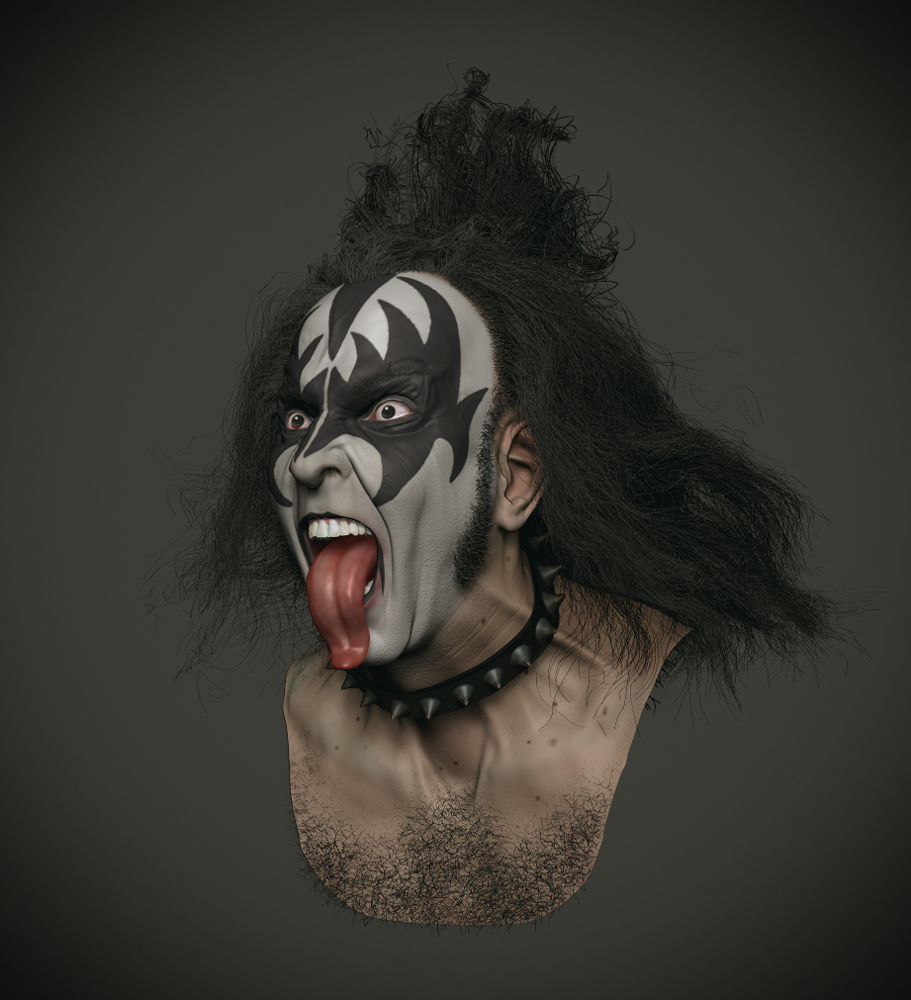
it is really great fun working with it.

click here to download the Material, LightCap and MainLight and some settings…

rm_sunandsky_settings.jpg

I’m not 100% certain about the saturation slider now. At the time I was sliding it side to side and nothing would happen, even though it had worked several minutes prior to this. When my wife came over to see what I was bugging me, it magically started working again. Unfortunately I can’t reproduce it now. It was a material and not a matcap, which I suppose could have something to do with it. One definitely tends to be more finicky to changes than the other. It may also be something specific to the material I chose (SkinShade4), and not the lightcap feature at all. Oh well, I’m sure we’ll hear from other people if there is indeed a bug here. I wouldn’t worry about it.

Many thanks for the download, Rudy! I’m going to jump into Zbrush and study it closely. :+1:

I love the expression and all the character this guy has. Great job as always man! Thanks for sharing the render setup.

Amazing,very cool character,lots of feeling.

Bryan Thanks man, love your work too. Good luck with your CGS Workshop, sounds like lots of fun.
Point Thanks, I’m glad you like the character :slight_smile:

Great (& fun) sculpt Rudy -> love the overall composition & shape/lineflow. The Noisemaker texturing came out really well as did the rendering -> thanks for sharing the Mats & settings :sunglasses:
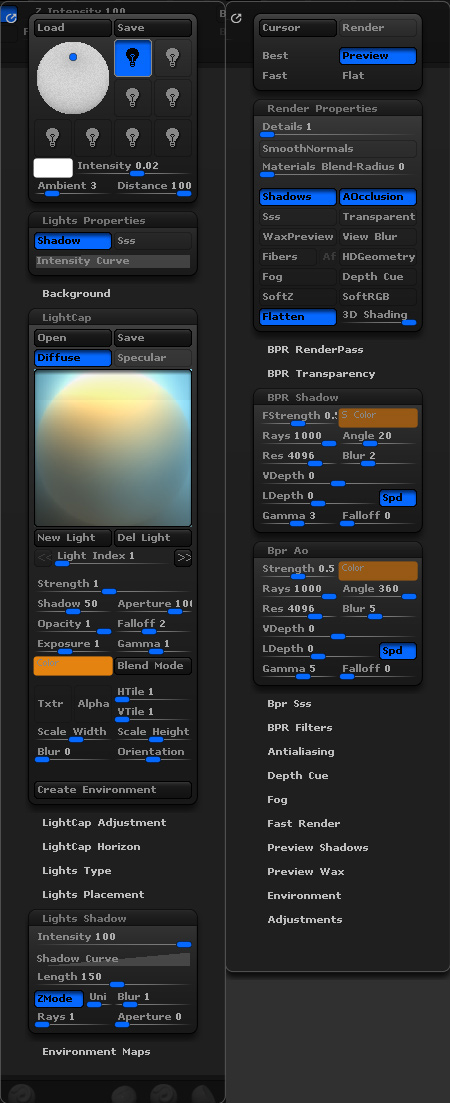
small_orange_diamond:+1:-> I’m gonna’ try those out for sure!

Yay, very nice model Rudy ! Always nice to see more stuff from you, especially when they get better over time :wink:

AWESOME!:+1:

Amazing piece of work :smiley:

I yawned when I saw it, great sculpt :slight_smile:

Etcher Thanks for the compliment
Waiyeh Hey Thanks, it’s been a while. How you been?
MikeCSE Thanks!
JWCorus Nice compliment, thanks.
Norbi1988 lol stay awake!

Thanks for visiting,
Please continue further on my ZSketchbook.
[
Best,
Rudy

KissPortret_ZBrush4R2B.jpg](http://www.zbrushcentral.com/showthread.php?165534-ZSketchbook-rudymassar)

AMAZING!!

Well done!!!

Thanks Dustbin1!

Great expression Rudy and Love the hair! It would be awesome to see a better skin shader though, maybe we’ll get Ofer’s skin shader one of these days :slight_smile:

love it :+1:

Amazing works Rudy!
Congratulations!