Introduction
My name is [email="[email protected]"]Steve Warner[/email]. I'm the 3D Modeling Instructor at the [Digital Animation and Visual Effects School](http://www.daveschool.com/demovfx/index.php) and the author of three [best-selling books on LightWave 3D](http://www.amazon.com/Essential-LightWave-v9-Fastest-Easiest/dp/1598220241/ref=sr_1_3?s=books&ie=UTF8&qid=1281385842&sr=1-3). I began using ZBrush in 2003 with version 2.0 and went on to write the official [ZPipeline Guide to LightWave](http://www.pixologic.com/docs/index.php/ZBrush_to_Lightwave) for Pixologic.
Working with ZBrush 4 has been absolutely incredible. The tools and workflow enhancements in this new version have yielded one of the most powerful and easiest to use 3D applications on the market.
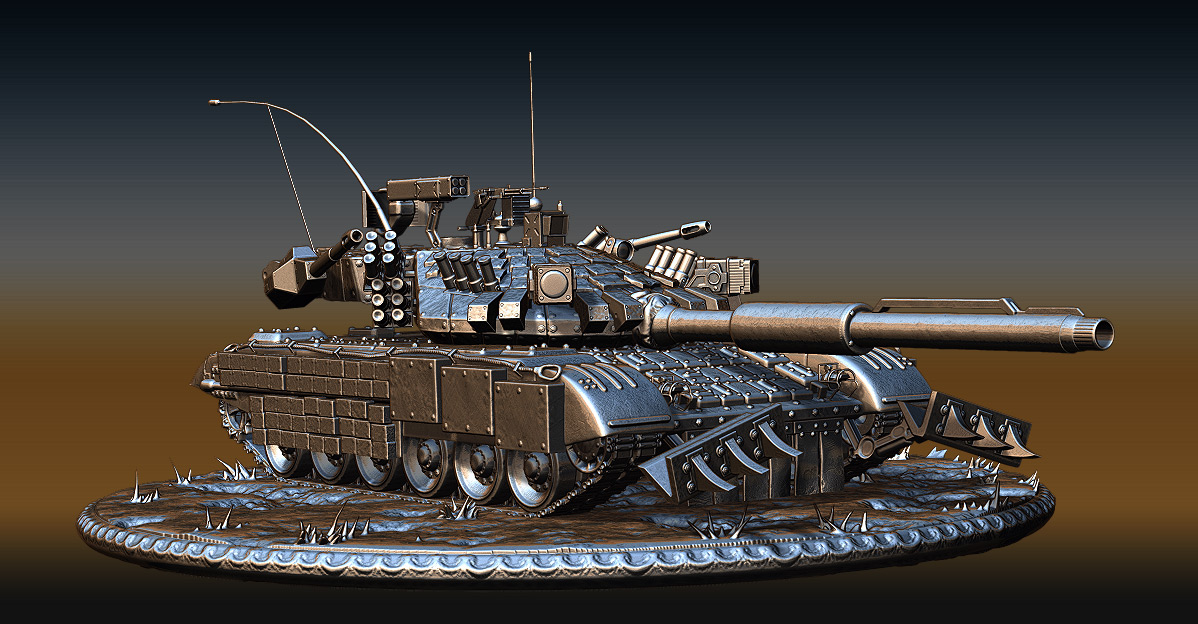
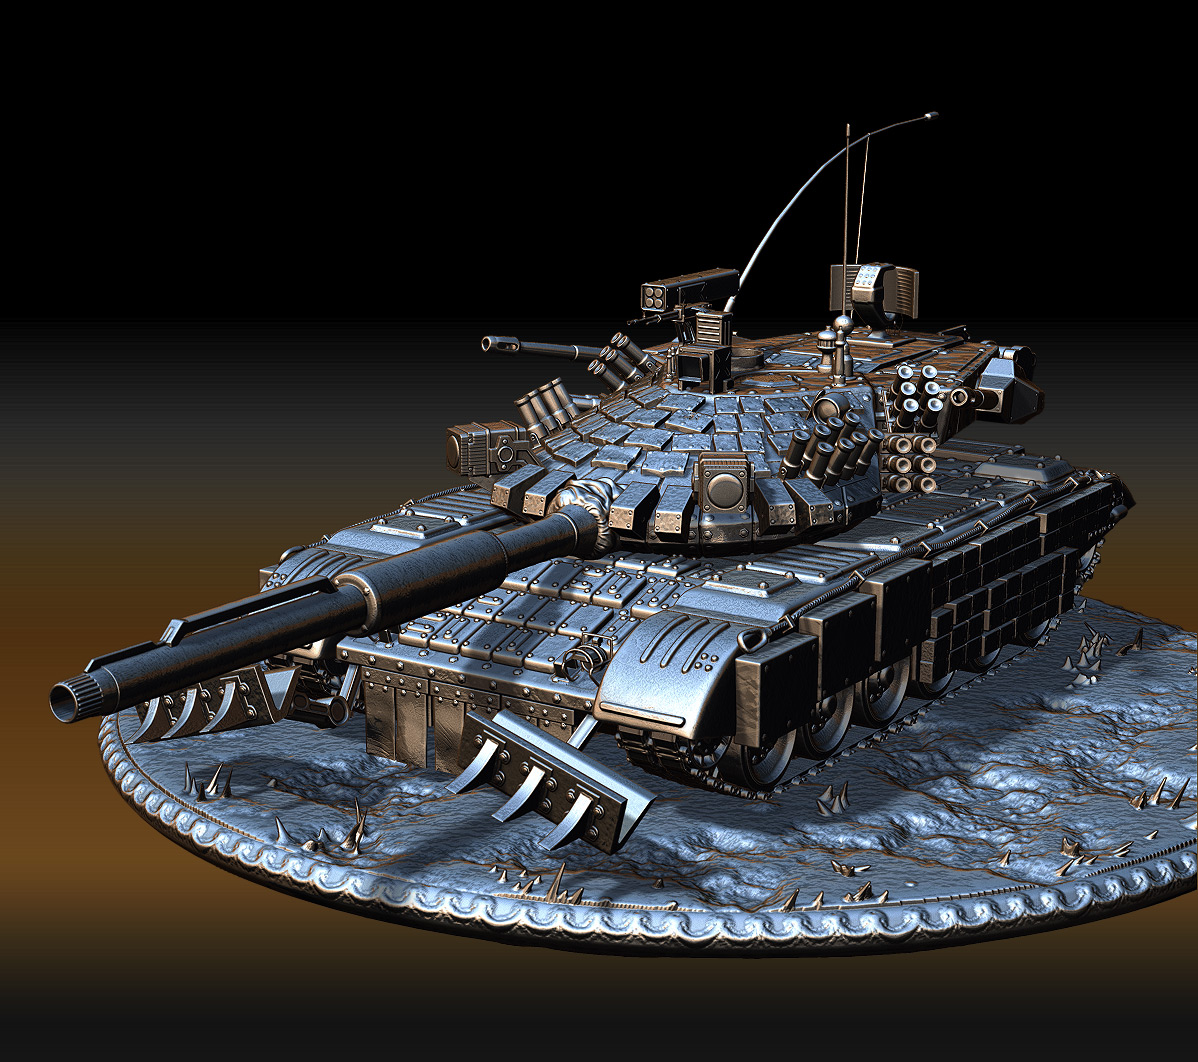
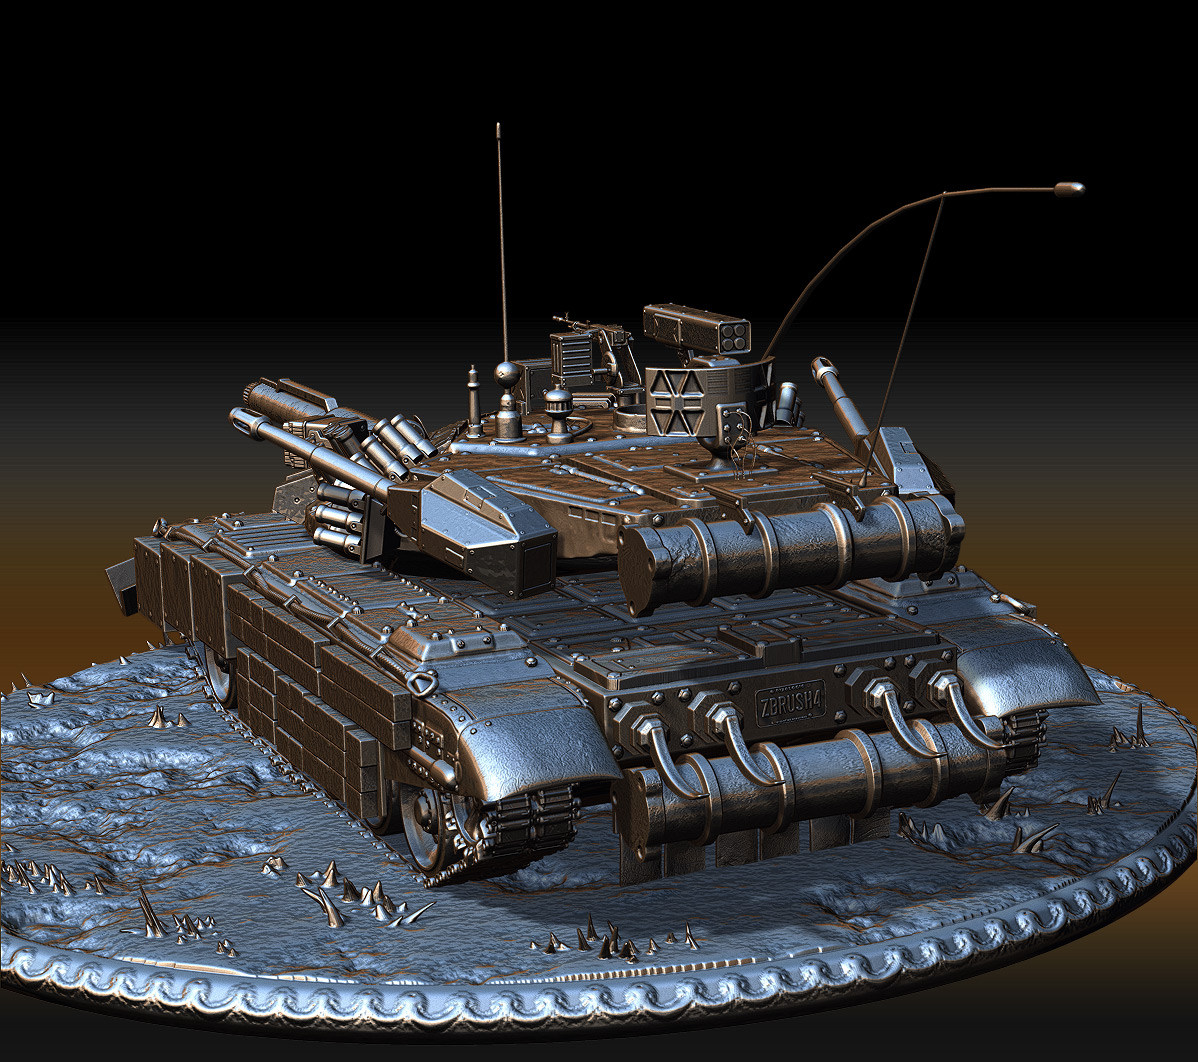
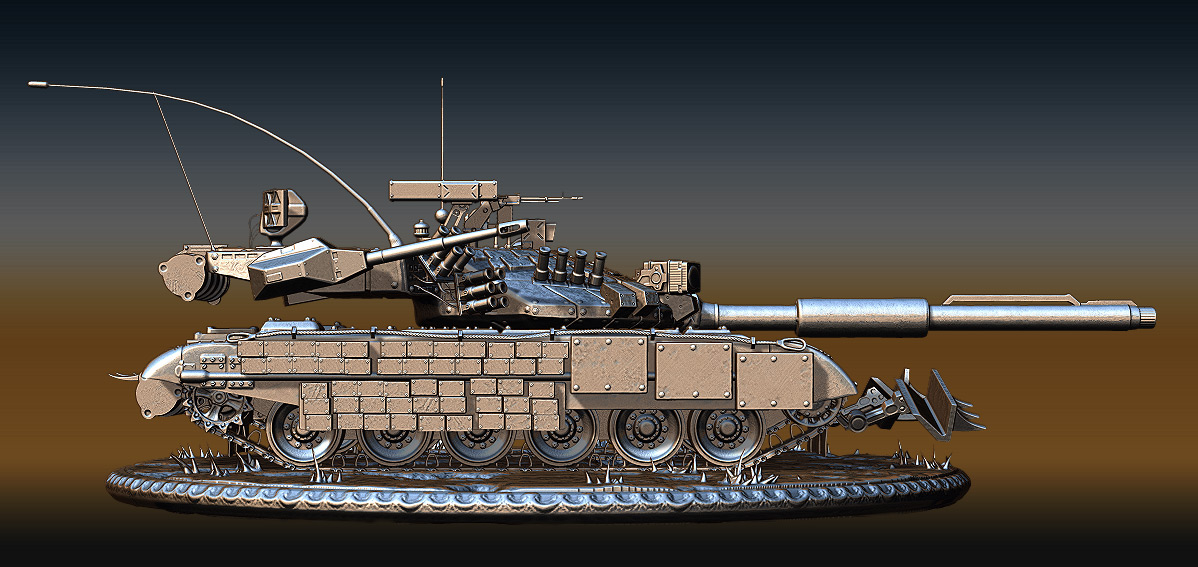
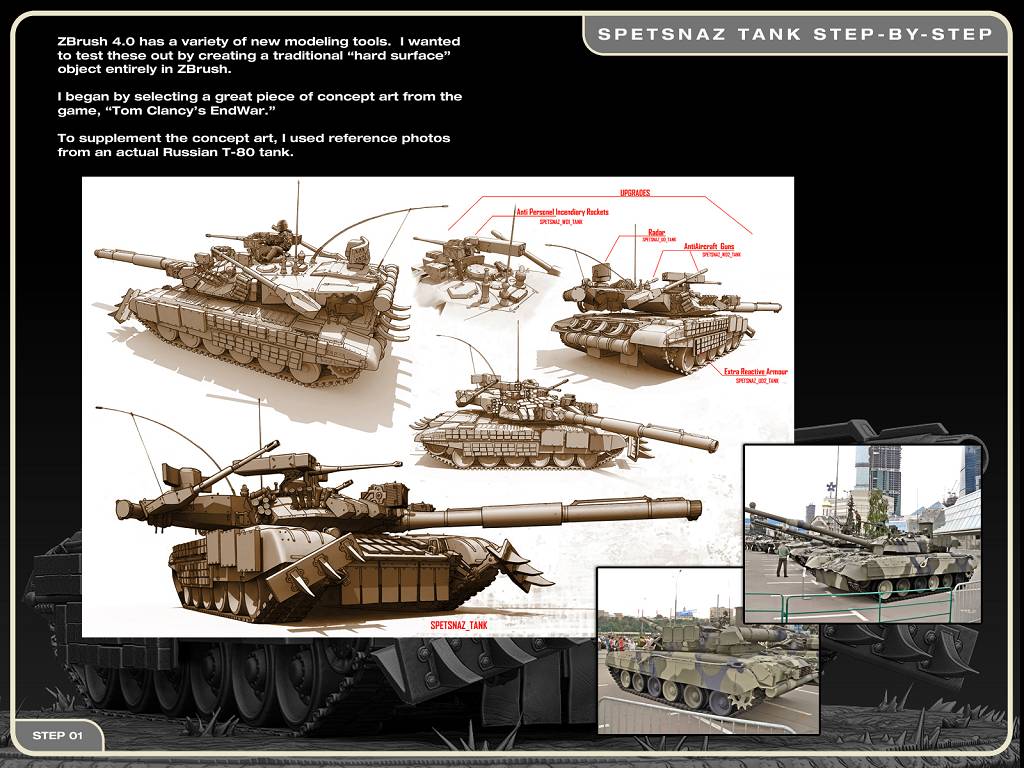
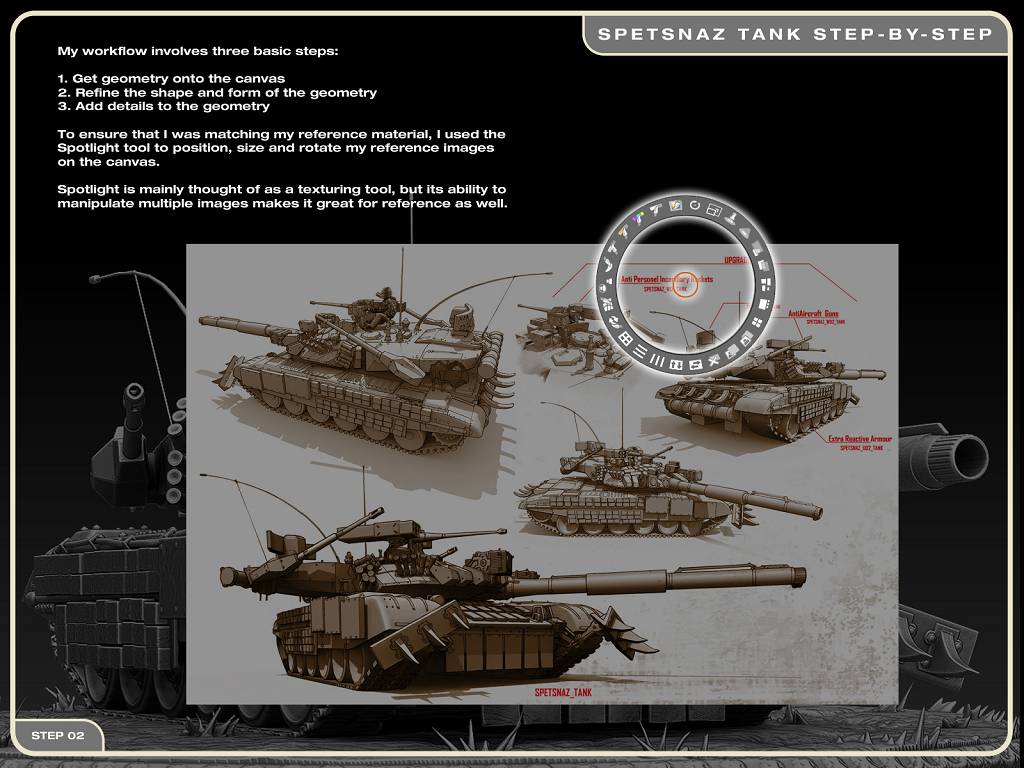
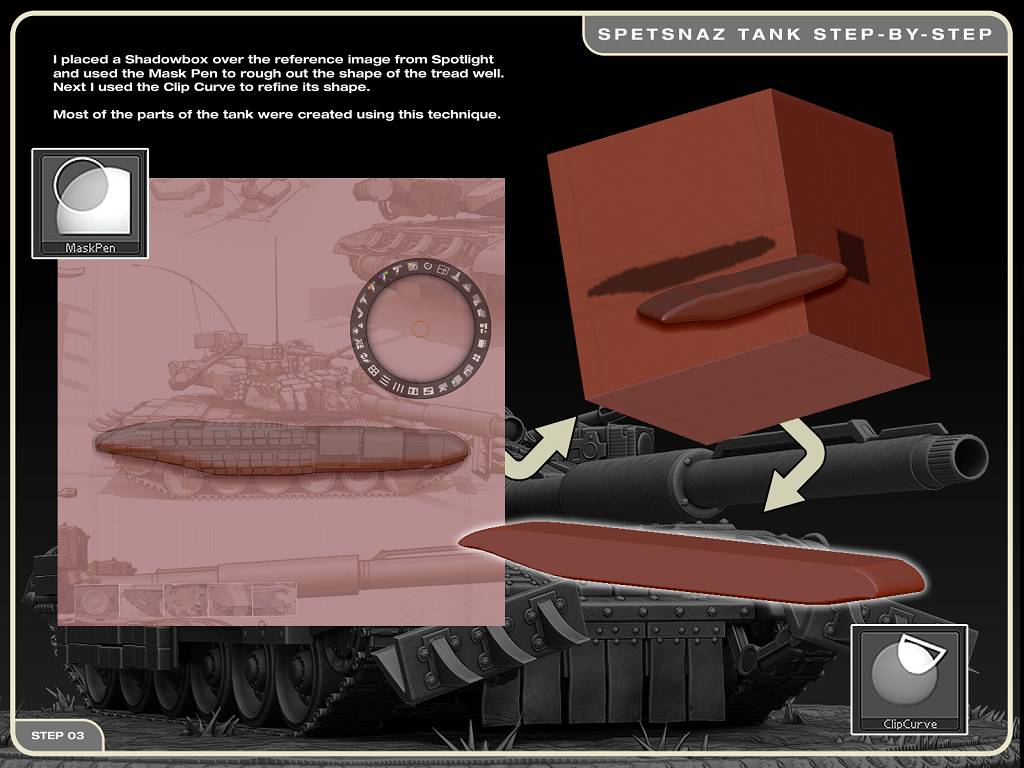
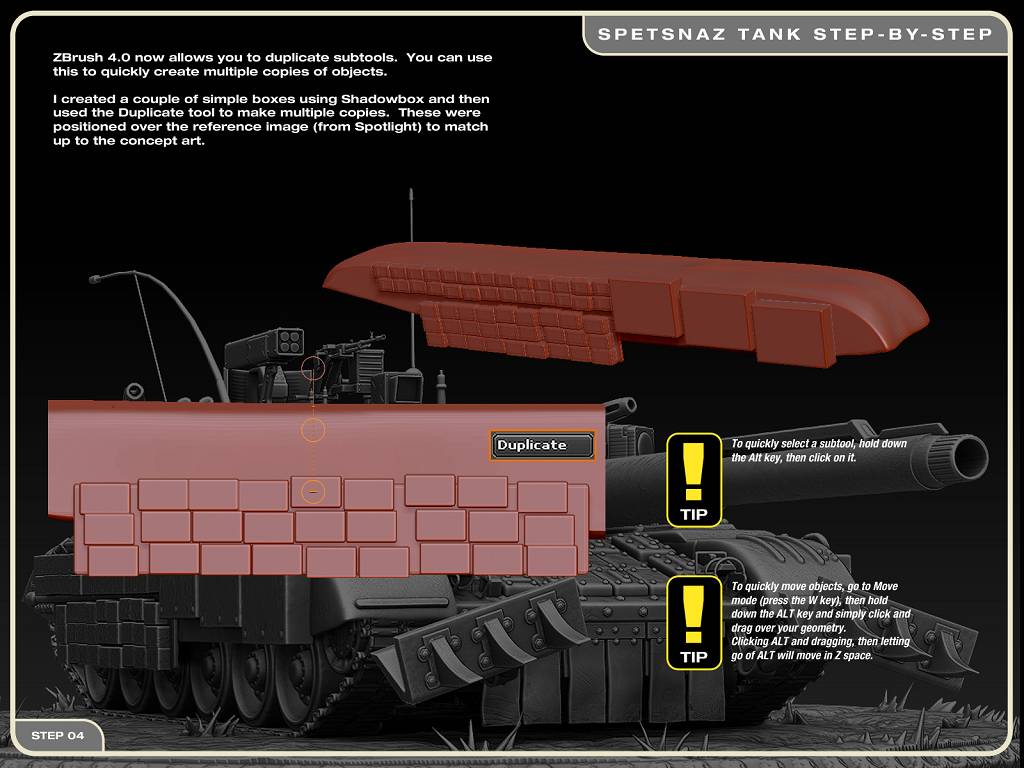
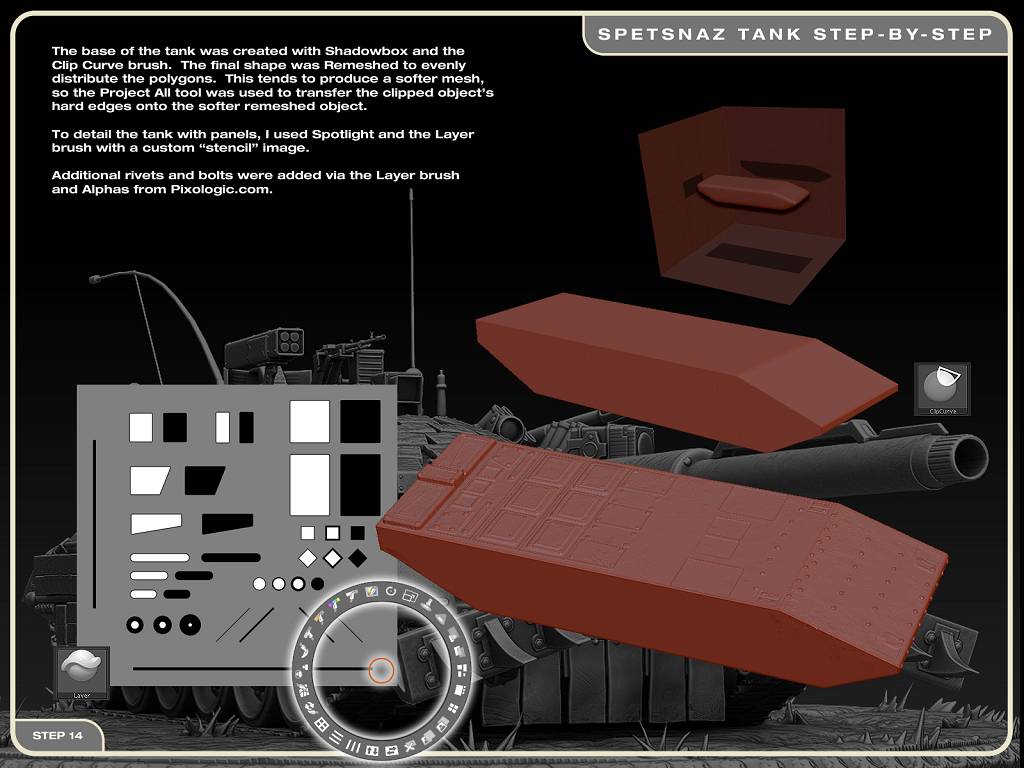
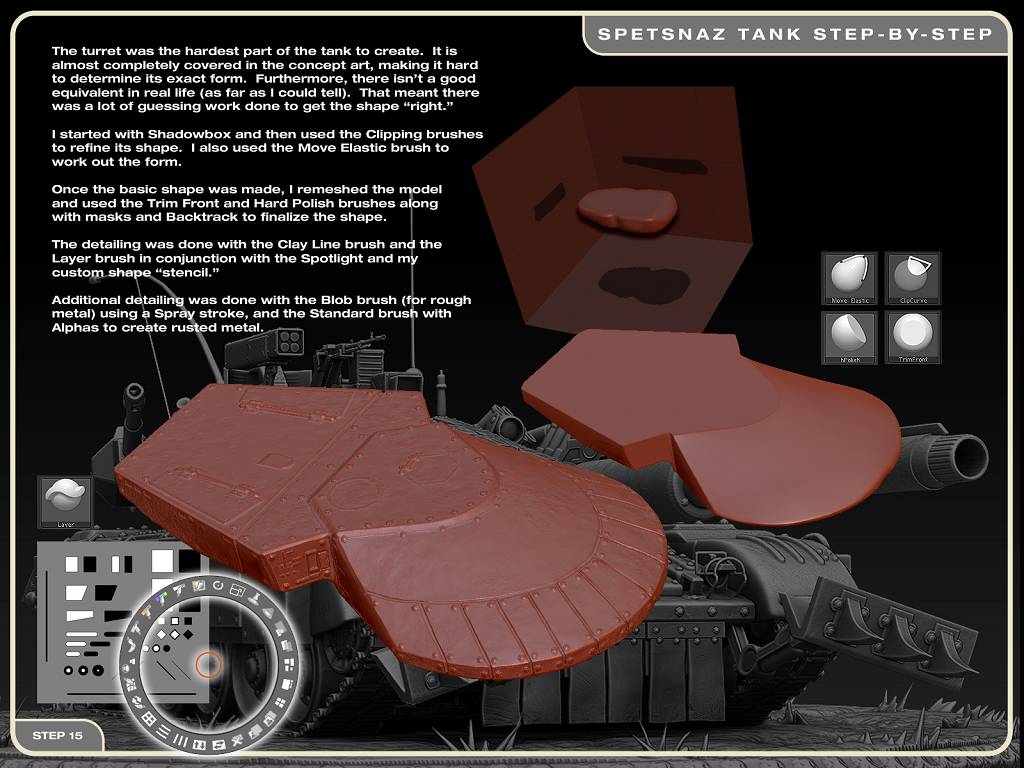
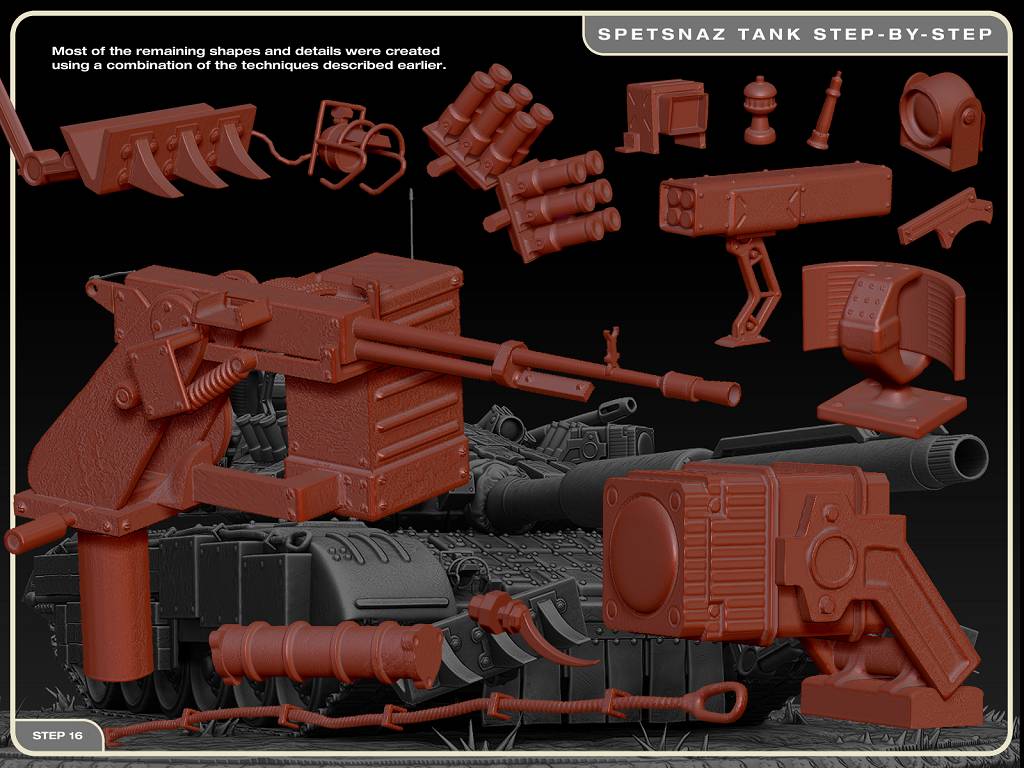
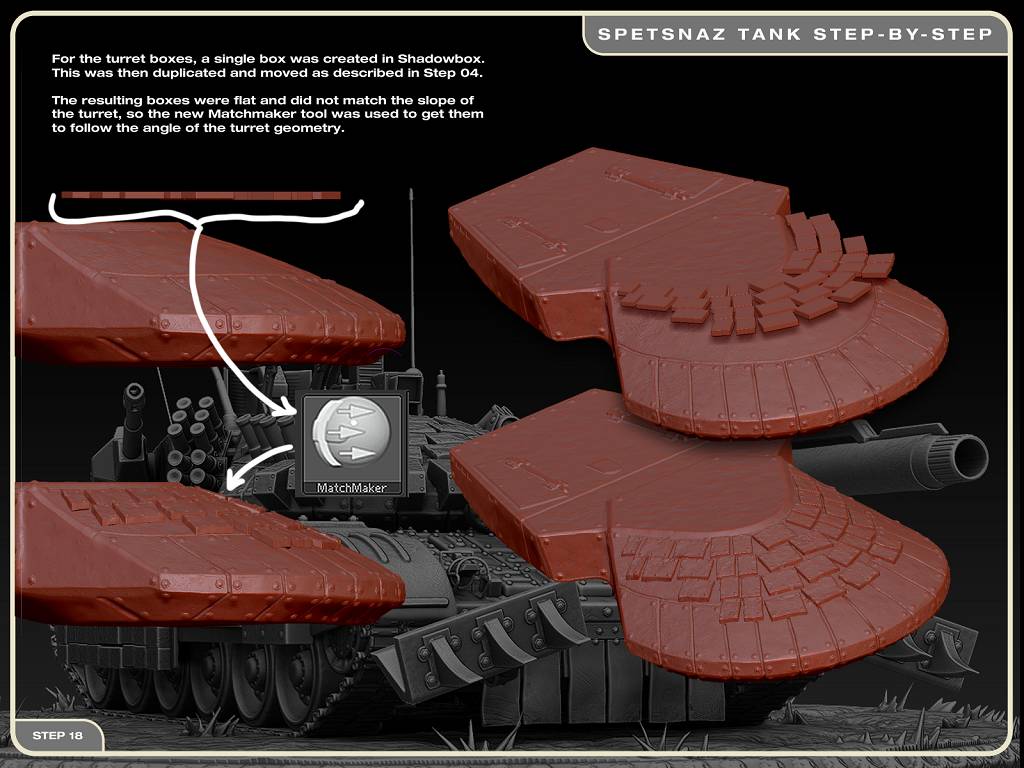
ZBrush is widely known for its outstanding organic modeling tools. But starting in ZBrush 3.0, a variety of hard-surface tools began appearing in the program. With the advent of ZBrush 4.0 (and features like Shadowbox and the new Clipping brushes), I wanted to see if ZBrush was truly up to the task of hard-surface modeling.
My primary 3D application is LightWave 3D. LightWave (and its spinoff Modo) have long been been recognized for their exceptional modeling tools. Hence, my expectations of what a program should offer for hard surface modeling work are quite high. The tools need to be fast, easy to use and produce great results. I'll be honest when I say I wasn't expecting much. But I was absolutely stunned by what I found. The hard surface tools in ZBrush 4 are astounding. They fit perfectly into the "sculpting" paradigm used throughout the program and make complex models a breeze to create.
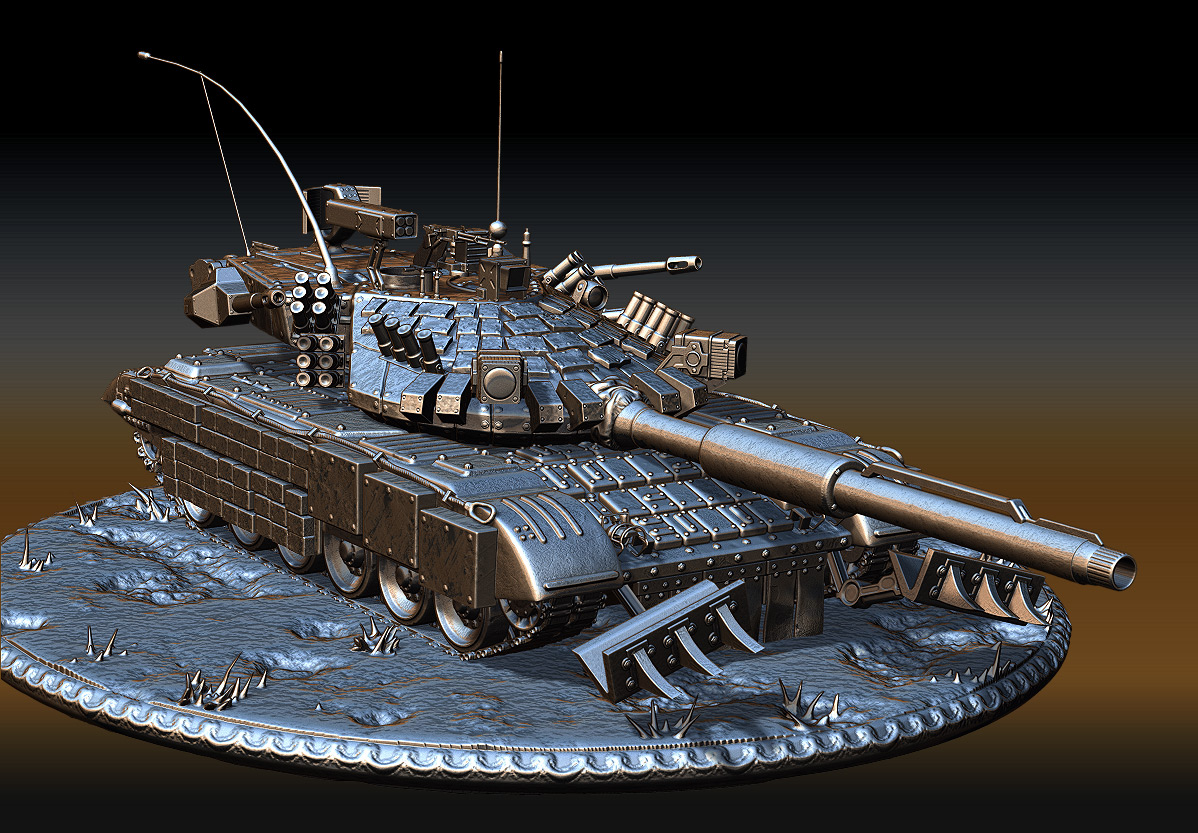
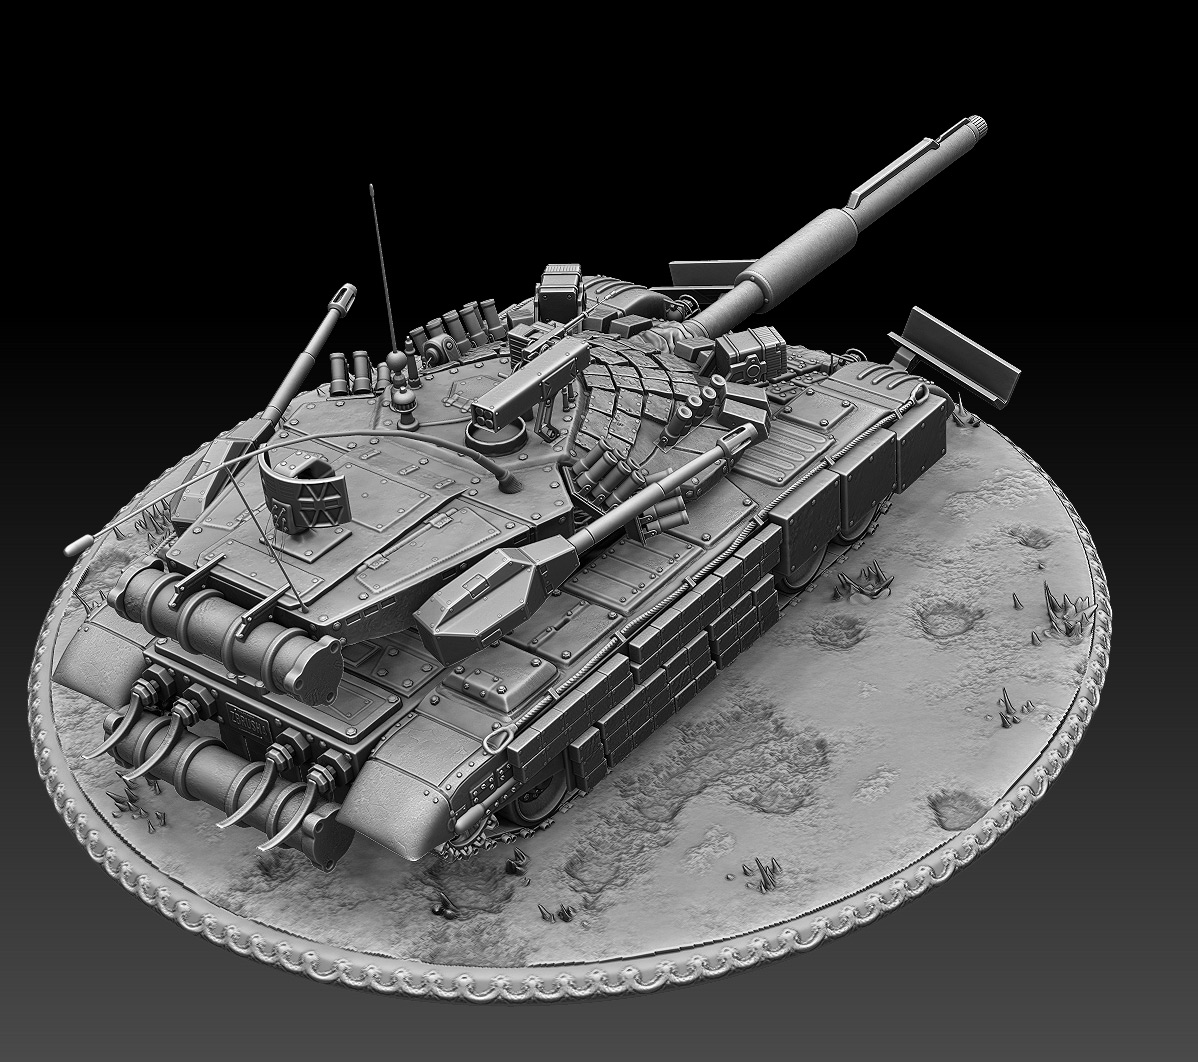
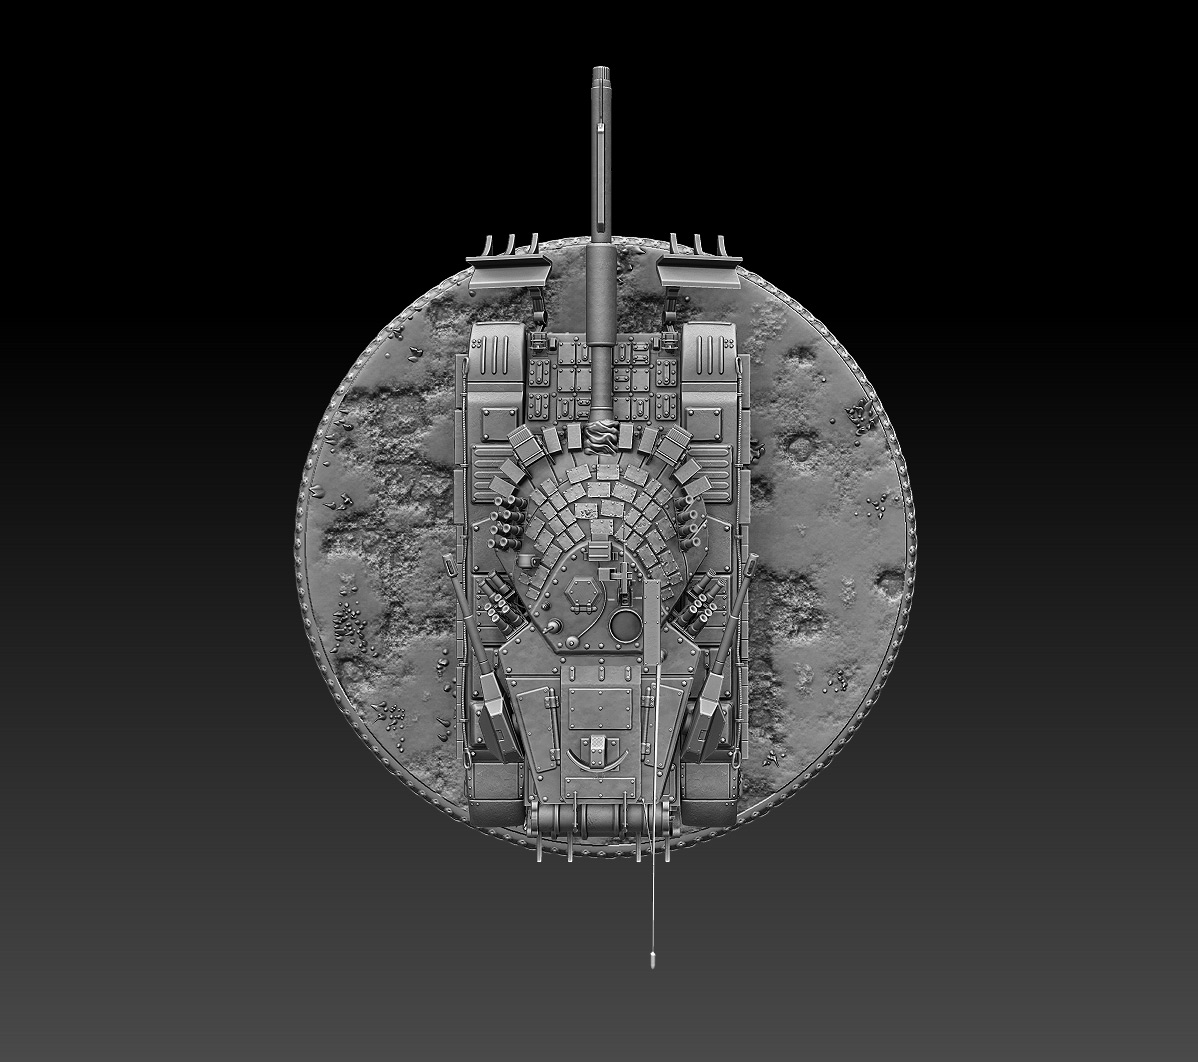
Here is the result of roughly two weeks of work, done entirely in ZBrush 4:
[]
<b>Animating Tread</b>
There is an old trick to creating tank tread animation in LightWave using morphs. (Virtually anything you can do with morphs in LightWave, you can now do in ZBrush.) The trick basically involves moving each piece of the tread by one tread space. When animated, the tread will appear to move seamlessly. I did a quick proof of concept to see if this would work:
[youtubehd]ZgXsZPFbxfg&hd=1[/youtubehd]
With a successful proof of concept, I moved on to creating the final animation. I began in ZBrush by consolodating my tread down to a single mesh. Your animation is recorded per Subtool, so it was important to make sure my tread was all on one Subtool. To do this, I used the Merge Visible option.
The resulting object consisted of roughly 60 pieces. (I didn't add tread to the top as it wasn't visible and would only bog down my model.) To ensure that I could quickly select each piece in the one Subtool, I went to the PolyGroup menu and chose the "AutoGroups" option. AutoGroups will assign a new group to each distinct (unweld) mesh in your Subtool.
Next, I duplicated the Subtool (so I could have a guide showing where my tread was and where it needed to go to). I used the Transparency option with Ghosting enabled to help see the second tread tool.
To set up an animation, you need to record the Subtool's deformation. To do this, I went to the Tool | Layers menu and created a new layer. This put the layer in Record mode - ready for deformation.
Next, I selected a single section of the tread by holding CTRL+Shift and clicking on it. This hid everything but the piece I wanted to work on. I then used the Transpose Move and Rotate tools to position the piece against the ghosted background object.
When I was finished, I showed the remaining tread pieces, selected the next one in line, and repeated the process.
When finished, I turned off the recording for the layer and dragged its slider. I could see the entire tread move forward by one tread piece. To get this to loop, I needed to record the animation to an MDD file.
I enabled the Timeline and positioned my camera. Then I clicked on the timeline to create an initial keyframe for the camera at Frame 0. I added another keyframe about half-way down the Timeline.
In order to animate in ZBrush, your camera needs at least two keyframes. The camera's keyframes determine the "recordable" portion of the timeline. And the length of the timeline itself can be adjusted (in seconds) in the Movie menu.
With the camera now set up, I went back to my tread deformation layer and clicked on it. The Timeline will only show the track for the current "element" (be it the camera or an object's layer). Clicking on the layer selected it as the active element. Next, I created a keyframe with the tread layer at 0% and another keyframe (where I set the camera's second keyframe) at 100%. Scrubbing the timeline, I could now see the animation.
I clicked the button in the Movie menu to store the MDD file and gave it a name. Then I CTRL+Shift+Clicked on area below the timeline to record the animation. This also stores the MDD file.
Once the MDD file was created, I disabled it in the Movie menu (so that it wouldn't be overwritten). I then went to the Layer menu and loaded the MDD file there.
To get the MDD file to show up, you need to place a keyframe for it on the Timeline. The location of the keyframe determines when the MDD file will start playing.
You can now control the MDD start time (via a keyframe on the timeline) and the MDD playback speed (in the Layer menu).
I repeated this process for the wheels and gears. The primary obstacle with these, however, was their circular nature. I couldn't just rotate the wheel. I had to rotate it in small increments by creating multiple Layers. And even then, I found that the deformation would cause "swelling" and "shrinking." So to offset this, I created "counterbalance" layers which compensated for the size change.
Another obstacle I encountered was the back gear. Since it "grabs" the tread and helps pull it along, it was crucial that it be timed properly with the tread animation. Unfortunately, however, the back gear is assymetrical. It could not be rotated 10 or 20 degrees and then looped. It would have to be rotated a full 360-degrees. And since wheel rotation is not easy with linear morphs, this became a major undertaking. I ended up animating the back gear separate from the rest of the tread and wheels. To get it to sync up to the tread, I used the MDD Playback Speed settings in the Layer menu.
I did several tests along the way before getting to the final. Here are two work-in-progress animations.
The first shows the finished tread animation.
[youtubehd]p6H_fdSkVu0&hd=1[/youtubehd]
The second shows the tank moving over a large terrain.
[youtubehd]bp6_0P-TdT8&hd=1[/youtubehd]
In order to get the tank (with its multiple subtools) to move along the ground, I simply animated the ground, leaving the tank in place, and then moved the camera to help hide the illusion.
Here is the final animation rendered with BPR and the metallic material I created.
[youtubehd]sl8iKkxiljw&hd=1[/youtubehd]
<u><b>Conclusion</b></u>
It's been a privilege and honor to be a part of the beta team and to work alongside artists whom I have admired for years.
I want to thank Pixologic (and in particular Jaime, Paul and Ofer) for the tremendous opportunity they gave me, and for the chance to prove that ZBrush is no longer just a great organic modeling program. It is now one of the best hard surface modeling programs as well.
Attachments


 I don’t believe ZBrush supports this but I’ll ask and let you know what I find out.