Well, here is another thing I have not been able to figure out. Any ideas?
I’m afraid that I’m not really understanding the problem from the illustrations alone.
From what I see the texture loks shifted. It has to slide up and to the left. The nipple is not where it belongs and thus everything else is distorting parts in a way that does not fit to the basic mesh flow. Check your uv mapping/texture projection. The key for your solution seems to be there.
Cheers
Lemo
I am not sure why the maps are giving me errors when the ZBrush model does not reflect that harsh of a contrast. What I mean is the zbrush model has nice rounding to the chest area, but the generated displacement map has pure white next to dark showing extreme contrast which is why the max model is screwy in that area.
The max render is properly reflecting that area of the displacement map, but the displacement map is not properly reflecting the zbrush model
zbrush (correct) > displacement map (incorrect) > max render (correctly reading the incorrect displacment map > incorrect render
Hope that makes sense. The error is somewhere in the displacement map creation process it seems for this particular problem on the chest area.
8 bit depictions of 32 or 16 bit displacement maps can fool the eye quickly.
I’m sure it’s a bend cage or a mapping problem.
Cheers
Lemo
I have never heard of a bend cage so will look into it. I can not find anything wrong with my mapping, but I am sure there is since I am getting anomolies all over the model; shoulder, chest and back. I have one poly that the uvw will not hold a texture at all for some reason.
I have not solved this issue yet, but may be on the right track. It seems that either something I did or ZBrush defaults to changing the seams of the custom uvs.
Example:
- create model in max
- create custom uvs with no overlapping or inverted faces
- export model as OBJ
- import to zbrush
- do sculpting
- export model as obj
- import into max
- apply unwrap uvw modifier so that you can see the uvw seams and every poly edge will now be a seam again instead of the seams you placed … still in same places on the map, but having that many seams can cause issues for sure
I mean by ‘bend cage’ a low poly model you are using which is not in sync with the lowest subdivision level in ZBrush. I’m often lazy and only transport displacement maps only. And once in a while I change something in ZB which affects that lowest frame. And then the maps do not fit anymore correctly… But I am using XSI so I have no direct experience which wizardry you have to perform to make Max happy.
Lemo
In my ZBrush, UVLayout, XSI workflow UV’s only change when I lay my hands on them. Max seems to be a bit more ‘dynamic’ there…
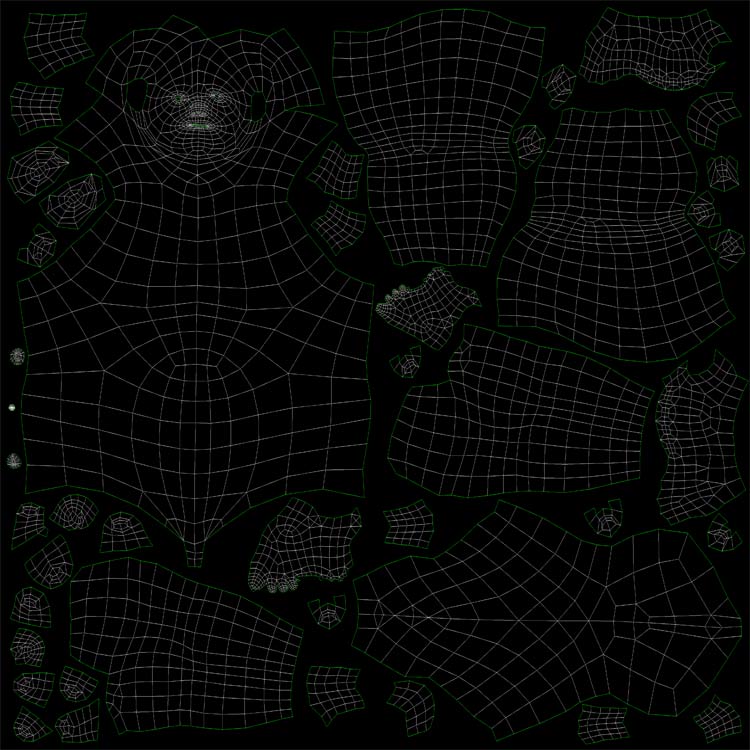
I am not sure what happened or if it was something I did (very likely when I adjusted the uvw with the adjust in zbrush), either way, that was my first time to create uvw maps so they really needed to be completely redone anyway. Here is my new uvw map which uses much more of the canvas and I used the relax adjustment good deal more so that there would be no stretching on my uvws.
Also, I noticed certain areas that were acting up and Aurick said it might be due to not having enough space on my uvws. At first it did not register what he meant, but once I started reworking my uvws it dawned on me (duh… he meant that the actual uvw landscape for high detail areas needed to be larger so the displacement information would have a place to go since there are only a certain amount of pixels on the canvas for the pixol information to be translated.
Areas like the inside of the mouth, eye sockets, etc. I scaled down and pushed off to the side on my map, areas like the fingernails, lips, etc. I enlarged and wham … sure enough that fixed my issues so far!
I can’t see it correctly, but if the muscle is forming an overhang or is coming close to that, then the displacement creation will fail. And the closer you come to that potential failure, the more prone to weird shader effects you get. Displacement cannot produce ‘overhangs’. Maybe that is it… Maybe you can ‘flaten’ the chest on a copy of the model and see what happens.
Cheers
Lemo
Ok, I understand. The geometry is overhanging somewhat so the displacement can not correctly depict that area that is hidden as it looks directly onto that normal that is under the overhang. I will correct these areas from my model. Thanks for the tip.
I wish there would be something like ‘displacing normal maps’. You know, normal maps encode the direction and intensity in all the color channels to generate a better bump shading than a 2d bump map. So using that information a render engine could in theory displace microploygons into all directions… I’m sure we’ll see something like that some time as the thought is so obvious and technology allows us in the meantime to haul large maps and ton’s of fine displacement around. I really hope that the overhang is the cause. Man boobies… always trouble… lol.
Lemo