ZBrushCentral

Well, here's some of my first Zbrush work

Here’s the first few things I’ve done in Zbrush:

This sea creature like face was created randomly on a rough test head I
had done earlier in 3.0. It was to see what changes were made in 3.1 and
I ended up with this. I’d only had 3.0 for a week. Started with a sphere.

creature_001.jpg

Darn convergence point on the top of the sphere on the above head. But hopefully it will be covered by stretched hair over it, if I can get that to look good that is.

Also, I’m overall new to 3D modeling. I do have experience with Hexagon vertex modeling so I know how different this kind of modeling is until say I retopology it or started with a simple base model in another software to have proper loops. I thing this software will be much more fun to create overall toon like body skins quickly with zspheres that regular modeling until I get faster the other ways.

Attachments

creature_002.jpg

zsphere.jpg

zsphere3.jpg

brisby_wip_001.jpg

brisby_wip_002.jpg

I think it’s very impressive for a new user. Brisby is great:+1: .

I just ordered ZB 3.1 and would hope to eventually get where you are.

Cheers.

Greg

More work on Brisby. Things were easier when I learned how to save masks
with alphas. But trying to come up with ways to smooth flowing shapes,
like the eyelids, took some time until I got what I wanted. Something like this is probably better down with subdivision modeling. O I just hope I learn more tricks and my speed improves with ZBrush.

[brisby_wip_005.jpg]

Glad you like the stuff, and Brisby. Watching the first 7 chapters of these lessons really helped learn how to work with this programe. Especially things like when and why you should switch between low division levels for large changes, back to high division for finer details, and kind of start low, get a general shape as good as you can and divide again when you can no longer get anymore detail:http://gnomonology.com/prod/19?&p=2

Wow love the Brisby, sea creature and hope you are going to finish the lion king really really good work.

Before I went any further, I decided to practive some retopology, creating
displacement maps, and figuring out how decent I could get them to work
in Carrara 5 Pro.

So here’s some steps in my learning:

Here’s a preview of what the mesh looks like started from a
3DSphere, not pretty. I learned early on that polygroups were not
very useful without loops since they change when you go to the
lowest subd. Thankfully after I learned you can save masks with alphas:
[attach=82036]brisby_wip_007.jpg[/attach]

I first started by drawing the lines on the model with colorize in
textures, just like in Meats Meier’s training video at gnomonology:
brisby_wip_006.jpg

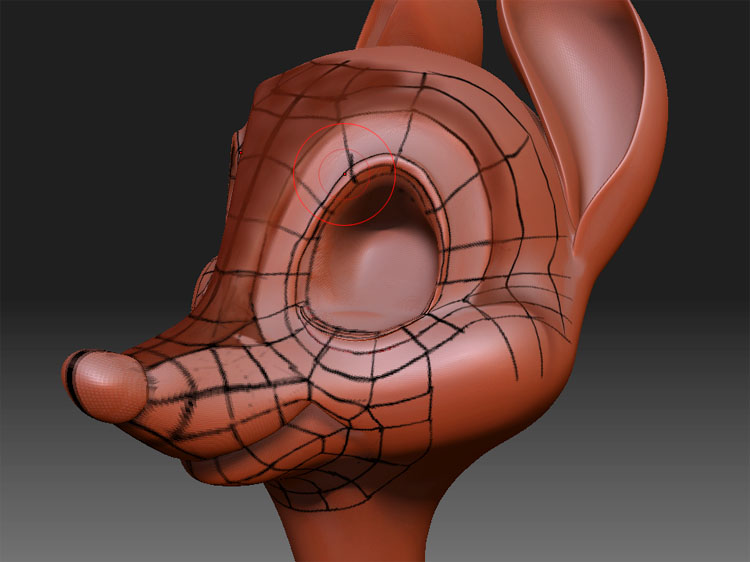
Progress on the retopology. I stopped here to practice on projection
and displacement. It did take some tweaking in the new topology to
get the project to work correctly with the fine crease detail on the
bottom of the eys:
http://other.toonguru.com/3D/zbrush/brisby_wip_008.jpg

Preview of retopology, no projection or subd:
http://other.toonguru.com/3D/zbrush/brisby_wip_009.jpg

Projection with high subd:
http://other.toonguru.com/3D/zbrush/brisby_wip_010.jpg

No projection. I decided to make new skin off of this and practice
redoing details around the eye with a better topology like this in the
next image:
http://other.toonguru.com/3D/zbrush/brisby_wip_011.jpg

Before I did this, for the heck of it. I exported the lowest subd, then
imported it into Hexagon and learned to create UV for it. Then I
imported it into Zbrush and subd many times and practiced redoing
some detail to test displacement. I think I did create a morph target
to switch back to for creating the displacement instead of using the
altered base mesh. So here’s the details added for testing:
http://other.toonguru.com/3D/zbrush/brisby_wip_012.jpg

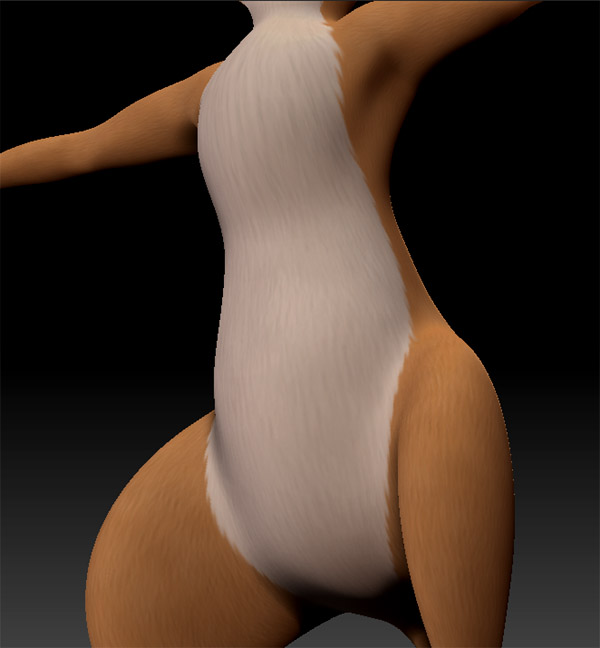
So below is the result of the displacement, and some extra changes
in the face to test movement. For some reason I left the
displacement map at 1024*1024, which probably did not help the
quality in areas.

Also, you’ll notice the displacement not matching around the outer
edges. I overlayed the displacement map on the UVs in photoshop, it
pretty much matched up, with also bad edges always outside the uv,
but some how it relaxed in zbrush and the bad edges were inside the
uv around the sides. Yet, some how areas that I thought had a good
buffer shows some jagged edges on the bottom at render. Confused
how that happened.

Each of these were subdivided 5 times at render. First one, no
displacement, 2nd, displacement, 3rd and 4th were changes to close
the eye, lower the smile, make the smile stronger, puff the cheek,
and lower the eyebrow:

http://other.toonguru.com/3D/zbrush/brisby_wip_013.jpg

So all that was just for learning, not really a final product.

Attachments

brisby_wip_007.jpg

A little more wip practice with Zspheres to create a body for Brisby. This time learning how to do those magnet things. I probably spent too much time trying to get things perfect in the zpheres when I could have just reshaped it from the generated skin.

First two images show the zspheres, 2nd two just show a bit of transposing, smoothing and moving on the legs to see how they’d repose. Plus a bit of color just to see how things are shaping up so far.

brisby_wip_015.jpg

Don’t know how much time I should waste with zspheres to create hands, but I’ll give it a shot. Then later merge the body and head as one in Zbrush with subdivisions using I method I thing should work.

Oh, I used KeiToon material for the toon shading.

About time I update this this thread.

I sort of took the Brisby character out of Zbrush at one point, connected the head to the body, and worked on the topology and final details with subdivision modelng, compared to trying to do it all in Zbrush, making it very limited for rigging if I were to try.

So here,s the finished face the was originally sculpted in Zbrush, then retopology in Zbrush, no displacement used, then final touch up in Hexagon
[attach=82037]brisby_wip_024a.jpg[/attach]

Then I exported the model back to Zbrush as I wanted to try a sculpted hair looked on top of trying fur. So I decided if I use a morph to move the mesh in position for a displacement, I could then apply a displacement when I need it (the chest looks odd here):
[attach=82006]brisby_thumb_001.jpg[/attach]

[attach=82038]brisby_wip_026a.jpg[/attach]

Here I fixed the chest to be more of a tuft of hair. Then I exported the new base mesh to Carrara, used it as a morph target, then applied the displacement. In the end, I will import back the original base mesh, and use morph brush to make the changes only to the cheeks and top of head and chest, and edit the displacement to not effect the other areas. I used Carrara’s basic toon shader to see the possibilites:

[attach=82039]brisby_wip_027a.jpg[/attach]

Attachments

brisby_thumb_001.jpg

brisby_wip_024a.jpg

brisby_wip_026a.jpg

brisby_wip_027a.jpg

nice work tim,
edit, oops didnt read your first post, it really looks like her, good job, youknow i always loved that movie until recently when i saw it again as an adult, unfortunately i was like “all they did was just to move a brick”, its funny how as a kid it seemed so much more epic. great animation tho.

I think Brisby is exceptionally well done. Very good job!

Oh, here’s a turntable of the above sculpting:
http://youtube.com/watch?v=jGNCfIGovMQ

Now, I then wanted to paint a light, suddle texture on here:

A test render to see flaws in Carrara, used it aslo as a bump map:
[attach=82040]brisby_wip_029.jpg[/attach]

More work in Zbrush after above image:
[attach=82041]brisby_wip_031a.jpg[/attach]
[attach=82042]brisby_wip_032.jpg[/attach]

Attachments

brisby_wip_029.jpg

brisby_wip_031a.jpg

brisby_wip_032.jpg

Thanks, Yep, Brisby from that Don Bluth film.

Also, here’s more of a easy to follow WIP on this character:
http://forum.daz3d.com/viewtopic.php?t=74163

Sadly, waiting for major fixes in Carrara, I’m putting my Brisby project on hold.

Though, in the mean time, I started another Don Bluth character. Goldie, from Rock A Doodle. This time I want to keep it simple, and have it all in Zbrush. no figuring out rigging and shaders in ohter programs. I only imported a cube for the eye lids because the cubes in Zbrush where spheres turned into cubes.

Still very WIP. No work on outer arms, hands, knees, and feet, which are
all still from zspheres basic setup of the mesh. I need to extract the dress, and frilly stuff around the bottom of it. Add the giant pony tail, tail feathers, then some shoes. Painting is basic enough just for these renders. I used a modified matcaptoon material.

Body was all zspheres. The top and bottom of the beek was bad up of three zspheres. The hair is all one piece, made from zspheres. I’ll try to post that later.

Here’s a full turntable at different zooms:
http://youtube.com/watch?v=HOHnn7k5RDg

[attach=82011]goldie_002a.jpg[/attach]

[attach=82043]goldie_003a.jpg[/attach]
[attach=82044]goldie_001a.jpg[/attach]

On this one below, I crashed and lost some of the refined work on the top of the outfit, so it’s blurry, and the render material seems strong around neck
and chest, showing too much detail:
[attach=82045]goldie_004a.jpg[/attach]

Attachments

goldie_002a.jpg

goldie_003a.jpg

goldie_001a.jpg

goldie_004a.jpg

awesome work make a full image and ill vote it too top row mad talent

Hello Timothy,

Very inspiring!!! All your models look great! I understand better now the improvement you get with the retopo … I hope mac version of ZB will come out soon so I can try all this…

Keep showing us more!

cheers
Helios

Thanks for the comments and I’m glad if any of my WIP help make things clear, like topology. So I’ll post the zsphere stuff on the goldie model when I get home.

Though, strange, the thumbnail of the brisby hair sculpting that was suppose to be in the recent update images of the forum disappeared a while ago, leaving the goldie preview in there, which is near getting knocked off itself now. Then, out of no where, the recent images now show one from my very first post months ago. I hadn’t changed a thing since my last post.

Nicely done. It really look tooney

Really Great Job. Also, my favortie animation. Thanks for the well thought out tutorial. Love this method.

TimothyB,

Ahh gotta love toon style work, yours is very polished and very well done! Really appreciate some tips on the retopology that you did, have yet to really play a ton with it yet get around to it some day here. Keep up the hard work got some really great stuff going on, I might have to play around with some toon stuff soon. :+1: :+1:

Finished and posed version of Goldie now posted here and some making of stuff:
http://www.zbrushcentral.com/zbc/showthread.php?t=55773