ZBrushCentral

Texture from Polypaint polygon seams (Answered)

Hey, I’ve had this problem before and haven’t found a solution.

When I convert my polypaint to texture I can see borders or seams around the polygons. The UVs are welded together so I don’t see how the UV map border would cause it, also changing that setting has no effect. I’ve also tried different map sizes, and the “Fix Seam” button which doesn’t seam to do anything. It’s getting rather annoying.

Anyone know what is causing this and how to fix it?

Thanks

Bump, and to clarify, the seams aren’t happening only where the UV seams are, but around every polygon. I can post a pic if needed when I get home from work,

thanks :slight_smile:

Bump because no one seems to notice this post and this issue is very annoying.

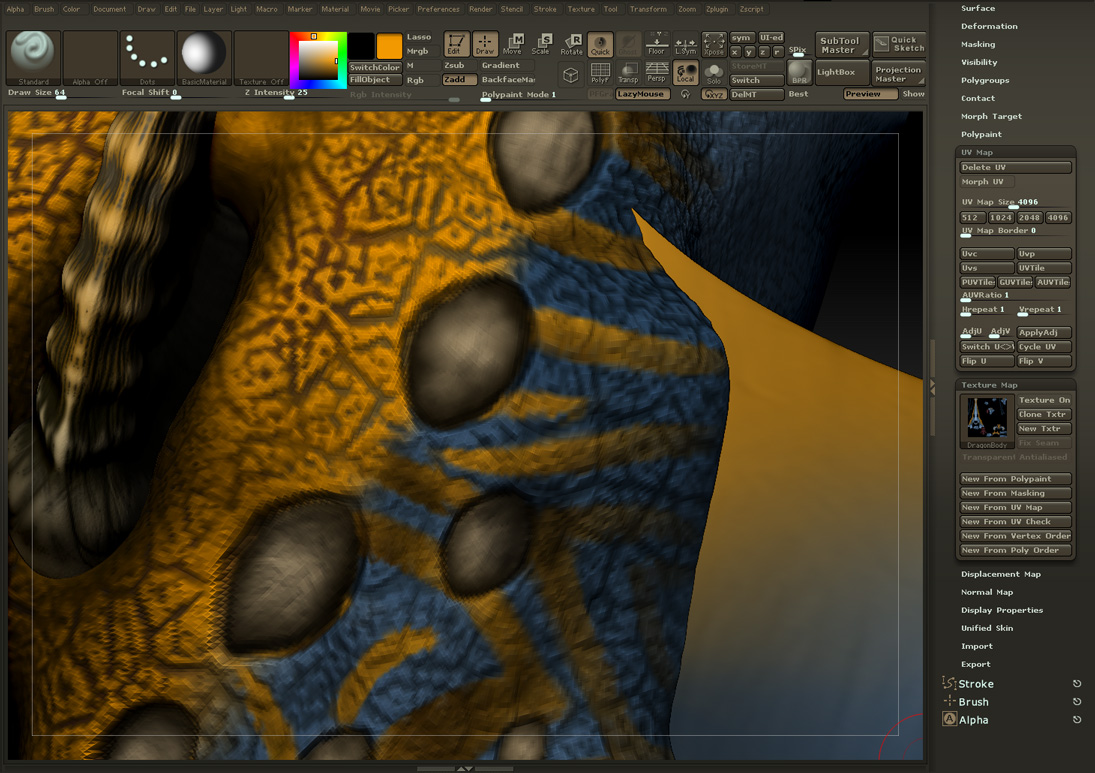
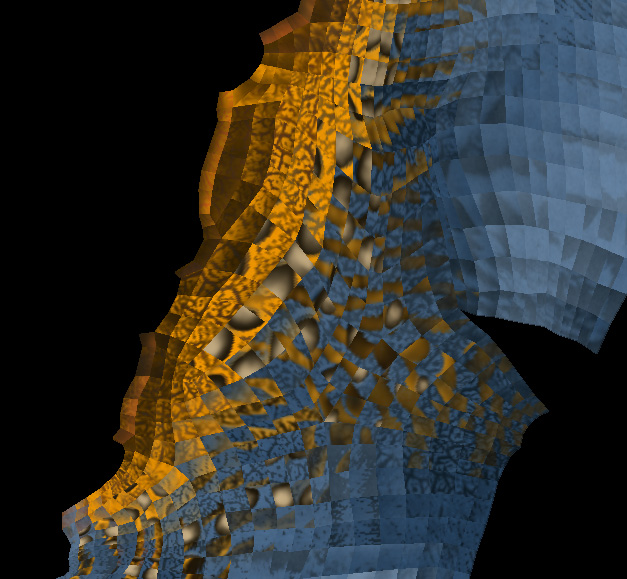
Here are some screen captures of the texture made from polypaint applied to the model and in photoshop, and the polypaint itself.

The UVs have no seams in this view, none of these are from UV seams. UV Map Border has no effect, it looks the same no matter its value.

It seems that Zbrush is doing something weird with my UVs. This mesh had no UVs during polypaint, I exported the lowest subdiv, unwrapped them in Headus UV Layout, then into max to move the shells around and split the mesh up the way the subtools are, then exported as obj. I have turned off settings in importexport to try and make sure that verts are renumbered.

When I import the UVd mesh at subdiv 1 it says “Mismatch points-order in the imported mesh was detected and auto-corrected.”

So why does Zbrush want everything ordered the way it orders, why can’t we use existing ordering without changing it. The UVs look great in every other program, but it looks like it’s getting shattered in Zbrush.

I need this unwrapped nicely, I already did it once, and I want to control where the seams are more than UVmaster will allow me.

Please, does anyone know what is happening. I try to answer people’s questions when I can, but it’s been 3 days without so much as a “we don’t understand please post a picture” or anything!

Thanks,
~Sean

textures.jpg

Attachments

textureOff.jpg

textureOn.jpg

lol okay, so I just posted all that, then went right back to messing around. kept pressing the cycle UV button and making a new texture from polypaint each time, after 2 times no seams!

So I’m not sure if this is the best way to prevent this, but for anyone else who might experience this problem:

  1. Lowest subdiv
  2. UV Map>Cycle UV
  3. Highest Subdiv
  4. Texture Map>New from Polypaint
  5. If not fixed start over at #1

it seems the cycle uv buttons rotates each UV 90 degrees or something? I’m not sure exactly what it’s doing but it seems to be working. I hope my frustration can help save someone else some time :slight_smile:

the problem comes from MAX. no other application I know of, or use has this problem. I believe it comes from max’s proprietary obj type…gw or some crap. Started happening as soon as autodesk bought mudbox.

There are other ways to fix this problem as well, you can find them inside the older threads part of the forums.

Clicking Cycle UV twice worked for me. Thanks a lot!

I had similar issues a while back and here’s the thread that describes the problem and my solution:

http://www.zbrushcentral.com/showthread.php?t=85704

I wish I’d known about the cycle UV’s button, that’s great. I could have solved the problem without having to re-export/ re-import. It will be a great help if I end up with the same problem in the future. Thanks for the post! I’m going to add a link to this thread onto my original post so people will be directed here.

Sorry to trudge this one back up, but the Cycle UV doesnt work for me. In the end the reason for this from what I can gather is the UVs or broken (like when you break a UV in Unwrap UV modifier in Max) in the export from Max or on import into ZB. This means that it sees every poly as a UV ‘shell’, so it doesn’t smooth between them when it is working out the polypaint to texture.

This maxscript is useful, it will weld all the UVs that have been broken in this way:

http://jhaywood.com/maxScripts.htm (WeldAllUVs)

Using this script would be fine for me, if it wasnt for the other UV issue which is occuring, I think it is related…

http://www.zbrushcentral.com/showthread.php?p=762895&posted=1#post762895

One thing for sure the obj import/export and how Max/ZB handles it is very suspect!

Goast

can you please provide links to those solutions in the older forums your talking about. I’m having this same problem and the cycle UV button is not working.

Thanks

Those threads are a year or two old by now. I’m sorry, but I don’t have time to go trolling. If I wasn’t on a deadline I’d be happy to look for you, sorry again.

Thanx for this tip Artesia and your efforts to get it sorted.

I was exporting my oject into Poser Pro 2011 and got the same out line of the polygons glitch, just like loosely glued bathroom tiles, especially if you cranked up the bump mapping in the materail room.

After a few tests, I discovered you need to cycle the UV’s 4X to get it back to 360 degree rotation (as only 2X does weird stuff as well) and this cycle UV’s seems to get rid of 99% of the glitches…I hope this tip helps others.

Cheers jif3d :slight_smile:

here is a pic of the glitch rendered in Vue 8.5

Attachments

ok I had the same problems, it tooks me one day to fix that.
I found the problem.
it is the retopology in zbrush.
the Zsphere must be in the object no outside of it.
otherwise you will get this problems.
than you get good results with nefative -1 values with reprojecting.
everything seems ok, but if you want to map it than you get this facetted look.
it has to be positiv values e.g. +1 at the reprojecting.
but what when you already chance your topo ?
than take a zsphere and make a retopo of the topo :wink:
level one adaptiv skin.
it will work, but dont forget to put this time the shpere in the object.
after you fix this, the mesh display flipped, no problem click on flip
on display properties and everything is fine.

sorry for my bad english I hope it will helps you.