love the venom plush toy! LOL
Very nice work! It’s fascinating to see pieces like this go from a bunch of 1’s and 0’s to a fully executed physical piece of art.
heh,very lovely pieace
Totally freakin’ awesome! Can’t wait to see the workflow.
YEAH!!! this is SOOO NICE!!! =)))
love it!!!
Very clean, and very fun. Im real excited to see the prototyping and molding process for production! Unfortunately I didnt get a chance to see this at the con :c Great work!
Very very nice modelling and toony feel is really gud
Love it.
Awesome!!! 
I really love the initial image in grey. I really think you did a wonderful piece, I’m just not liking the colours, but my view isn’t important. I think MJ has just become my kinda girl after all these years… 
beautiful work
wow thats cool
WOW that looks amasingly real did you get your idea from a real model or all in your head?
outstanding nice doll and sexy ^^ girl
This is a very clean, stylized and interesting work! I would be very happy to have more information like the making of, seeing more your process (including the way to cut elements for mass production, etc.
Damn, not enough stars in the rating system ! 
Fantastic Job man! So inspiring!!!
Cheers
AMAZING work! I really like all of the details like the weight of her foot squishing the stool. Nice stuff! If I had one critique, it would be that her breast would hang lower on the side without the strap eh? Very minor. Love her face too. You don’t see many good cartoon female faces in 3D.
Are you gonna sell some prints of this?
Cheers,
-ShaneO
I loved, awesome curves.
Like I said to you at the Con, AWESOME work!! Keep it up.
miOk, so I’ve put together this “making of” for MJ which is a fairly broad overview of her modeling and construction. I didn’t want to go TOO in depth (because it’s long as it is), because I don’t want to bore you all with what I figure are irrelevant details. If there’s something you see that you want me to discuss further, by all means, PLEASE let me know
This is the basic process that I have used for awhile now, and the process that I implemented where I work, a major toy company that shall not be named
Let’s start off with a couple of refresher images of the concept by Mark Brooks:
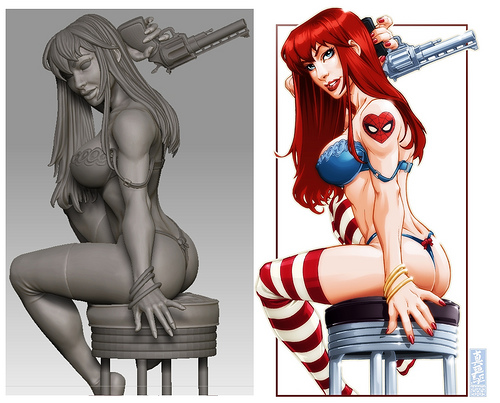
1st image is a comparision of my model and Marks artwork. There were some changes made to accommodate the shift into 3D so things would look correct. 2D requires some finessing that would otherwise look odd in 3D. Mark and I worked to accommodate for this transition.
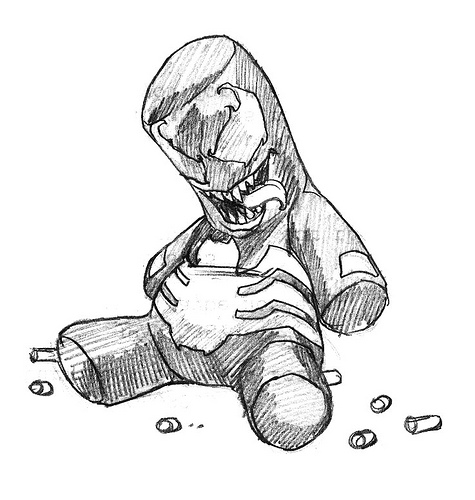
2nd image is the concept for the Venom Voodoo doll.
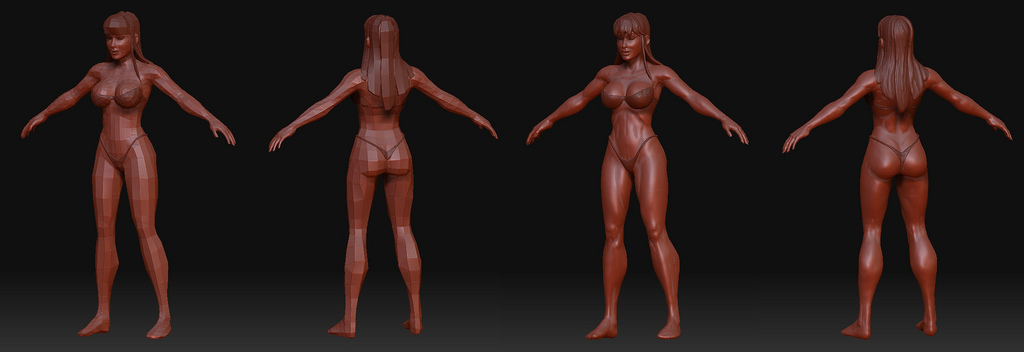
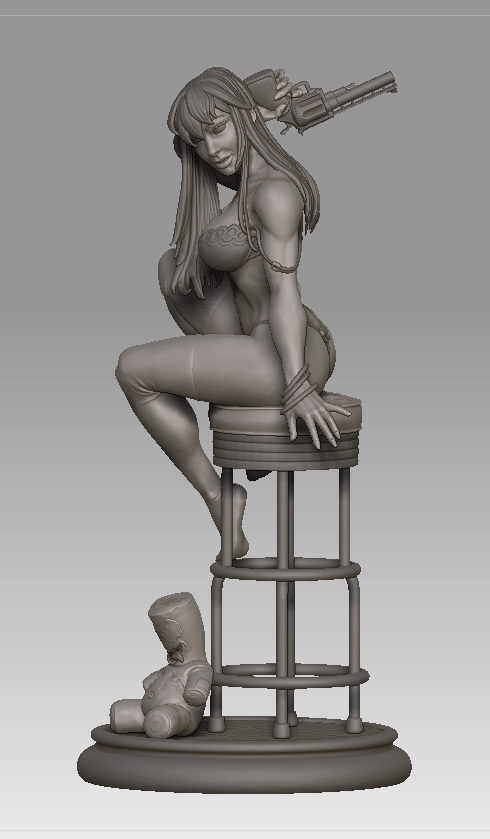
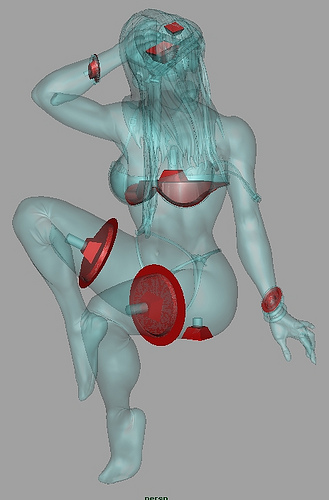
So, I have built up a collection of base meshes over the years. Some are optimized and some aren’t. Some were specifically for the purpose of print, and others towards the end of animation. I always try to have good topology, edge flow, and poly density whenever possible, it just aids in the sculpting process and generally makes life easier. However, when you’re up against a time crunch, sometimes you have to do it dirty. This was somewhat the case with MJ. She came up at the last minute and I needed to get her done for SDCC, so I pulled out a few base meshes and modified/Frankesteined her together. Here’s the base mesh both low and high. At this point I don’t worry about any sharp detail or precise muscle structure, as she’s going into a pose that’s vastly different from her T pose.
If the pose isn’t TOO different from the T pose, I’ll get things more precise…but why worry about it if the detail is only going to be uber-deformed?
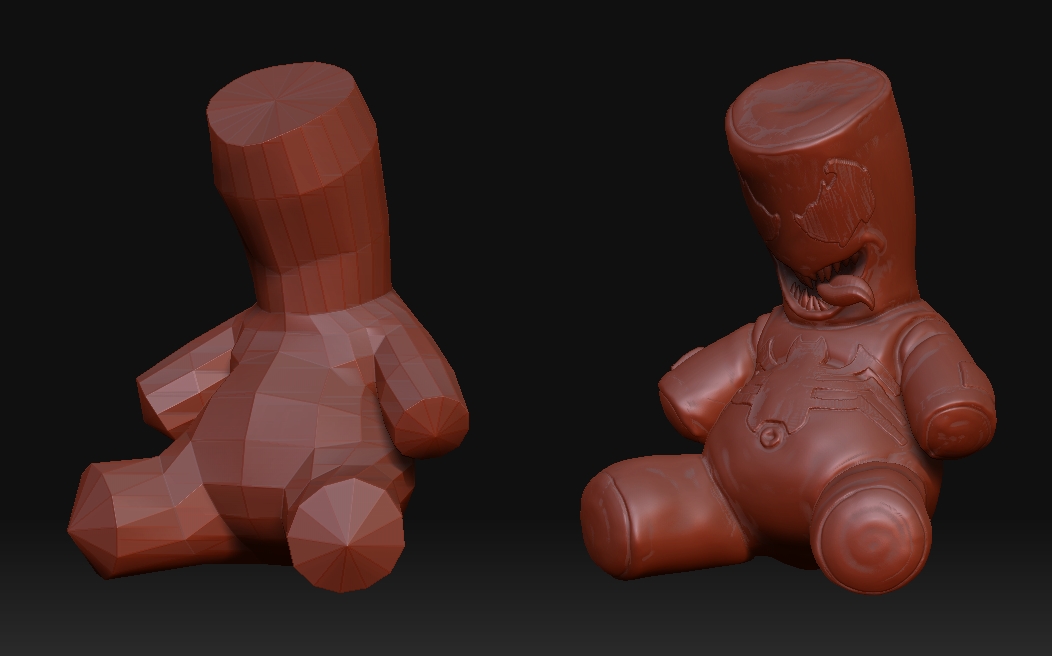
Here’s the Venom doll base mesh and high res. This is also the final piece that got printed. Whenever I create these pieces, it’s always a balancing act between time, detail, and printer. If I know what printer I’ll be printing on, I’ll keep this in mind when I’m trying to balance the three. Little areas that I would normally smooth out and clean a little more if this were going to be a pure ZBrush portfolio piece, I let them be, because I know what I’m going to get out of the printer. Those little areas will be smoothed over, anyway due to the printing process.
When doing these things, balance is always the key. While it does pain me to not go back and perfectly tweak everything out to my ultimate specs, I do realize that a finished product by the deadline is the goal…like it or not.
Now, on to the RP process…which is what I figure most of you are interested in
When printing a figure, it is ALWAYS best to think forward about how it’s going to be cut. Some people choose to incorporate this into their base mesh, separating arms, heads, etc before beginning the sculpting process. I’ve chosen to do it differently. I like to sculpt the body as one mass as many traditional sculptors do, then cut at the end. It just flows a little better for me. I do; however, end up making subtools out of clothing, hair, and other various accoutrements. This is often times because of my modeling schedule. I need stand in parts for things like the hair, gun, and stool so that I can get a better overall feel for where I’m headed. The hair you see in the final image on page 1 is not the hair that you see above. That was merely a place holder as was the original version of the gun. My rule is “Anything I’m not completely sure of, make it a separate part”. Here’s the final modeled image again, so that we can segway into the cutting process:
At this point there are about 12-15 parts. Some that are separate will be merged with the body…and parts of the body will be cleaved off. Having been in the collectibles industry for the better part of this decade, you end up learning pretty quickly how things need to be separated. This is primarily learned from how things are done over in China for production. No matter how smart you THINK you are, those guys always come up with something better. Their changes aid in the painting and production process, and the better you can tool your own parts, the faster they’re made and the quicker they hit the shelves at a cheaper price.
Now that MJ is finished for all intents and purposes, I export each piece as an OBJ. From there I run it through MeshLab…(its a FREE app that converts and cleans a multitude of geometry formats…GET IT!) to convert the files to STL, which is the universal standard for rapid prototyping.
I don’t clean my meshes in MeshLab, as sometimes with parts that have overlapping surfaces, it can get confused and destroy your mesh. Some will tell you not to have hair, skin folds, etc overlapping each other, as this makes the software detect false inverted normals and can botch your mesh. I disagree with this whole heartedly. You can’t make as realistic looking parts as possible without overlapping meshes, it won’t always look right. The answer is another program whose boolean functions are unmatched…Magics by Materialise. We’ll get back to that in a few…
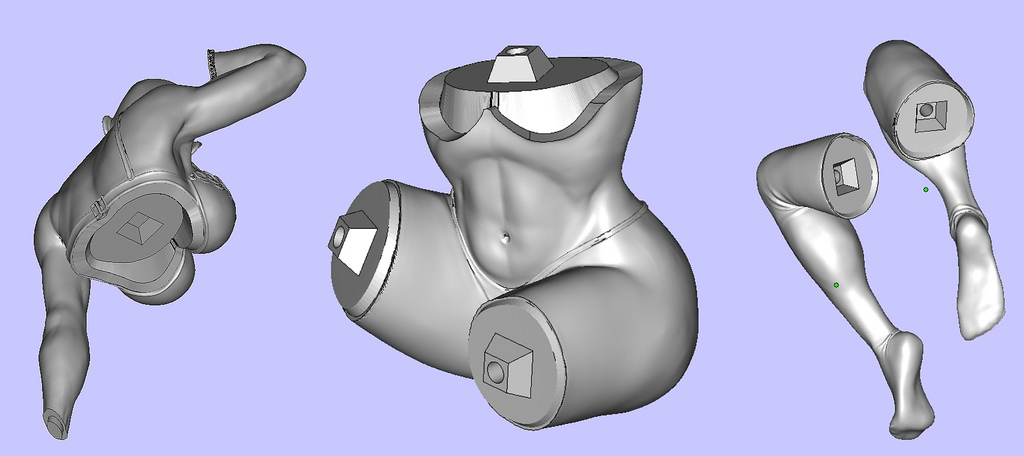
After having converted all of my OBJs into STLs, I take a retroactive step and go back into Maya. I sometimes even re-export my primary meshes at a lower level so Maya can handle them better. I then create my boolean objects which will slice her body into its respective parts. Taking all issues into consideration, I decided to separate her at the stocking tops, right below the bra, the hair mass (which will be divided into 3 parts for easy assembly…right down the center of the hair parting and the bangs), and each hand (logical cut points above the bracelets). In Maya, I select the edge loops closest to the cut points. These are the edge loops that run around the bottom lip of the bra, the stocking tops, the wrists, etc. I select the edge loops and extrude them inward, creating a flat plane. I then separate this flat plane and create an undercut so that the skin appears to go under the clothing, not just end at the cut. I then create a wedge (like a pyramid with the top cut off). This creates a nice key so that you know exactly where it’s supposed to lock in place. I top it off with a boolean to accept a standard size steel pin (usually 1/8 to 1/4 inch). These are made to be very tight so that the piece holds together well. Here is a screencap to show you the boolean shapes I created then exported :
I then import these boolean objects along with the final STL meshes out of ZBrush into Magics. As I mentioned before, Magics is (at least in my experience) the best tooling software out there. Forget disappearing objects when you execute a boolean function (yeah, Maya…I’m talking about you!). Magics will handle dang near anything. Back to those overlapping folds of hair, fat, etc…Magics can unify your meshes in addition to unifying the overlapping areas, creating a clean mesh that has sharp folds, but no true overlapping surfaces. Here are two examples of the final booleaned parts of the upper and lower torso in addition to the legs:
After having finished all of the booleans and creating the final parts, I then send the parts to the RP machine. In this case, it’s the InVision XT by 3DSystems. It has a 328 x 328 x 606 DPI (xyz) resolution. That’s well below the advertised resolution for the Eden series by Objet; however, I’ve found that I get more accurate results out of the InVision. The resolution difference isn’t as obvious as one would think. The other pro for the InVision is the support material…it’s wax as opposed to the jelly-like support for the Eden. This means you can print more delicate parts more easily on the XT because you have a hands-off approach to getting the support material off. You have to remove the jelly support from the Eden parts via a water pick…which can mean broken pieces. Not to completely dis on the Eden…we have one, but I prefer the XT. To combat the resolution difference with the Eden, 3DSystems has just released the ProJet…which in my opinion now completely lays waste to the advantages of the Eden on nearly every front except for build tray size. Here are some images of the InVision XT and the ProJet:


I’ve worked with many types of RP machines…FDM, SLA, and Polyjets. I’ve found that the polyjets keep the most resolution, regardless of brand.
On to the results!
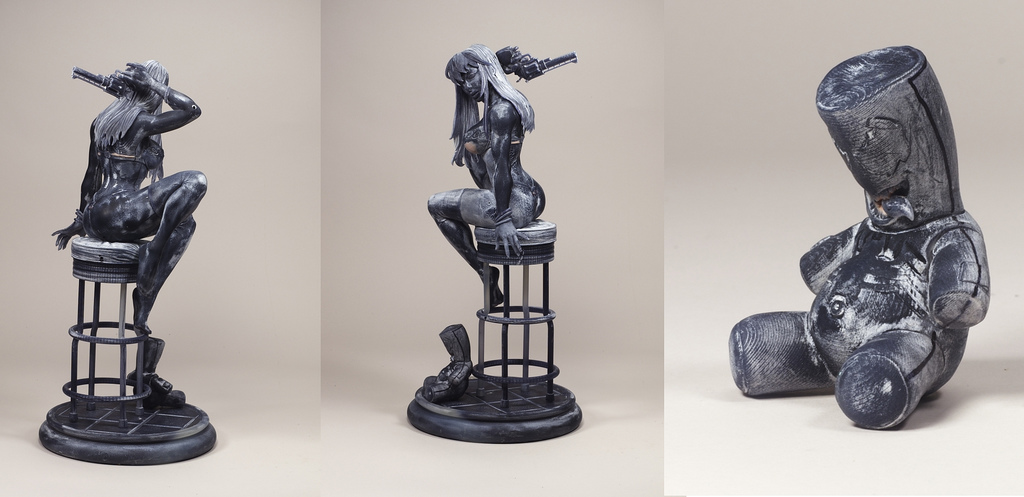
Because I didn’t have the chance to snap off some pics of the pieces during or after print, you’ll just have to settle for the assembled pieces post molding The white residue is an artifact of the mold release, and the pink is a little clay I added to a few areas I wasn’t completely satisfied with at the time of print (again, and issue you face daily when on sharp deadlines, but easily remedied):
For now, I won’t be able to show you the cast pieces because at this point, I don’t have any  Because of time constraints I had to send my first casting/tooling copy to the painter in order to make it for SDCC. Once I make another casting to make master molds, I’ll post those. I can say that once the first castings right off the RP models come out, you have to do a little sanding to get the build lines off. You have to watch yourself because if you get too crazy you can begin to sand off the details. This becomes MUCH less of a problem if you’re using the Projet, as the build lines are so faint that you could pretty much paint the first casting and the slight build lines would be filled by your base coats.
SO…now that this long diatribe is at an end, I hope you’ve enjoyed seeing the process. If you have any questions, please let me know!
Best!