ZBrushCentral

Sculpting Uniform Ribbing/Piping Around Objects

I’m new to ZBrush and am trying to add uniform consistent rounded ribbing/piping to a smooth surfaced glove model.

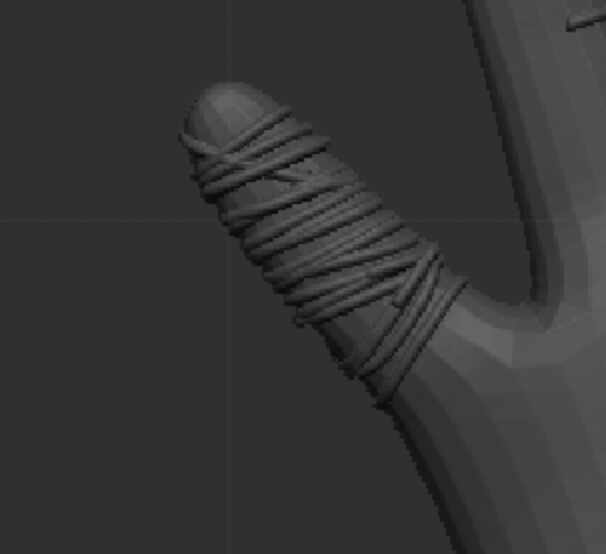
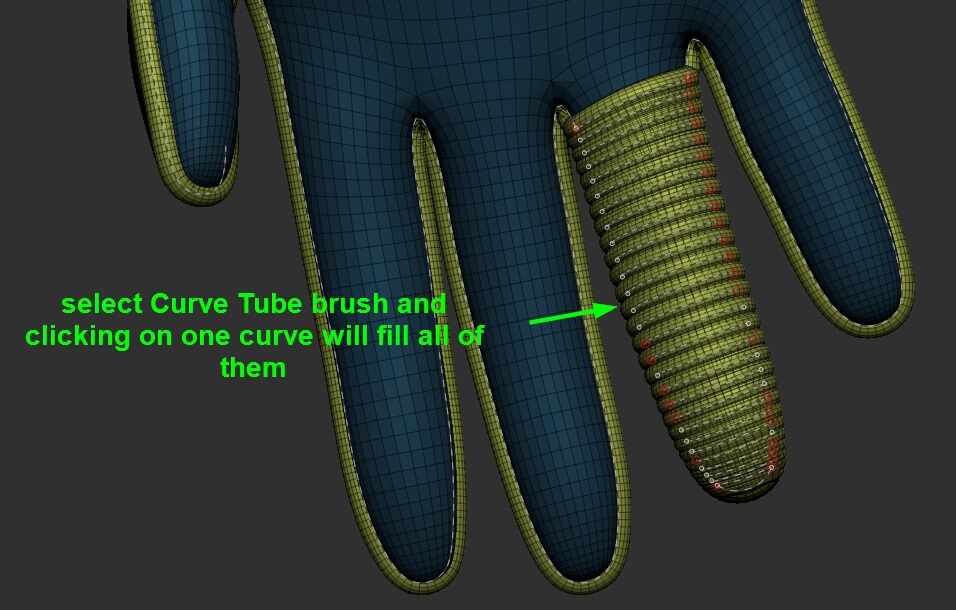
I’m using the curve tube brush with shift + left click drag to empty canvas to wrap curve around glove object. I want smooth piping that is evenly spaced, that wraps around the glove. Is the the curve tube brush the best type to achieve this design? I’m having a hard type placing curves adjacent to each other, because the curve that is already laid down tries to connect with the new one I’m trying to place.

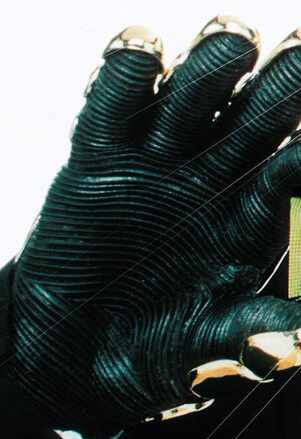
I’ve attached a screenshot of what I’m doing and a reference of what I’m trying to achieve.

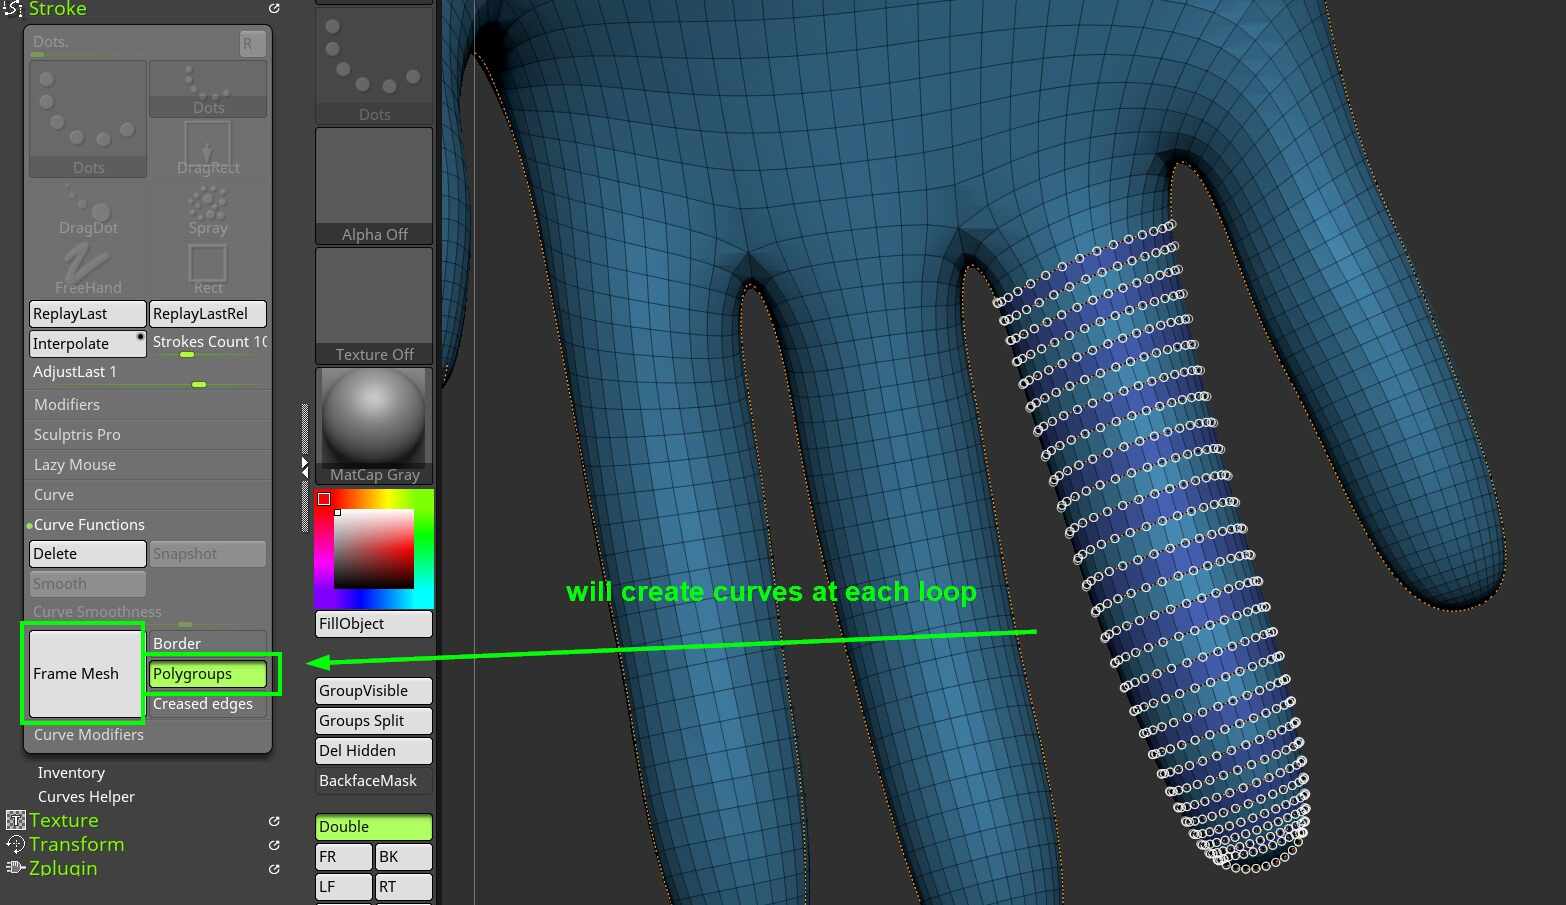
Is there a way to a add a guide so I can evenly space the curves?

Check Stroke:Curve Modifiers:Snap Distance to adjust snapping of adjacent curves.

For more control over curve placement try duplicating your mesh, slice curve brush to give a clean edge along the required curve trajectory, hide one side of the mesh to expose the clean edge, Stroke:Curve Functions:Frame Mesh Border to create a curve along the border edge, then apply your imm split off the IMM mesh to work with your source mesh.

Search Michael Pavlovich (YT) for Stroke:Frame Mesh fucntionality details.

Thanks for the tip to adjust snapping. I can sculpt curves now adjacent to each other by hand.

I will look into the slice curve brush / mesh border trick.

While looking into Michael Pavlovich’s YT channel I found a stroke function called interpolate. It basically added strokes between to manually drawn curves.

I tried it on a finger of my glove but the pattern was not very clean. Is this a potential way to achieve the piping design I want?

Screenshot 2024-04-20 at 8.00.08 PM

@insultcomicdog

Here is a suggestion.


2024-04-22 07_39_57-ZBrush
2024-04-22 07_44_38-ZBrush
The rest is up to you!

Thank you for the guidance @zber2 .

I understand the part about adding curves to each polyloop.

The part I’m stuck on is making the polygroup loops themselves, having never used polygroups before.

I clicked b + z +m and right click on my geometry. I used the same settings in zmodeler for polyloops as you showed. When I try to paint/select groups in the same row/‘latitude’ my selection is not as clean as yours. Any tips to get nice clean selection as you did?

You have all triangle polygons. You won’t get any loops with them. You will have to use ZRemesher to get four sided polygons so you can use loops or you will have to start from scratch to get proper topology.

@zber2 Thanks for the tip about zremesher. With the simpler 4 sided polys I was able to generate loops on the fingers and wrist, and follow up with the curve tube brush. The pattern is pretty much spot on with what I was looking for.

For the finger tips and palm, there are still no loops even with zmesher.

I tried using the curve tube brush freehand on the fingertips (I’m using a mouse to sculpt) but the piping it produces looks so messy compared to the loop method. The shift drag method to surround object with curve is better than free hand, but the straight cross section of finger tip sometimes doesn’t match existing piping.

I’m going to try @tobor8man 's suggestion of duplicating the mesh, and using the slice curve brush to get a clean edge, to apply stroke frame mesh. I’m not 100% sure the slices will line up completely with the piping I’ve already placed.

Are there other ways to way nice clean piping lines using bezier curve etc?

![Screenshot 2024-04-23 at 10.44.00 AM|1000x1142]
(upload://naSSuWthecyb84Fc74WyzEtxgru.jpeg)

@insultcomicdog

ZRemesher will get you 90 percent of the way, but it isn’t perfect nor can you expect any automatic solutions to be perfect. Using Slice Curve is a good idea, but if you find you are having trouble with that, you can also use ZModeler to delete the undesired topology on the finger tips and rebuild with desired topology using ZModeler edge extrude and scale so you can continue to use Frame Mesh in the same way you have already used it. The same goes for the rest of the glove.

I made some progress using the slice curve brush. It works well on the pinky and index finger. But when I try to slice the thumb or other fingers, it has a hard time making the correct polygroups. The correct slice is made, but the same colour polygroup gets applied to other fingers. Then when I go to apply curve brush to polyloops there are artifacts.

Here are the good finger slices:

When I try to slice thumb it slices correctly but applies the part of the index and pointer finger to same polygroup in green:

If I slice the palm the polygroups are fine. Symmetry is turned off.

Any ideas why I can’t slice the remaining fingers cleanly?

Saw the reddit post first and replied there.
https://www.reddit.com/r/ZBrush/comments/1cd7ilo/comment/l1akk32/?utm_source=share&utm_medium=web3x&utm_name=web3xcss&utm_term=1&utm_content=share_button

@tobor8man Thanks for the tip. I posted on reddit bc for some reason I can’t upload screen recordings here. I can only post screen shots here.

For the sake of redundancy, setting only the thumb part of the model to be visible, prior to slicing solved my issue of random polygroups being formed.

So far I’ve had good success using the slice curve brush to generate clean edges to apply curve tube brush.

What if I’m sculpting on a part of a my model where the piping is on a flat surface that doesn’t wrap around?

Here’s my reference where there is piping only on the palm of glove.

FIzEtfeVcAEg_Fh copy_crop

I’ve tried using the “CurveTubeSnapBrush” which connect the ends of the curves. I don’t have much control over the curve like I do with the slice brush:

I don’t like my freehand circles because they are hard to match what’s already laid down and kind of squiggly in spots.

I can’t use the slice brush in this area because the piping is a different pattern on the back of the glove.

Is there another brush or method I can use to sculpt this area? I’m sculpting with a mouse. Is this an instance where I need better tools like a stylus or drawing tablet to have more control? Or do I just need more practise steadying my hand and learning to sculpt better? :rofl:

Hide the back of the glove. Brushes do not affect what is hidden, so slice won’t go through to the back. Also set the stroke to Circle, Square, Center to lay down a centred circle. Or disable square to draw a circle originating from the first pen click. Disable Centre to get an oval. YOU get a new polygroup with each slice so draw a bunch of circle slices originating from the same center (easier to see if you activate Poly Frame) and then Frame Mesh on polygroup borders to get a lot of curves onto which you can lay you IMM all at once.