hmm, I don’t know about “very off”. I agree they need some work. Can you do a quick paint over to illustrate what you think the problem may be?
I brought my arm model in as a subtool with a low res version of the downloadable model by Freedom of Teach and made some adjustments to the size of the hand, and the upper arm. I also have the actual Freedom of Teach model. Keep in mind that my version of the arm is pronated and outstretched from the body I just rotated the whole thing so that I could match the FOT version.
Well the medusa and green man are exceptional. The little frankenstein looks familiar and cool. The ‘Frazetta’ style needs work, unless you change the style goal. It is a cool image, but lacks the visceral motion that defined Frazetta’s work. 
Thanks for the input.
I think I’m going to leave the pit/Frazetta image alone. You’re right, its not really very Frazetta, but it’s time for me to move on to other things. If I ever get the time maybe I’ll practice by trying to reproduce an actual Frazetta image in ZBrush, but who am I kidding, I’ll never have the time for that!
post number 5 for day 5. For my morning warm-up I decided to take the anatomy model that Ryan Kingslien created from the Freedom Of Teach (Anatomy Tools) model and just do a little practice. My knowledge of arms needs work. so I just used the clay brush to block out the muscles. This is just a quick 10 minute warm up. I haven’t worked on th masked parts yet…
You can download the base mesh from http://www.freedomofteach.com/downloads/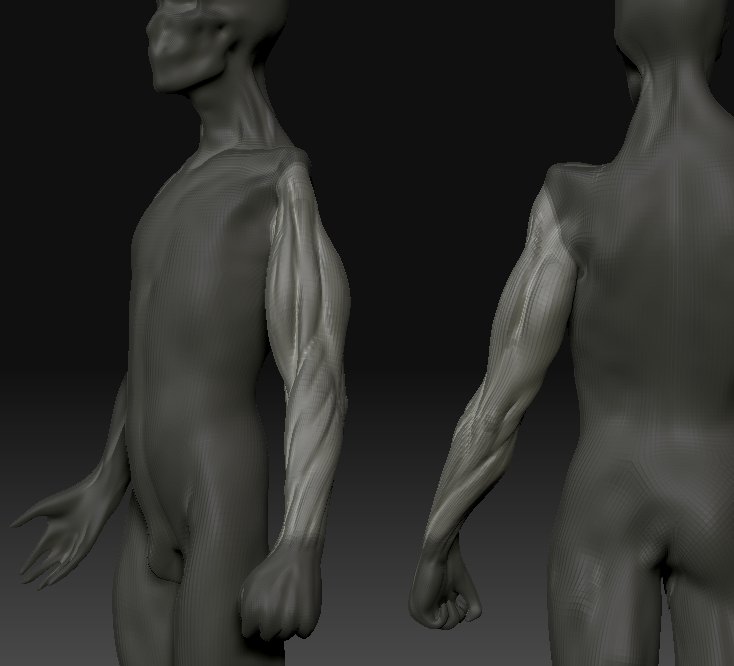
OK I’m failing miserably at the 30 post in 30 days thing. Maybe I’ll try again when I’m not so busy. Been slammed the past few days and there is no let up in sight. At least I get paid to work in ZBrush! I can’t post any of the work until the project is done though. In the emantime here’s my progress on my anatomy practice using the Freedom Of Teach model. Just worked on the face for a little bit.
First time on your thread. Loved the renders on the head from page one of the post. Awsome.
Here is a beetle I am working on using Go Z with Maya and ZBrush. rendered in mental ray DOF is added in post. This is a single mesh. Whenm I get teh chance I’l spilt it into subtools and add more detail to the wings and maybe a better paint job. The real thang has some awesome deatila on the wings I’d like to incorporate into my model. In any case. Go Z is cool man! Way to go Pixologic!
amzinn realismmm
good work man render looks amazing.
oh sick
i thought you put the photo on it
Robotball,
Outstanding work! Really like your translucency on parts of your head. DOF is just right. You are a lucky dog to be able to have GoZ. I can’t wait to have that little zinger for Lightwave…
Gary
Yeah, Go Z is a great tool, takes a lot of the guess work out and speeds things up tremendously. I need to fool with it some more to establish my own work flow. I also want to try it with Modo at some point.
The shader for this render is extremely basic. Just a blinn with color, disp, and normal. i used a copy of the same color texture and plugged it into the transparency channel which helps to get the translucency (after fiddling with alpha gain and offset). the lighting is an HDRI image. I want to fool with this some more but I think its pretty good for a first stab. the DOF is done in After Effects using a depth pass and the Frischluft plug-in. DOF makes everything better ;).
i’ve done some other bugs for projects using the mia material and gotten some awesome results. Can’t post any images though since the project has not been released.
looks awesome man
Hey Eric,
Its cool to see your other projects here. You do some great work.
here is a character I created while beta testing ZBrush 3.5. He’s based on the Hindu monke god Hanuman. No real reason why I chose this subject, just thought he might be interesting. Rendered in Maya/mental ray. I used Maya Fur for the beard.
Love that whole image, very nice colour balance 
A real pleasure going through your thread…Inspiring…
I hope you find time to work more on that last monky god piece…Great expression/emotion captured there.
Yeah, he needs eyelashes and some more detail on the crown, plus the composite is a little slap-dash. I may work on him some more depending on how inspired I feel.
Haven’t posted in a long time but I have been ZBrushing. Just finished writing “Introducing ZBrush 4” which is entering the editing phase. I completely rewrote the original Introducing ZBrush (the one with the Medusa on the cover). The new edition focuses entirely on sculpting so I did not cover the 2.5D illustration aspects. I think everyone who read the first edition skipped those sections anyways.
The new edition will cover new features in depth (ha ha) and it has been edited by Pixologic so you know all the info is correct and up to date! Also I’ve been teaching introduction to ZBrush at Gnomon for the past two years and I’ve learned a lot about how to better teach the more quirky aspects of the software. I was also an early member of the beta team and I put together the videos for the new features that you may have seen in the ZClassroom.
The book comes out in March. i’m very excited. I think this is my best book yet (it’s also my fifth book on 3D software! Mastering Maya 2011 came out last summer).
Will you be blown away by the artwork in the book? Probably not, the exercises are meant to make ZBrush accessible even to people who have never created art on a computer. As much as I would have liked to try and show off that’s not the point of the book. The point is to help new users and users who want to get detailed info about ZBrush 4 learn the software.
Will you learn practical ways to use the new features such as Shadow Box, Spotlight, and Clip Brushes? hell yeah. I wrote way more pages than I was supposed to and (as usual) pissed off the publisher because of this so you know I packed as much info into the book as possible!
here’s a few of the things I cover:
- Digital Sculpting Basics
- Light Box
- SpotLight
- ZSpheres and ZSketching
- Shadow Box
- Clip Brushes
- New masking and selection brushes
- new alpha features such as spinning + deco brushes
- Brush design (Planar brushes, advanced brush settings, tilt, pressure sensitivity, elasticity, and other mysterious settings).
- BPR settings such as transparency, sss, AO etc.
- Timeline and Layers
and much more. The book focuses on a few projects such as creating dragon models and a hot rod body.
Here is an image from the book. I’ve never done anything in this style before but I thought it would be something that is fun to try. I’ll post some more images when I get a chance. The book covers how I created the car body using Shadow Box (as well as many other things).
