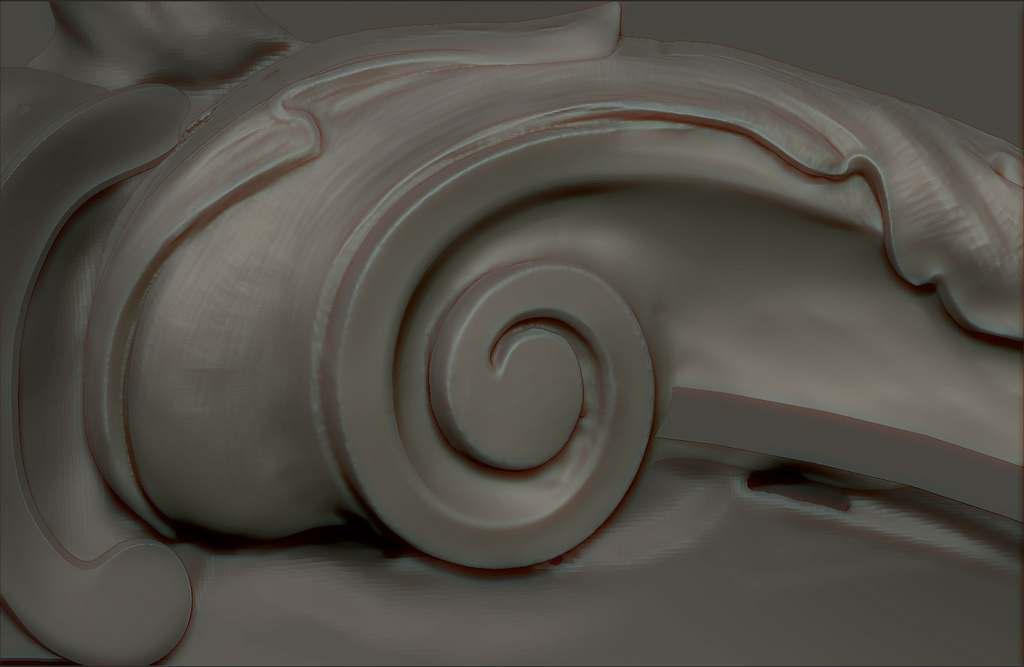
Oh, yes it’s realy, realy problem. For my opinion it’s strongly necessary to make non linear smoothing that can using, for example, zremesher guide line for define separately increase for the U and V smooth direction. Any way it’s doesn’t exist 
So, how, i’m think, Mikelangelo says the volume define a shape not the shape define volume, if you have a good base shape it’s more easy draw a long smooth crease on it. So, usualy i am make base, and sometime very good, model, and used it like reference. Then i’m make a smooth simple base form or from the sphere using the move tol for smoth result, or using zremesher for simplify copy of the base model. Other important thing is using the hard brush ( i am mean tablet presure curve) with a little z depth even if you use Dam_Standart. When you use hard brush you can define line little by little. And of course you can draw some geometry with insert brush, i am mean curve mode of insert brush.
So I wish to know other ways to make the long smooth crease, Any advice for me :)?
Amazing work!! Sculpterra, just in case you don’t know, there is a “smooth directional” brush, which might give a similar effect to what you’re talking of?
Thanks , Sculpterra. Hoping to have more and good modelling like those and share with us :). I use cad and sometimes cam at work for cnc,too. Maybe For base and measured mesh you should use rhino tspline or maya software
I didn’t know about it. I’ll try it right now! I am often use separatly smooth peak and smooth valey, about “smooth directional”… will see.
“smooth directional” is realy good! This is result of less than one minets of work with “smooth directional” and “dam standart” with hard setting.

Can you tell us in detail about your sculpting process in Zbrush?
Thank you for showing your work. Do you come from a traditional sculpting background? To make pieces in ZBrush that have to match with other existing real life pieces you must have come up with a lot of techniques that we all would enjoy knowing more about. I wonder, do you start from photos of the wood pieces and how do you measure to match in the real world? I liked your mention of Michaelangelo, but I’m not a traditional sculptor so I find how you start the process a mystery. Congratultions on top row!
thats awesome! i love this use of zbrush. i want to create something like this for myself and my home one day! thanks for posting
This is great! Always interesting to see how people use ZBrush in not so traditional ways.
Yes, great to see for what Zbrush can be usefull. Great 
Thank you for all your words!
If my sarcasm detector didn’t broken and you realy thought that those guy who didn’t knows about “smooth directional” brush, could says something interesting, so I’ll try
Yes it is. I am a Restorer with more than twenty years experience, i’ve worked in the most of museum of Sankt-Peterburg, Russia and, it was not long but it’s sounded great, i’d worked in the Kremlin
I’ll try to told about it, if it’s really interesting.
Oh thank you!!! It’s great surprize for me!
Sculpterra, nikakogo sarkazma - prosto interesno uznat’ Vash process roboty.
PS. Forum pochemu-to ne podderjivaet kirillitsu.
I think that if you make different objects with various extruding’s and sculpting on each, it might be easier to get nice creases.
Could you post some resources on the type of CNC Milling/Routers you are using to shape from your ZB files?
There is a large and growing interest from those of us that need to be able to produce architectural and large works.
There are so many people enamored by the tiny prints they get from 3D printers but without great expense and huge workarounds fail to be able to translate that to life size works or in materials that are final use.
I really appreciate what is coming out of the maker resurgence and look foreword to more posts that highlight the larger scale realizations of ZB models in the analog world and the processes it took to get there.
The Carvewright machine does fast raster carving. With the back and forth of raster carving you want fast. And this machine has servo motors. It can carve .75 inches deep or deeper with an upgrade. It has an STL Importer software package available too. It’s a hobbyist machine but if you do more carving than cutting and routing it can last a long time. This is the machine I use but I’m also building my own machine that I plan on running from my Linux CNC software computer, which does raster carving.
I must say you one great thing about milling process, with milling process you don’t need in the one closed shell. So this is the end of story because in the zBrush only what you have to do is a decimation and export your models, the rest of workflow is going in another programs.
But there is some issues if you stand before choosing the technology.
So, I am using the simple 3 axis chinese cnc machine, with the italian spindle. Very simple and very good machine. The cutting area of my machine has a size 900 to 700 mm, and there is the first problem. For some reason i am using cutting step with 0.1 mm (the human eyes can see at least 0.1 mm the step of cutting line) For this size it give as 9000 line in one axis and 7000 in second axis, If you want cutting with the high map it’s near by the maximum, at least in zBrush you can’t generate maps more than 8192 px. And 3d Exporter also has a 508 mm limit for the model.
But this only theoretical problem, in the real life a Decimation Master can approximate model very well, and i’ve never had a problem with a triangles on the surface of real product after cutting. You also can export model in size 1:10 and it’s solve the problem with 3d exporter limit, milling program can resize it back.
Another problem is a polygon count. PowerMill can compute model with about 1.5-2 million point without problem, maybe more, it’s a limit of comfortable work, but i am think it’s enough for the model about two meter if you’d prepared it with the Decimation Master.
And the third big question is a cost of the more than 4 axis machine, they not cheap, it’s really really expensive, most of them, maybe all of them.
Therefore
If you, as i am, has a wide and flat models or your models can be sliced for the wide and flat parts so, ok a milling process for you. It’s cheap and fast.
If your models has a lot of wrinkles, scratch, looks like a part of the sand beach, and you want to save every corn of sands. Of Course you can’t decimate it to 1.5 million polygons, and the milling wood be problem. But you still can milling models part by part.
If your models so complicated that it can’t be milled with a three or four axis machine so i’ll be glad to hear from you where you can buy something with reasonable cost
Any way i am think the only way to bring the huge model to life with reasonable price is a milling process.
Great work. I love to see artists post on the machining process.
The details every clean and the compound curves with sharp edging is great. That is very difficult to achieve.
I have a 5 axis router and I do a lot of machining work for myself and other sculptors.
Large figurative work is what I love to do and the ability to sculpt in ZBrush and then be able to create an accurate physical copy of that sculpture is just so exciting.
If there are any of you that would like to see the process in action I have a few videos of the machine cutting and the next stages of moulding and casting fibreglass copies.
Let’s keep the machining thread alive as there are many artists out there who want to take their ZBrush sculptures into the real world.
John
@Sculpterra, @johncox85 : thx for sharing your work. As a person who is working on exact opposite things size wise I enjoyed watching what both of you do throughly, simply couldn’t leave the screen drooling. Awesome work!
Hi all! I’m want share with you my last work that is didn’t finished yet. Also It’s my first time when i am try to do timelapse, i am always wanted to do this because it’s looks really great when it’s made by another guy 
So this is work that i am planned to do, really first step. The base i did in the SolidWorks, because there is a lot of works for another people to instal it in reality, and i’m must give them a precisely drawing with exact dimensions.


http://www.youtube.com/watch?v=SWcfgYWOd_M
Attachments
Thanks for very helpful video. I ask you to make slower and higher resolution video than it now, please . I dont understand very difficult sculpt and using brush Thank you very much