I am trying to create accessories.
I want to make the edge of the mask stand.
dam standard
smooth
pinch
I tried using these three, but it became unnatural.
How can I get it clean?


I am trying to create accessories.
I want to make the edge of the mask stand.
dam standard
smooth
pinch
I tried using these three, but it became unnatural.
How can I get it clean?
Hello again Beginner!
If I understand correctly, you would like to insert a hard edge along that line?
This will be somewhat difficult to sculpt at high poly on a piece of geometry that thin. It will be difficult to avoid deforming other parts of the mesh. It may be more straightforward to simply create the geometry in the correct shape to begin with, rather than trying to sculpt it into shape.
Pinch brush will be more effective if you enable Lazy Mouse (L) for it, and increase the Lazy Radius for a smoother stroke.
The Crease Brush may also be useful here. It operates in similar fashion to the slice curve brush, but it creates creasing. It would be most effective on a low to medium poly mesh, perhaps after being run through zremesher.
It would be fairly simple to do with a bit of low poly modeling with ZModeler and creased edges.:

Thank you for your reply.
My goal is that.
It is possible to solve it by using crease and 【zmodeler extrude】 at the center edge with low poly.
I made it low poly, but the edge like the mask of the image is not centered.
How can I create a beautiful edge at the center?
High Poly:
With the cleanly poly-grouped Extract in the above post, mask everything but the top surface, and run a Pinch brush with a low intensity and a wide radius across it until you get the line you want. This will produce geometry that needs to be cleaned with with Dynamesh, and then with Zremesher for best results.
OR
Low Poly:
Use the Topology brush instead of Mesh extract to draw out exactly the toplogy you want, with a perfect edge line down the center. Create the mesh, and use Tool > Subtool > Split > Split to Parts to split the resulting mesh into a separate subtool. Use the low poly modeling tools in Zmodeler to shape and crease it as desired, then subdivide to smooth it.
Thank you for your reply.
And I’m sorry for my late reply.
I was able to succeed by the method of using the pinch brush that I got advice.

Then I did [dynamesh].

The result is like an image.


How do I do [dynamesh]?
Thank you for posting your Dynamesh settings. It gives me a better understanding of the situation.
Your Dynamesh resolution is extremely high. You should try something in the 100 range to start, and adjust from there. If you find your subtool requires that much resolution, it is probably extremely small in the world space. World size matters when it comes to Dynamesh.
“Project” should not be necessary for a shape this simple. Disable it.
“Polish” should not be necessary. Disable it.
Disable “Groups”.
If you still have issues, it is most likely because the geometry towards the bottom is extremely thin. Thin or 2-dimensional geometry are the most common cause of Dynamesh defects.
I assumed that since you were working with extracts, you had an edge with simple straight geometry with no edgeloops, like in the illustration I posted. If this is the case, then you may need to add some additional thickness to the mesh to keep the geometry from becoming too thin. Prior to Dynameshing, mask everything but the top surface, and use Tool > Deformation > Inflate at a low value until the mesh becomes thick enough to dynamesh without issue. There are many different ways to do this, but this is the easiest to explain.
The only reason we are using Dynamesh here is to clean up and fuse the geometry you pinched at the top. It would otherwise be difficult to sculpt on, and difficult to Zremesh.
Thank you for your reply.
I tried [Dynamesh] which I got advice but the result was the same.
The size of the object is small.
I removed [top surface] and used [Mask].

Tool> Deformation> Inflate
I used this.
But it failed.


How can I solve it?
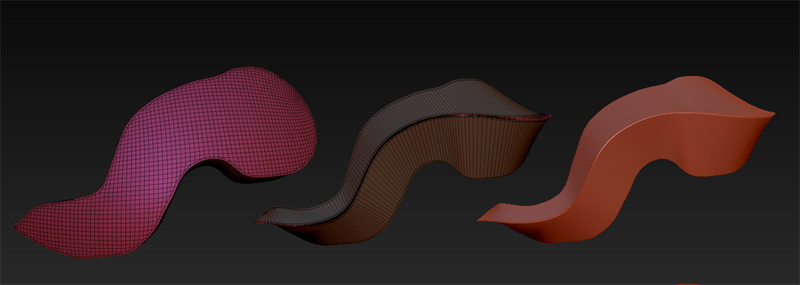
Sorry for not being clear. My advice was based on geometry of the sort generated by the Mesh Extract operation, not a high poly mesh. If your geometry doesn’t look like this, it wont work:
You need to perform the inflate on THAT version of the mesh to make it thicker, before pinching, or before re-meshing in any way. Otherwise, there will be too many polygons, and it will be too difficult to control cleanly.
Or simply create the extract with more thickness to begin with.
Your mesh also seems to be extremely small in the Zbrush worldspace. It would be better to increase the size of your source mesh before the creation of the extract, if that is at all possible. The size of the object affects Dynamesh performance.
If you are unable to get this to work, I recommend simply creating better geometry from the beginning with low poly tools.
Thank you for your reply.
[Dynamesh] was made correctly if you enlarged the mesh.
The problem was that mesh was small.


I did not understand.
I’m sorry
Tool> Deformation> Inflate
Should I do this at this time?

If you’re happy with the results you have now with that mesh after enlarging it, there’s no need. 
Good luck!
Thank you very much.
About DynaMesh.
Changing the size no longer breaks the overall shape.
However, the edge has collapsed.


How can I keep this from happening?
Yes, this is something I explained back in your previous thread here:
https://www.zbrushcentral.com/t/cleanly-extract/
Dynamesh changes the topology and will keep the “general” location of the polygroups, but they will no longer be cleanly divided, because the topology they were based on is no longer the same. This is one of the drawbacks of a high poly workflow, and why it can sometimes be better to work from low poly.
For the approach you chose here, dynamesh was necessary to fuse and clean up the pinched geometry. If it’s a problem, since the polygroups are still pretty well defined, you can probably go a step further and use ZRemesher with “Keep Groups” active to clean up and simplify the mesh even further. With a bit of work, you can create a new low-medium poly version of that geometry with cleaner edges and polygroups.
Since the resulting mesh would be lower poly, you would probably have to use edge creasing to keep edges hard when subdividing to smooth the mesh.
Thank you for your reply.
Sorry for letting you answer the same thing.
I learned the importance of low poly.
I decided to study low poly.
I will try [Zremesher].
You’re welcome, and it’s no trouble. I worry that I’m throwing more advanced concepts at you than will make sense right now, but you happened to choose a tricky shape to work on. 
Just remember, there isn’t really a “right way” to use any of these tools. It’s just a matter of learning the characteristics of each, and learning what will work best for what you want to do in any situation. There’s always more than one way to do anything, and you might choose to use one or the other depending on what your priorities are.
Keep familiarizing yourself with everything, and it will all start to fall into place as you gain more experience.

