ZBrushCentral

Quick Question about masking

Hello all, I have been following these forums for a while, and I own ZBrush 4, but I have yet to create anything substantial because I am conceptualizing beyond my current ability in ZBrush. I finally have inspiration for simpler pieces, but I was wondering…

How can I draw masks in perfectly straight lines? I know there is a key command to do so when drawing tools and such, I have just forgotten.

Thanks in advance for answers, and advice for a beginner would be much appreciated.

There is a key stroke to sharpen a mask…click on the mesh while holding ctl + alt (or the mac equivilent keystrokes). You can keep clicking for increased sharpness.

Other then that, hold down ctl and pick your from your choice of drawing masks in the brush palette. Or Brush on your mask using a alpha/stencil.

Hopefully this is of some help. Good luck.

Thanks, but I wasn’t asking about sharpness. I was asking if there is a key I can hold down so that the mask will snap to a straight line.

[ctrl+drag.jpg[/ATT]%3C/font%3E"]ctrl+drag.jpg](http://%3Cfont%20color=%22#9A9A9A%22%3E[ATT=215440)

Hold down the ‘Ctrl’ key for masks and select the Curve Stroke from the Stroke palette. Once the line is drawn, hold ‘Shift’ down to snap the stroke to 5 degree incraments. Take your finger off of ‘Shift’ if you want to change the angle of the line without snapping. Anything on the shaded side of the line will be masked.

p1.JPG

Attachments

p2.JPG

p3.JPG

p4.JPG

Maybe I am just too much of a newbie right now to get this, but it would probably help if i posted my reference pic. (on a side note, how do you load a reference pic into ZBrush so you can trace right over it?) But here is my reference image. I am trying to make the shape on the end of the blade in Shadowbox. I probably should have posted the image in the first place.

Now that I have given more of the story, any Shadowbox advice to make that shape?

Attachments

kingdom key.jpg

Hi,
look at the Etcher’s tutorial, you’ll see 7. Using reference images in Shadowbox.
You can also see it in the pdf tutorial in your Zbrush/Documentation directory :wink:

@ ssentiWsavoneJ

LMAO! Read your first post, then read your second post, then please explain to us what post 1 and 2 have to do with your 3rd post. A little forsight and planning can go a long way. :rolleyes:

Apologies, third post was wee hours in the morning. But i was asking about masks, because thats basically what shadow box is using, is masks to make shapes, and i thought that if i posted an image of what i was trying to make in shadowbox, that it would help clarify what i was trying to do with masks within shadowbox.

If they are not masks in shadow box, then ive just been confused, and i apologize. But to me, shoadow box seems like its using the same prinicples as masking primitive, only creating shapes based on the masks applied to each side of the shadow box.

Because this is ZBrush things aren’t as straightforward as we might hope :wink: … Shadowbox seems to me to be as much about removing parts of the mask you initially create as the drawing of the mask. Make bigger general shapes and clip away and refine by subtraction…rinse and repeat. So Zber2 has given you an excellent answer. Use those tools and draw a rectangle then subtract away a smaller rectangle using the same tool with the alt key and end up with a straight line.

As an advanced beginner, myself, I reserve the right to be wrong about this. Just trying to be helpful here.

I have been trying to clip away at a general trapezoid shape to get the crown shaped cutout on the key, but using Zber’s method is adding to the mask in odd places. Like, whenever i shift the line for the mask, the shadow that indicates what side of the line will be masked shifts to a uniform direction.

Like, If i have a vertical line with the shadow on the right, then add a curve and a perpendicular straight line, the shadow will shift to match where the shadow will be on the last section of line I added.

I am not really sure how to explain this, so if it needs clarifying, let me know.

Shadowbox key.jpg Hmmm, I have to think about that for a bit to be sure I really understand, but in the meantime, I copied your jpg image, took it into photoshop and turned it into a black on white image. I imported that into Zbrush as a texture and applied it to a hi rez shadowbox. (turn on rgb and polypaint from texture). Then I selected “Mask by Intensity”. Easy to clean up after that. Here’s a pic in its rough state.

Wow! that is a great idea! I had seen stuff like that before, but unfortunately, I cannot presently do that, because I am without Photoshop at this point in time. It would be a great help if I had photoshop, though. I will keep that in mind when i do get it. Thanks!

But alas, for the time being, I have to figure out how to do it manually with masking. I tried to freehand it (using a mouse), and it just is not clean enough.

OK, now I understand your problem with the masking brush. You need to break it down in sections and not try to make an enclosed shape. I’m including a picture here showing stages of building the key part you are trying to mask. Note the round portions are made by switching to the round masking brush.

  1. Mask two triangles separately,side by side. Drag down to the lower right, click alt twice for a sharp corner and go up to make a “v” shape

  2. Drag around the shapes to fill in

  3. Switch to the circle mask brush to make the little circles

  4. use the straight clipping brush with the ALT key to trim away the unwanted parts.kEY.jpg

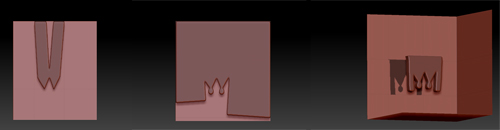
You can use more then one shadowbox (you might already know this), as subtools, and work in parts. You might be better off with a cylinder for the barrel of the key in any event.

I hope this works for you. Again, I’m also a beginner and struggling along with ZB4, but I enjoy a challenge and I learned a lot myself from this. And please excuse the sloppiness of the work here, I did it fairly quickly, but with a little effort you should get a very nice shape :slight_smile:

Download Gimp then. It’s free and does just about the same thing as photoshop.

Thanks Ghostly, i will check that out!

and Nancyan, I was going to make it in sections, using a cylinder for part of it, but i figured shadowbox would make the end easier to make. Thanks thats a load of help! I know I was not clear all the way through my inquiries, but I appreciate everyone’s help and patience!