Example of its intended use.
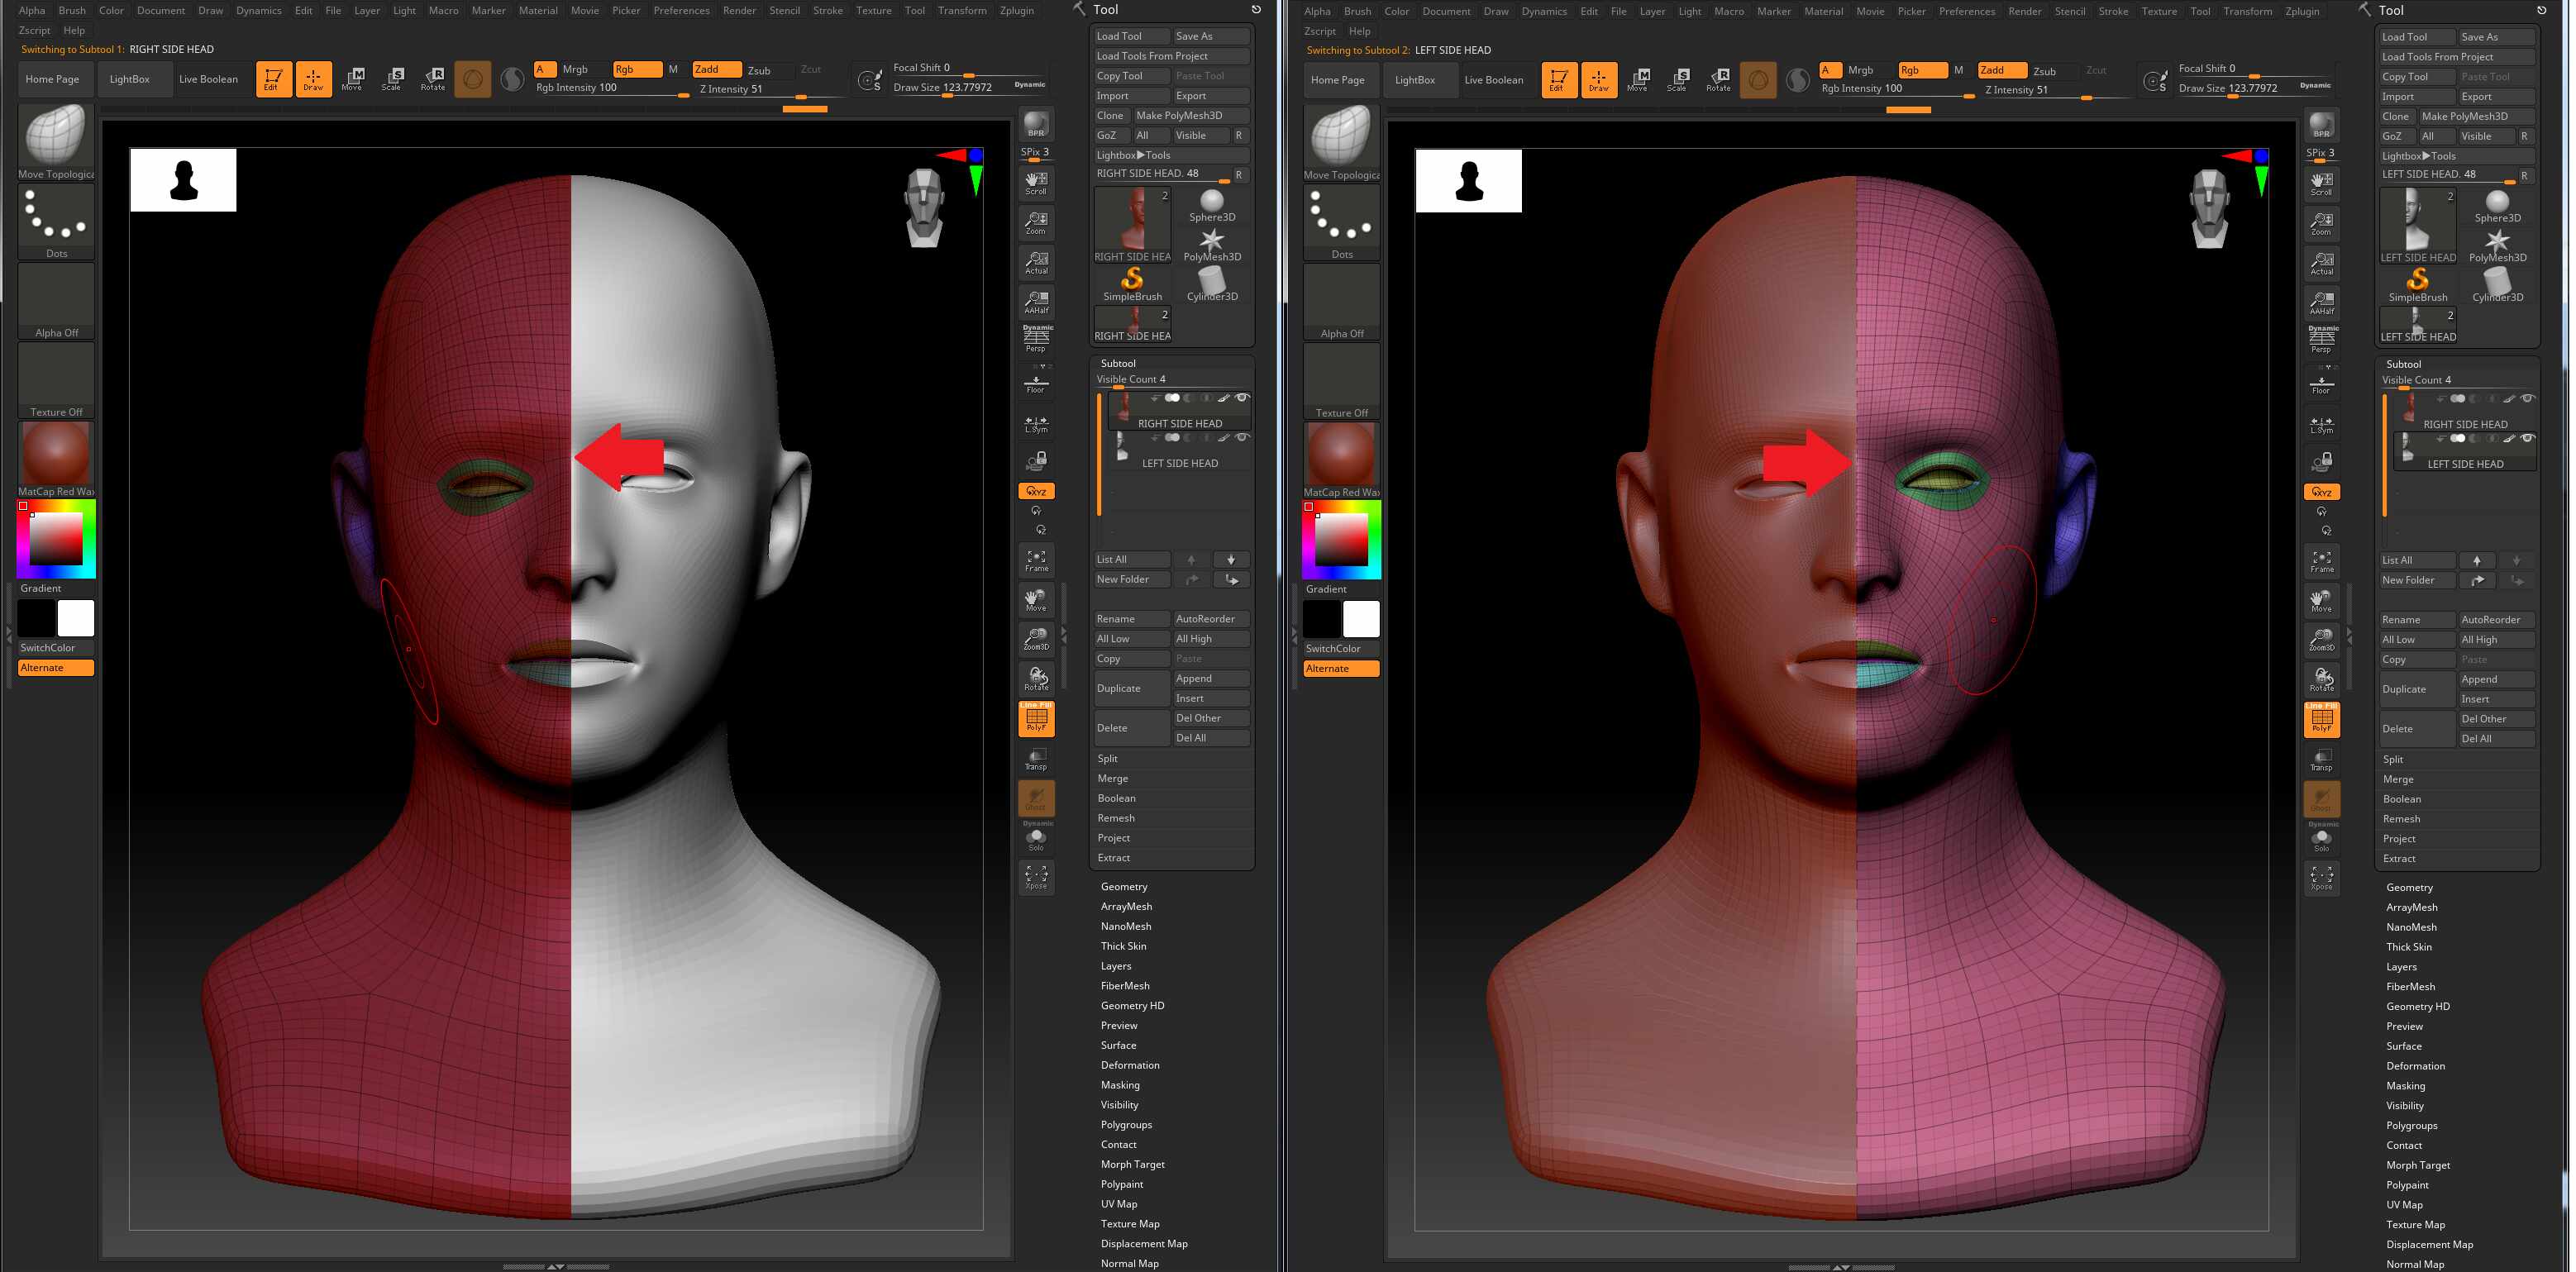
Let’s say I’m working on a human head sculpt.
I duplicate an instance of the human head sculpt as a separate subtool.
One subtool will be turned into the right side of the human head. The other subtool will be turned into the left side of the human head.
I turn off symmetry.
I use the selection tool to hide the right side of the face from the center of the left heads model. I turned symmetry back on.
I do the same thing to hide the left side of the face on the right sided human head version of the model.
The visibility is turned on for both of these subtools. So they appear and look like a single head in the viewport display in Zbrush
I’m able to sculpt between the left and right sided subtool versions of this head with symmetry turned- The brushes will affect the hidden portions of each mesh because active symmetry is turned on for both models.
It will keep the center polygons trapped to the center where they need to be between both models.
There’s no need to commit to any changes that you make to either side and there’s no severe deformation made to your mesh that you can’t undo.
Making it easier to revert back to any previous sculptural changes that you made to either side.
Obviously once you’re pleased with your changes to the left and right side versions of your model you can combine them into a single object by deleting the hidden portions and merging them into a new mesh or by using the morph/projection brush features of Zbrush while masking off the other side.
Being able to do this for a human head sculpt is one such example of it’s use. I can think of lots of other things I could use this feature on to improve my workflow and get the desired results I want out of Zbrush.
So basically this Plug In will let the brushes effect the hidden portions of the models geometry after symmetry is turned on.
Marcus Civics if you see this and you think you could do it I’d really appreciate it.
I hope it’s possible.
Edit: (Response) the feature is intended to support the ability for the brushes to affect the hidden portions of the active subtools geometry when symmetry is turned on. Basically this feature or plug in will let your brushes affect the hidden topology on your model as if it hasn’t been hidden at all.
Essentially making that hidden portion of the model still editable as if it wasn’t hidden at all.
The image I’ve included roughly explains how you could use this to move away from symmetry on a human head while still keeping the active symmetry function on each individual subtool.
You guys created Fibermesh, Layers, and Surface Noise based on my ideas and suggestions for the program. I was the one that talked about extruding fibers from a mask on the surface of the model so you could make hairstyles like Mr. T. -with sliders to control the direction, length, number of hairs- etc, etc.
My username back then was “It’s Alive.”
Marcus Civis invented the Toggle Model Plug In after I explained that idea here. I still use that plugin to this day and I know that it was used on lots of films to recreate actors faces to make their CGI stunt doubles and action figures/toys based on image ref.
All this is is a “brush affects hidden geometry when you activate symmetry”.
I’ve wanted to talk about fibermesh so bad and what could be done to make it better.
Fibermesh would become a whole new thing. It would have its own selection icon in the brush palette like zmodeler. And it would include all of these features that I’m trying to explain below.
I would call it FiberModeler.
I want to use the transpose tools and selection box and lasso tools to select and manipulate individual fibers and groups of fibers.
I could use a lasso to select the fibers tip or a group of tips in order isolate and work on just those fibers.
I can make those fibers active or hidden or I can turn them into their own polygroup. Or I can copy them and save them as a separate fibermesh subtool
I want the ability to shape individual fibers by moving their control points while in spline mode.
A copy/ clone/paste/ influence fibermesh feature so I can select individual hairs that I want to copy/paste and move to another section of the model. This is where the masking for the root needs to be turned off and the snap to surface feature needs to be active.
The influence feature lets you select one fibermesh strand as the parent. Then you hold down shift or some other hotkey and you select the child strands you want the parent to influence and then you have a slider that controls the intensity of the influence. dynamically
reshaping the other fiber strands into a similar shape and directional flow.
I want a button or slider that lets you control the distance and spacing between the control points on the fibermesh when it’s in spline mode.
This way the control points can be distanced evenly to smooth out the overall fibromesh.
Or you can add more control points to individual fiber meshes or selected groups of fibermeshes. This will obviously change the number segments when its converted back into a fibermesh.
I want a button that lets you add and delete control points or segments by clicking anywhere you want to onto the pre-spline version of the fibermesh or the polygon version of the fiber mesh
I want a button that lets you convert your selected fiber mesh back and forth from polygon to splines. With a profile editor so you can continually change the polygon profile number in order to change the shape and smoothness of the fibermesh strands it creates.
I want fibermesh to include a root masking on and off and snap to surface feature for the root.
Obviously the move fibermesh or selected/clone/paste instance of fibermesh removes the masking from the root and enacts a snap to surface like feature to the root/roots of the fiber against the surface of the model.
I’d love to see fibermesh include sliders that control the fibers kink and curl and number of kinks curls and direction.
Slider button control to change the thickness of the root and tip dynamically for any selected single or group fiber mesh or pre-fiber mesh spline.
A length change slider that you can use on any selected group of fibermeshes or pre-fibermeshed splines.
A length lock button- in order to prevent length changes when using move tools.
I really want to throw a lot of stuff at you guys to make this program even better and I have the truth of those things that I suggested you implement in the past which made it into its 4th or 3.5 edition as my credibility. I love zbrush more than any other program I use but there’s so many things I still want to see for improvements and change.
I also have a really cool idea for Zbrush to support all 3D printers just based on your 3d printers print bed dimensions. Something where zbrush actually takes a model and converts it into a series of numbered images that represent each print layer- maybe in scalable vector graphic format. This way the polygonal count of the model will no longer matter. File size of each individual image that represents those layers will matter. There would be an island detector and support post editor and a printer selection option to support any of the known and supported 3d printers out there. With a custom user input XYZ dimensions menu that represent the print bed and build tray arm dimensions of any number of 3D printers it doesn’t currently support. Trying to slice up the model into a series of images that are saved and a folder system. I guess I’m hoping that would end the problem of high polygon counts since it could be done in passes to collect and convert all of the layers into those images. This way we won’t have to use Decimation Master anymore to reduce the poly count and potentially lose any of the details we put into our models.