ZBrushCentral

Pixologic Release - Reference Image 2 - The New Image Plane ZScript

baker17,
Sorry the plugin is giving problems.

Are the jpgs you are selecting ending up in the Texture palette? If they aren’t then perhaps they are of a type ZBrush can’t handle and that would explain why you are getting blank backgrounds with a transparent model.

The image sometimes wrapping on the model is a ‘feature’ of the plugin that I will get corrected very soon. In the meantime simply select ‘No Texture’ in the texture palette before pressing the Store Position button.

SNARK,
There is no need to uninstall the original Reference Image; the two plugins are completely separate. However, as you probably won’t want to keep both on your system (though note that the new version won’t load any project files from the original version), uninstalling the original is easy enough:

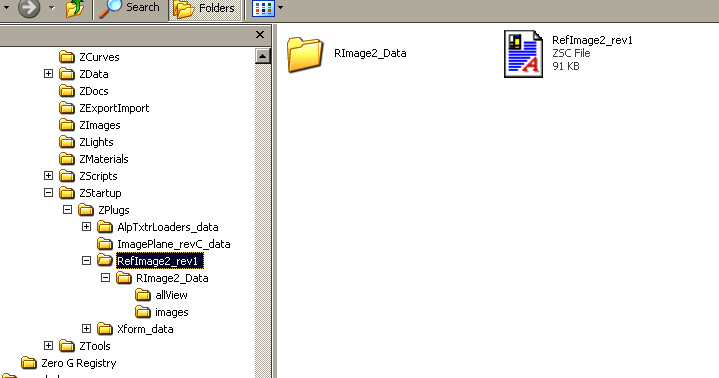
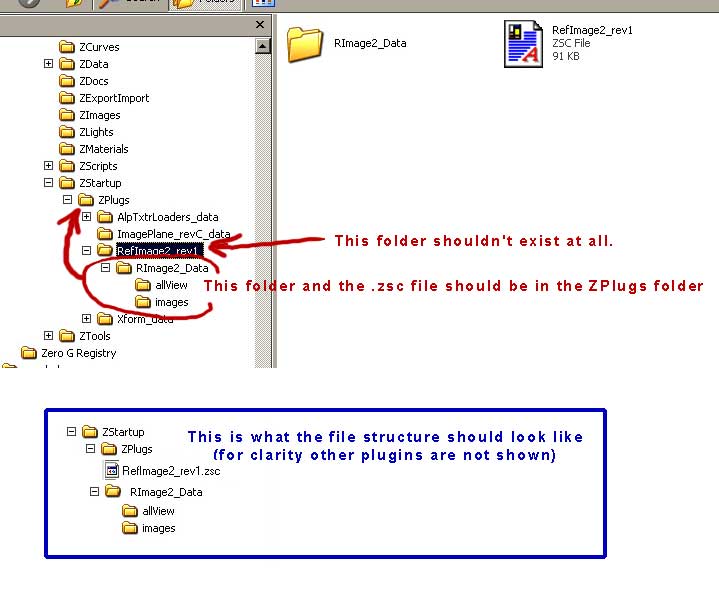
Delete the RefImage.zsc file from your ZStartup/ZPlugs folder.
Delete the RefImage_data folder (and its contents) from your ZStartup/ZPlugs folder.

That’s all that’s necessary.

HTH,

Thanks, Marcus. We all appreciate the work you’ve done to make life a little easier for the rest of us.

~S.~

thanks marcus… will try it out. :+1:

Thankyou for making my life better!!

Marcus,

Here’s what I get when I use the new version. When I open a new document (‘Double Size’), I go to the Plugins dropdown and open the new RefImage utility. My first move is to load the background image I wish to use. When I push the button to do this I am allowed to browse for the image and select it and it appears in my document. However, as soon as my background reference image appears, so does an error box (which I have posted). If I press the cancel button on this first error box I get three more error boxes (also posted) after which my background image remains and I can draw my tool over it.

When I first draw the tool (a head model) it appears as an empty white matte, defaulting for some reason to ‘Current Material’ with ‘Flat Color’ and the ‘00’ brush and ‘Current Alpha’. If I change the material to something like ‘Polkadot’, I am unable to achieve transparency by going into the materials dropdown, adjusting transparency then going to the render dropdown and unchecking ‘Flatten’, as I was able to do with the old version. I am able to adjust those settings but they have no effect on the model.

If I choose a view to store, my background image is stored as a distorted texture. The image is squashed horizontally, not an enormous distortion but enough to be clearly inaccurate and unusable as a guide.

So, right now I am just loading my image each session and working without transparency.

Also, when I view the unzipped file structure, there is only one .psd file in the ‘Images’ folder but there are nine .psd files directly under the main ‘RefImage2_data’ folder along with a single .ztl file (‘RI_labels’). Is that correct?

Suggestions?

~S.~

Here’s my machine specs:

Microsoft Windows XP

Home Edition

Version 2002

Service Pack 2

Dell Notebook 16000

Intel ® Pentium ® M

Processor: 1.5 GHz

1.5 GHz, 2 GB of RAM

RefImage 1 copy.jpg

Attachments

RefImage 2 copy.jpg

RefImage 3 copy.jpg

RefImage 4 copy.jpg

RefImage 5 copy.jpg

SNARK,

All the error messages suggest that you have not installed the plugin correctly. Please check that your installation matches the structure outlined here: http://www.zbrush.info/site/index.php/Reference_Image_2

Note that the folder RImage2_Data (which should be in the main ZStartup\ZPlugs folder) contains a number of files and also two subfolders :
allView containing 2 files:
allView.zmv
tmp.zmv
and images containing 1 file:
0.psd

HTH,

Thanks Marcus.

I downloaded the zip again. It is installed where it is supposed to be. Now, it doesn’t show up in the ZPlugin dropdown unless I first go into the ZScript dropdown and browse for the .zsc file. When I manually open this, the utility appears in the ZPlugins dropdown. I have to do this for each session. Transparency is working now.

When I try to save a model position, for example when I line up my model and press the ‘store front position’ button, my model flips upside down and backwards and centers itself in the middle of my screen. And this is the position that is stored, not my careful line-up.

Your site for the plugin says there should be a file - RefImage2_verA.zsc - but the file in the download is actually - RefImage2_rev1.zsc - is this the same file? If so, then it is where it should be. I must be doing something wrong but I cannot find it yet.

Clues?

~S.~

:+1: :+1: :+1: :+1: :+1:

Thumbs up for mr civis, AGAIN!
His scripts are the best!

SNARK,

I’m sorry you are still having problems. Can you either post or email me a screenshot of your ZPlugs folder in Windows Explorer? I really think that this is an installation issue. With a correct installation there is no way you should have to manually load the .zsc file. If we get the installation sorted then we can address any other problems.

On your comment about the name of the .zsc file, that’s an error in the Wiki which I’ll correct. Thanks.

if this thing is not an integral part of 2.5, then i will have to stay with 2

Hey, Marcus.

Here are screen shots of the file tree. Thanks for having a look.

~S.~

RefImage 6 copy.jpg

Attachments

RefImage 7 copy.jpg

RefImage 8 copy.jpg

RefImage 9 copy.jpg

SNARK,

Thanks for taking the time to post the screen shots. Somehow an extra folder has been created and that’s causing the problems. Check out my screen shot to see how the installation should look.

RefImage 6 copy2a.jpg

Thanks, Marcus.

Everything is working fine now. Funny how that extra folder got in there.

Could I ask a basic question about tools and drawing them on the canvas? When I draw my head tool on the canvas it appears back to front and tilted with the head more down than up. It is a simple correction to re-orient but I wondered if there was a way to control this, a way to instruct the model to appear face forward and vertically alligned. Is this a center pivot issue?

~S.~

Thank you Marcus.

SNARK,

I’m glad the plugin is now working correctly. :slight_smile:

Until you press the Store Position button the plugin bases its default positions on how your model is oriented in the Tool>Preview window. So it helps to check that the ‘Front’ of your model is as you expect in the Tool>Preview window before using the plugin. If it’s not, adjust the model’s orientation in the Preview window and press Store. The initial Front, Back, Left etc. positions should then be as you expect.

HTH,

Hi Marcus,

Everybody has already said it, but thank you for such an amazingly helpful tool!

Leo.

great logic zbrush script,ths for share.

Hey Marcus and Ryan,

Any word on getting a 3.1 version of this script? I like how it lets you load different images per “image plane” and stores multiple model positions as well as project files.
All around great tool!

S

Hi Scott,

Yes, an update is in the works, though with slightly simplified functionality & combined with the Image Plane plugin.

Hello Marcus,

Will your plugin (which I liked in 3.0) will improve speed in any way? So far, using image planes slows down to a crawl my computer (3 gigs of ram + AMD X24600+GeForce 7900GTX 512). I couldn’t help notice ZB subdivided imageplanes and lowering the res of the plane will pixelate the picture as well.

Isn’t there a way around this? I am thinking this way of handling pics is bound to the ZB engine, but it’s troubling to use references, especially if I need to activate the “double” feature in display properties rollout. 10k for 2 planes seems a tad too much IMHO.

Sorry for the rant and drift. I admire your comittment to ZB and hope you can get a better version of the plugin to make our lives easier. Some of us rely on reference (I am an illustrator, if you wonder).

Cyas.