[ ]
]
Just a fun little script to populate the canvas with various models using a mouseclick. How it works.
I have included 10 low res models with the old zipfile, named People01, People02 etc.. Replace these models using your own, they can be as hi res as you want. As noted in the above picture you will have to orientate your models so that the Z axis (facing you) is the Head of your model. The easiest way to do that is.
1. Place your model on the canvas.
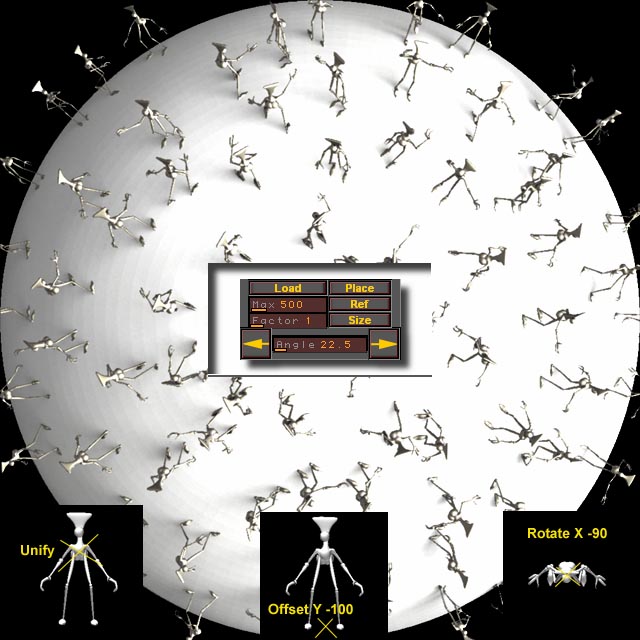
2. Press TOOLS:DEFORMATION:UNIFY
3. Select 'Y" in the TOOLS:OFFSET (deselect X and Z)
4. Enter -100 in the slider, this will move the center to the feet
5. Select 'X" in the TOOLS:ROTATE (deselect Y and Z)
6. Enter -90 in TOOLS:ROTATE
7. Save your mesh as one of the People 1-10 files
To create a horde of people on the canvas
1. Create a floor. A 3D Plane at 60 degrees X rotation is pretty good.
2. Load the Script
3. Press "Load" this loads up all your models and makes the screen 1024x1024
4. Place "People1.ztl" on the canvas by pressing the Hot Key 'd' and clicking anywhere on the plane you made.
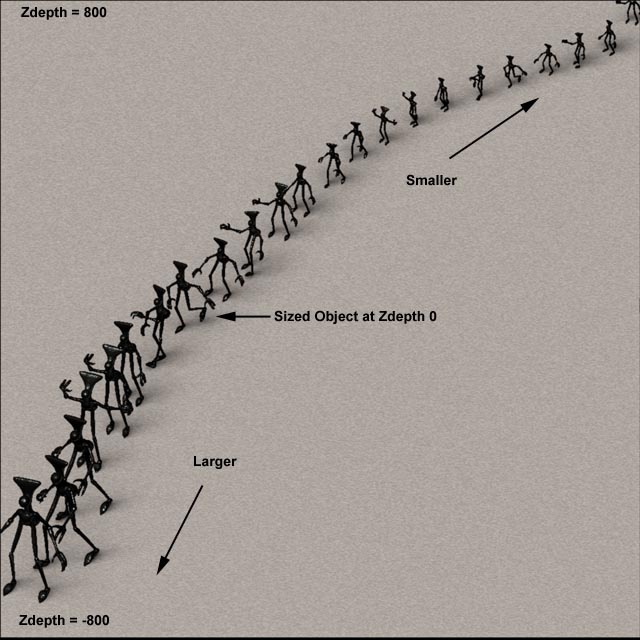
- To create the illusion of Perspective slide your model to the back of the canvas and look at the Zdepth, then enter that value in the Max Slider.
- Still using the first model place it where you would like it to be on the 3D plane and enlarge or shrink your model to the size it would be at that Zdepth. Then Press “Ref” This sets the reference point for the Script. Each model placed on the canvas will be sized according to its position on the Z axis using this reference. You can exaggerate this effect by making the Factor slider greater or less than 1.
- Continue to add models to your scene by pressing the ‘d’ key. Each model will be placed and sized on the canvas in a random direction. When the script gets to People10 then it will start again at People1.
8 Use the Arrow keys to rotate your model to a desired location right after you place it. You can change the Rotation increment by making a new value in the Angle Slider.
Use the Size button to manually size your model to a position on your canvas if needed. (you could use this script to proportion any mesh you might have to your canvas by using the Ref and Size button)
       I hope the above isn't as confusing as I think.

       Place the Zip file somewhere in your zscript directory.

    This script was an idea created from an old WingedOne script a while back.

   :warning: UPDATE Version B 4/16/05 :warning:

   :large_orange_diamond: Updated button Graphics (wow!)

   :large_orange_diamond: Instead of having a fixed model series People1, People2 etc.. The Load button will ask for a filename. Navigate to where your models are located and select the first one of a series. The script will automatically load all models. This will allow you to create banks of different models to use with the script.

   When naming your models the Index number must have 2 digits

   example:

   Model00.ztl
   Model01.ztl
   Model02.ztl ......
So… If you want to use the old People1 People2 etc… files you need to rename them to People01 People02 etc…
The script will automatically load all the models if you select Model00.ztl from the Load button.
If you need to change your model while working on your scene press “Load” again and load a new model. The script will check if the Model already exists in the Tool palette so feal free to switch back and forth between model files.
Note: Different models might have different internal scalings. Placing a new model in an existing scene the new model might be larger or smaller than the previously placed models. To fix this
   1. Size the new model in the scene to scale it.
   2. Press the "Ref" button to record the new scaling.
 UPDATE - VERSION C - 04/17/05
 Made it more efficient searching for existing tools
Added ROTATE Switch
Switch this ON when you want the Script to Randomly rotate your model when placed on the canvas. Switch OFF to manually rotate the model using the <- -> buttons.
Added Follow Function
Switch “FOLLOW” on and the Script will automatically Rotate the model towards the last placed Model. Use this to create people waiting in line for example.
Added PointTo Switch
Use the “SET” button and a model to record a Orientation Point on the Canvas. Set POINTTO On and each model will automatically rotate to face this point. Use this to make people circle around a campfire, for example.
To use PointTo
-
Place a model on the canvas, press “w” to activate Transform Move
-
Drag the model to a point on the canvas that you wish for all the models to face.
-
Press the “Set” button to store this position
-
Switch ON the PointTo switch.
-
Now each model will face the point that you recorded with the Set button.
Have fun!