Glad it worked out for you.
The brush I use is standasrd with freehand strok and a very small radial alpha.
The shader is Skin shader 2 with the opacity turned down under materials:modifiers
: )
S
Glad it worked out for you.
The brush I use is standasrd with freehand strok and a very small radial alpha.
The shader is Skin shader 2 with the opacity turned down under materials:modifiers
: )
S
Heh Scott - when I was a kid, in sweet times of Amiga computer, I even get a nickname “pumpkinhead” for the Amiga scene  Good old times - movie is a classic
Respect man, bring up some more materials when You have time 
damn man u rock. I’ll try this soon. Thanks for sharing!
Thanks scott, these kinda videos keep me buzzed up and inspired to do better.
High end results as always.
It is master work, no doubt.
It is a shame that We can’t export the actual material but only the textures
in ZBrush3 .We may use Skin subsurface scattering combined with the textures
in another package renderers , However frankly is not the same and is not worth
the new material improvements in ZBrush 3 .
So this is a suggestion for next Wish list. :idea:
Thanks for the kind words! : )
Yeah, I have often wished for a material that mimiced fast sss in maya but I suppose the solution is setting up your fast SSS to mimic the ZBrush skin shader. I paint for mental ray renders this way and it reads nicely with some shader tweaks - more presets from Maya or plug and play would be ideal though : /
Also dont forget you can export these shaders in renders to photoshop and composite them together… same for after effects in theory : ) Th leading image on the video is entirely zbrush renders composited in PS.
S
Yes, both the creative model and painting are great in my opinion. Thank you for the tip about Photoshop.
Didn’t know about that,Can you export the shader material to PS ? how do you do that ?
with a Zbrush2 or even 3 plugin?
if someone clarify that for me I’d apreciatte.
:ex:
Scott, very good, thanks for sharing.
5 Stars deluxe from me.
You bring me back to my traditional painting, especially airbrush-techniques.
I have done my ‘real’ paintings in this kind of technique for many years.
Since I have focused in the last time more and more into CG-Art and modeling techniques, exploring the amazing features of ZBrush and fighting with the incredible difficulties of several render engines, these ‘good old things’ that made the most fun of all came totally out of my sight.
Thank you for re-inspiring me to go back to my roots and do some fundamental good painting again.
Here are 4 examples of my traditional artpainting using mostly the same layer-painted technique with a real airbrush:
(as they are scanned paper-photos of my paintings, the quality of the colors is a little poor)
Again, thanks a lot for this great video-tutorial.
Ralf
OT:
Btw, can anybody tell me why almost all companys are not able to sell render-engines that are so prepared that you can get good results easy ?
It seems they all have a lot of fun in de-aranging almost all settings in that way that your first renders look like the poorest trash you can imagine.:evil:
Of coarse only few or no information about how to correct this shi… included.
Arggghhhhh…:evil:
Just now saw this. Great technique! Studying every second of this vid! Thanks for making it!
Stunning artwork Rasta!
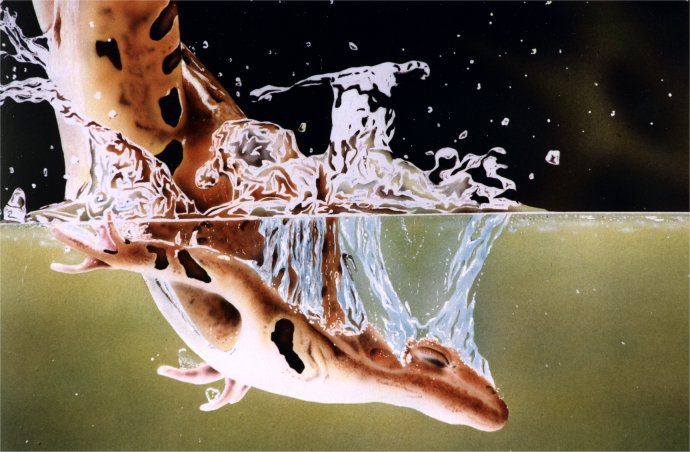
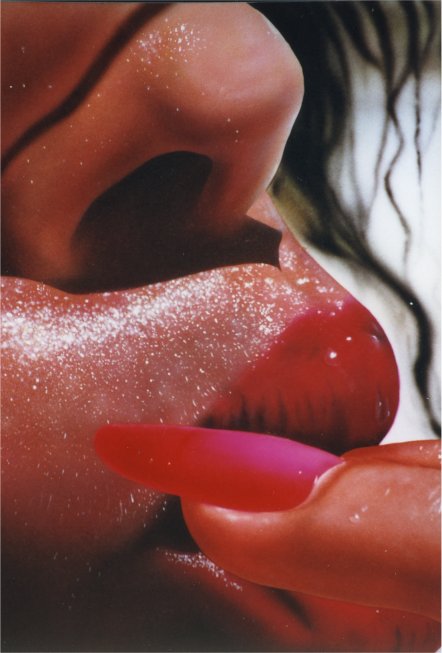
Wow Rasta! Those are awesome paintings, I love the denture one and the submerged lizard : )
As for render engines I am wanting to try out VRay since from what I hear it has some nice presets and good out of the box results.
thanks Scott ,i hope to see your video toturials early days.
this is an awesome technique!! Thanks so much for sharing
hey Scot, first 5* for this great effort, cause thats the maximum i’m allowed to give i guess…and thanx a ton for sharing this video…which is really amazing, interesting, and inspiring…!!!
worth waiting for the download to complete…!!!
though the video is pretty clear at describing showcasing all without any vo…but still, i would like to ask u a few queries thats going on in my mind…
u hav mentioned earlier that u r using a Skin shader 2 at the start of the painting, is it in the material palette or is that a custom made shader as i was looking to find it but couldn’t get one within except for those matcap skin shadres…i followed a help in poly painting tut from the pixologic z3 help site where it was suggested to use the matcap skin shader 05 to start off…but it gives a very monotonous pinkish hue all over the skin…here’s what i got when i tried in one of my model…
…and how much opacity u r using initially as that color is looking great for painting on…!!
r u using the projection master while working on that back big horn?? is the deco brush stil accessible in z3.1…?? i guess, u were using it for those long smooth curve strokes on the horn or something like that…
and also…that cavity masking is a great option…is there anyway to control the intensity or the amount of the cavity masking ??
also, if i want to remove whatever i polypainted earlier and start a fresh new one…how to do that??..
…I switch to a skin shader then with a standard brush set to a VERY low opacity ( 3 or 4) I mist a version of the base color over the whole head. This pushes all those colors back into the skin…
i think this is a very key part of the whole process as it was merging/pushing/blurring back the whole initial spray of colours blended into the skin amazingly…hmm…how u did that???…
it will be great if u can post some frames of major key areas of the video with some notes pasted of the kind of brush and alpha settings, colors u r using…
thnx again for the great video…
Hi dhruvsm vbmenu_register(“postmenu_390368”, true); ,
Glad you liked the video. i will try and answer some of your questions here.
About 2/4 of the way into the video I switch to a skin shader. This is the Matcap Skin 2 (if I recall, any of them will work though). Just back off the intensity slider under modifiers to get a more natural look.
On the back horn I am using Projection master. It is still active and the deco brush still rocks for long sweeping streaks of color. PM is even better now as it works wit polypaint AND it allows masking!
If you use the cavity masking option uinder the brush controls you can control the intensity and amount. I dont use that option because it does not let me see the vidual feedback of the mask.
to remove piolypaint just select white as your active color, make sure your brush is set to RGB and go to Color>fill object.
I will try and post some screens when I can. honestly I will prolly just make another video with audio next time  The brush settings change so much I am always adjusting size and coilor opacity. The best thing is to experiment and see what works for you
Thanks again for checking the vid out. I am glad you liked it.
S
Amazing work, thanks for sharing your video i have i question what shader did you use in zbrush and did you render in 3d max, maya thank a lot seea ya Alfredo
Thanks a lot Master Scott Spencer for condivide your Experience…
Very useful Video!!!
Great work! Thanks for sharing your techniques with us! Looking forward to the next vid with voice, and artistic insight  , of course.
But I cant seem to find the Matcap Skin 2 in Zbrush 3. In Z3 we have to the bottom left, and continuing one row up and to the right: Matcap Skin 06, 05 and 04. Contiguous to that we have the Matcap Skeleton, Matcap Sculpy 2 and Matcap Sculpy. Is it new in 3.1 or are we talking about the Matcap Sculpy 2? Thanks a lot!!
MatCap skin 04 will work fine (or any of the skin shaders) just be sure to back off the opacity setting.
S
Thanks! that solves the enigma. Again, thanks for sharing. Will you be creating any tutorials on sculpting and painting, for Gnomon, anytime soon? I noticed you have online classes on www.gnomononline.com, but those classes are way too far out of my budget. so a tutorial will fit my needs just right.
Cheers. Happy ZBrushing you ZAddicts.