I am a lightwave user and i am currently using this fantastic software know as Zbrush2.0. SO , could anyone please tell me how to open my lightwave file and map in Zbrush and back to lightwave 8.0…
Thanks
For normal mapping, microwave seems to be the best, but Marvis’ NormalMapper plugin is not bad. It can make for some strange shadows if you use it for low poly stuff with certain lighting setups.
When it comes to UVs, I haven’t figured out what ZBrush does with AUVtiles. I’ve only had success with GUVtiles, but to make them work in Lightwave (and also Ultimate Unwrap3D, UVMapper, and Wings3D), you have to either rotate the texture map 180 degrees and flip it horizontally or rotate the UVs 180 degrees and flip them across U.
BTW, in response to he previous post, just do obj export in Lightwave, import obj in ZBrush, generate GUVtiles and do your modeling work, export to obj, then import it back into Lightwave. For that last step, you have to do the flipping and rotating that I mentioned in the prev paragraph, unless there is some ZBrush setting that will do that automatically upon export (I haven’t found it yet).
Also, Lightwave’s OBJ exporter doesn’t export UVs. That’s one of the main reasons I use Ultimate Unwrap3D as an intermediary between ZBrush and Lightwave.
custom_junk_mail: I’m confused about why there would be a need to export the UVs out of Lightwave and use Ultimate Unwrap3D if you’re using ZBrush to texture and detail the model that is to be imported back into Lightwave. Can’t you just use the UV map created by ZBrush? Is there still a problem using the UV map created by GUVtiles? How does it fit into the workflow?
(I’m still trying to figure out how this all works). 
Also, how is Microwave used in the workflow? Is it a plug-in that renders Normal Maps to be viewed in Lightwave?

At this year’s SIGGRAPH conference, I had the opportunity to sit through the zBrush demo and was duly impressed. I wasn’t the only one. My wife, who it should be noted is not a graphics person, was so impressed that she told me I had to purchase zBrush. So I took the plunge. But my initial foray was rather unsuccessful, despite its outstanding documentation. The basic tools were easy enough to learn, but there just wasn’t enough info on how to integrate zBrush with LightWave.
I scoured the net and read just about every tutorial I could find, however many of these tutorials offered conflicting advice. One would use Bump Displacement. Another Normal Displacement. And another just “Displacements.” Some said to use the ATI Displacement plugin. Others recommended the Lynx plugin. I was sufficiently confused. I know there are some extremely talented zBrush users out there, but I never found a straightforward, detailed tutorial explaining the process of getting your model into zBrush and then back out again.
After much reading/tinkering, I finally got a handle on it and have put together a tutorial for those who, like me, are just getting started with this amazing app. This is not mean to be an all-inclusive zBrush tutorial, but rather a way to document the symbiotic relationship between it and LightWave.
The tutorial is 6MB in size and is optimized for 1280x1024 resolution. You will need the Flash player to view it.
Cheers!
Steve
Thanks Steve! Wow!  That was one of the best tutorials I’ve ever seen! I really like the way you documented every step and highlighted what to pay attention to on each page. Your tutorial could even do something Zscripts can’t: allow the viewer to move backward. I really liked using that feature as well.
Great job! 

Many thanks Steve for sharing your findings.
Your wife was absolutely right!!
for others:
ZBrush importing Lightwave uv’s and texture maps:
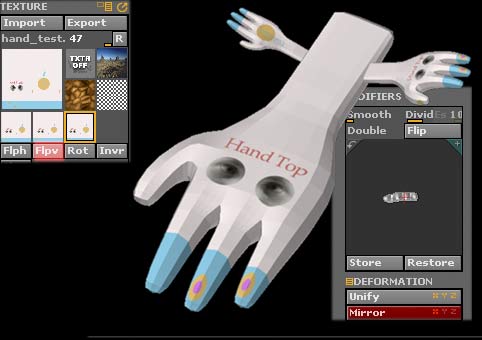
When importing an object with a uv map and partner texture map created in Lightwave,I had to mirror the imported .obj across the x axis. (Modifiers > Deformation > mirror x ) And flip the imported texture map, (Texture > Flipv )
Lightwave-exporting uv maps
tip from Robin Wood
’ If you want to export a model to a format such as .obj with the uv’s intact, use the map in atleast one channel in each material, and export. The uv’s will be retained. ( You don’t even have to assign an image, just the uv’s)"
Plugins recommended by Steve at http://lynx.aspect-design.de/plugins.htm, as yet there doesn’t appear to be a Mac version of the 16 bit grayscale TIFF loader.
Note that at the time of this posting Lightwave v8.01 contains a bug that crashes on .obj import. This hopefully will be fixed asap. There is a fix by using the import plugin from 7.5 (Conv3D.p) (should you have version 7.5)
v.8 also does not talk successfully to Maxon’s BodyPaint, again a fix is awaited.
custom_junk_mail: I’m confused about why there would be a need to export the UVs out of Lightwave and use Ultimate Unwrap3D if you’re using ZBrush to texture and detail the model that is to be imported back into Lightwave. Can’t you just use the UV map created by ZBrush? Is there still a problem using the UV map created by GUVtiles? How does it fit into the workflow?
The main reason you’d want to create the UVs in Lightwave (or another UV mapping software other than ZBrush) is if you want easily readable UV templates. UV maps generated using AUVtiles and GUVtiles are great for minimizing distortion, but the problem is that if you want to post-process the resulting texture in a 2D program like Photoshop, it would be virtually impossible to read and work with. If you want to make your texture using 3D painting/projection only, then there’s no reason to have a nice UV layout and ZBrush’s methods work just fine. Also, if you’re making a model in parts, then the other mapping methods like spherical and cubic mapping can work pretty well.
Also, how is Microwave used in the workflow? Is it a plug-in that renders Normal Maps to be viewed in Lightwave?
I’ve had limited experience with Microwave, but it is another plugin that uses normal mapping like Marvin Landis’ normal-mapping plugins. A normal mapper is really just a pixel shader that shades an object as though its normals were varied across a flat, polygonal surface. There are some problems with Marvin’s plugins when used with endomorphs. Strange shadows and creases start appearing in unwanted places as you deform the geometry. I’m not sure if this same behavior exists in Microwave, but from what people have told me, it’s a better plugin (though not free like Marvin’s).
I just started using ZBrush and have had a fair amount of success with the process of creating a texture in ZBrush and importing it into LW and rendering.
My problem is that I purchased the program with the intent of adding details to objects that have already been textured using LW uv maps and LW weight maps. So far any tutorial I have found explains how to create a map in ZBrush, but none of them explain how to maintain the original texture settings of the original LW object. Is there a way to simply make a UV map that can be added to the already existing object or a way to copy the LW texture back on to the imported .obj from ZBrush?
Get the ZWave plugin from http://www.madeinasa.com/plugins/zwave.asp. Follow the regular steps for getting your object out of LightWave and into ZBrush. Create a new UVmap for the details you create. Then paint away. When you’re done, export the object with the UV map you created. Then load your original object (with the LW generated UV and Weight maps) into Modeler and run the ZWave plugin. Direct ZWave to your ZBrushed .obj. It will copy the UV map from ZBrush and add it to your old model. Once that’s done, you can use your color, displacement and normal maps from ZBrush on your existing model.
Hope that helps,
Steve
i found some problems with normal map.
i try to use normal from zbrush to lightwave, but with marvin landis plugin and otherplugin called tb_normal shader plugin, i found a problem, obj diffusion seems go to 0.
if i enable inverse on layer option, normal map seem work correctly, but i think is strange working,
any suggest?
Attachments
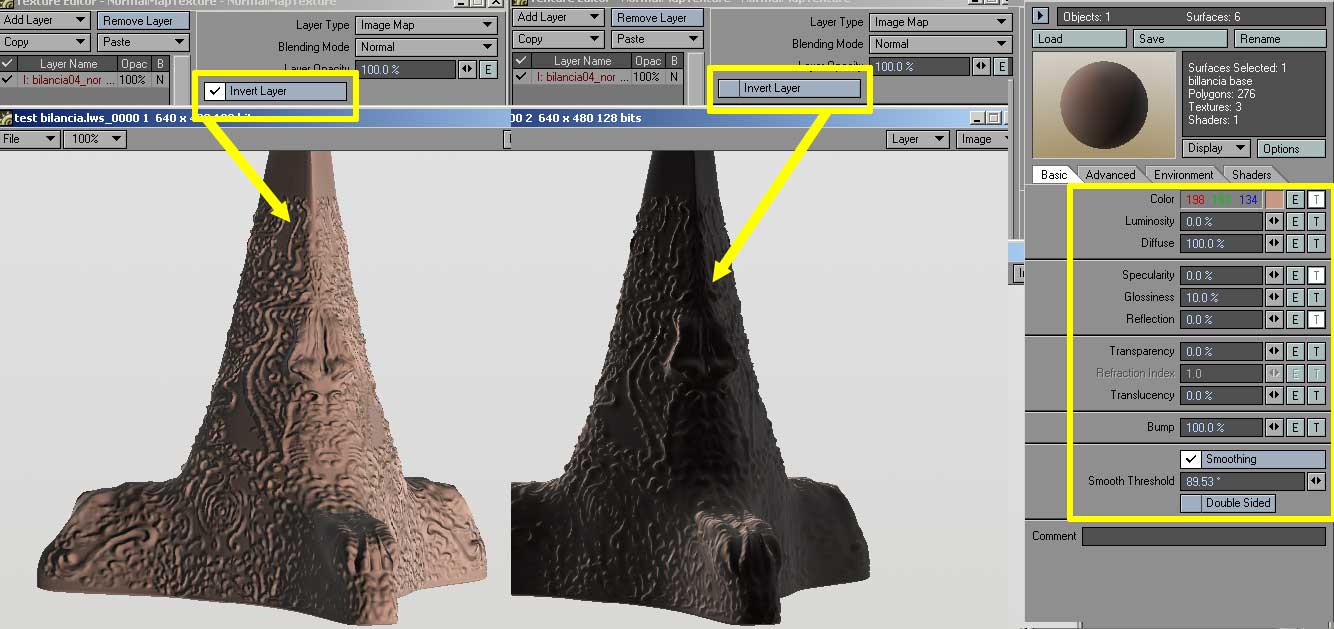
Make sure that your export prefs are set to eFlipX and eFlipZ for Normal Maps. If those aren’t set properly, the object will appear to be backlit (or as is probably the case here, having a low diffuse level). If you’ve already exported the normal map (and didn’t have the eFlip settings properly in ZBrush), you can bring the Normal Map into Photoshop and invert the Red and Green channels to correct the problem.
Another head’s up is that the Landis plugin (which is a derivitive of the ATI plugin) will not work properly with bones. Nor will it work with bump maps as it cancels them out. The TB shader, however, does not have this limitation.
Hope that helps!
Steve
Hi Steve, thanks for your fast suggest, now i check and test it.
ehm, i’m newbie of zbrush, what is the effects of eflip ?
Hi All!! First of all this is great forum and Zbrush rules!! But i think you guys already know this !
I recently started to learn Zbrush so i could use it with Lightwave and create more detailed models, for this i brought the intro to Zbrush dvds from gnomon3d. I haven´t even reached the 1/3 of the lessons (Only watched the part about the interface ). But i wanted to mess around with the tools before i continue with the dvds so i imported a LW model and started playing with the tools and adding detail to it, after playing with the model i thought “Let´s see how it will look in a scene in LW!”, there is where the problems began! 
I must be doing something wrong, because the displacement does not work in Lightwave. I followed the tutorial of Steve Warner (Great tutorial), but it still don´t work, the only thing i didn´t do when i change the model in Zbrush was to store the morph, because i didn´t knew that :p. That step is really necesary? With it is, that means that i have to redo all the changes i made to my model in Zbrush?
Sorry for the big Image and this is my first time using Zbrush to add detail to a model so it´s still a newbie model (Low poly, zbrush changes and back to Lw) 

I could export the mesh as an obj file, but open and animate a model with 1.000.000 in Lightwave will be suicide at least with my pc config! :evil:
Anyone have some insights to help me with this problem, i will really apreciate!
Thanks in advance!
Thanks, Lorigosolo. I’m glad you liked the tutorial. 
Storing a morph target before you make any changes is actually a critical step. Without it, you won’t be able to get back to your original mesh and LightWave will have trouble replicating the changes made in ZBrush.
Yes and no. You should be able to load in your original OBJ that you exported from LightWave. This time, create the UV in ZBrush and store a morph target. Then boost the subdivision level up to something like 5 or 6. Finally, load in the Displacement map that you exported before. Flip it vertically (assuming that you filipped it vertically before exporting it) and then apply it by boosting the Intensity value in the Tool/Displacement menu (where you create your Displacement maps). That should recreate the effect of what you did before. In my experience, it takes a bit of trial and error to get this to look just right, but it should enable you to recapture the effect without having to redo all the work again.
Not saving the morph target seems to be the problem here. It looks like the map is not being applied to the proper polygons in LightWave and my guess is that’s due to the morph target not being saved. But I’ve also seen that when my map wasn’t flipped vertically when exporting from ZBrush. So make sure that step is performed as well.
Also, keep in mind that if you’re using the Displacement plugin for LightWave (as described in my tutorial), you will need to adjust the Render Subpatch level in LightWave. Typically for characters, this will need to be bumped up to an inordinate amount, such as 20 or 30. The primary reason for this is that you’re asking LightWave to apply displacement on an object that has fewer polygons than existed in ZBrush. For example, if you subdivided the object in ZBrush until it had 1 million polygons, you’d need to increase the Render Subpatch level in Lightwave to about 1 million polygons to match what you saw in ZBrush. In practice, this isn’t really necessary. Just keep in mind that the more you subdivide your object in LightWave, the closer it will look to what you had in ZBrush.
It’s also worth mentioning that no matter how much you subdivide your object in LightWave, it will never look 100% like it did in ZBrush. There are a couple of different reasons for this, but one of the primary ones is that LightWave doesn’t support sub-pixel displacements. To get around this, it’s advisable to use regular old bump maps to simulate minor details and displacements for major details. Remember that displacements should ideally be used for the types of shape-changes which will affect the object’s profile. But minor details such as pores, wrinkles, etc can all be achieved with bump maps or normal maps.
Normal maps weren’t covered in my tutorial and my work on updating the tutorial got delayed indefinitely due to other projects. So for what it’s worth, here’s what you need to do:
-
Get TB’s Normal Map shader from this link: http://home.att.ne.jp/omega/tabo/3dlabo/p_junk.html
-
In ZBrush’s preferences, set your Import Export option to: Normal Map Flip X and Normal Map Flip Z. If you don’t set these, your normal map will not export properly.
-
Follow the steps in my tutorial. Once you’ve exported your Displacement map, go ahead and export a normal map as well. Then continue following the steps of my tutorial to get your model back into LightWave.
-
Once in LightWave, bring up the surface for your object and apply TB’s Normal Map shader. Then apply the Normal Map you exported from ZBrush. You don’t have to use the Displacement map unless your object has some extreme displacement to its profile. Your model would fall into this category. As a result, you should apply both the Normal Map and the Displacement map. But since the Normal Map is handling the small details, you don’t have to set an extreme Render Subpatch level. Something more reasonable (like 6-10) should work just fine.
-
Tweak the settings between the Displacement and the Normal Map to get the desired effect.
That ought to do it. If you run into additional problems, let me know.
Cheers,
Steve
Hi Steve, thanks for the quick reply!
Storing a morph target before you make any changes is actually a critical step. Without it, you won’t be able to get back to your original mesh and LightWave will have trouble replicating the changes made in ZBrush.
So if i don´t store the model when i import it, i will not be able to go back to the lightwave model, but if i export the sub 1 model from Zbrush and use that as my new base model, can i do that and use the displacement applied in that model? If i do that i should get the results i was looking for or at least something close to what i see in Zbrush?
Yes and no. You should be able to load in your original OBJ that you exported from LightWave. This time, create the UV in ZBrush and store a morph target. Then boost the subdivision level up to something like 5 or 6. Finally, load in the Displacement map that you exported before. Flip it vertically (assuming that you filipped it vertically before exporting it) and then apply it by boosting the Intensity value in the Tool/Displacement menu (where you create your Displacement maps). That should recreate the effect of what you did before. In my experience, it takes a bit of trial and error to get this to look just right, but it should enable you to recapture the effect without having to redo all the work again.
That´s intresting i will try that later!
It’s also worth mentioning that no matter how much you subdivide your object in LightWave, it will never look 100% like it did in ZBrush. There are a couple of different reasons for this, but one of the primary ones is that LightWave doesn’t support sub-pixel displacements. To get around this, it’s advisable to use regular old bump maps to simulate minor details and displacements for major details. Remember that displacements should ideally be used for the types of shape-changes which will affect the object’s profile. But minor details such as pores, wrinkles, etc can all be achieved with bump maps or normal maps.
OOhh so that´s why Zbrush can handle insane amounts of polys without freezing, i hope Newtek can make some changes to Lightwave programing and let Lightwave support sub-pixel displacements! I heard that even Poser supports that! And it would be nice to have a bridge plug-in to Zbrush, something like the bridge plug-in of Maxon Body Paint! 
Normal maps weren’t covered in my tutorial and my work on updating the tutorial got delayed indefinitely due to other projects. So for what it’s worth, here’s what you need to do:
I have started to learn how to create Normal maps for game models using Lightwave, and looks pretty sweet! It´s like a “super bump”, if i use that i should not need displacements or it will be better to use both? I will try to follow your tutorial and apply the changes you mentioned in your post, and try to create some Normal maps in Zbrush, i guess it is easier and faster than Lightwave´s technic! Thanks for the mini tutorial on Normal Maps!!
Also, keep in mind that if you’re using the Displacement plugin for LightWave (as described in my tutorial), you will need to adjust the Render Subpatch level in LightWave. Typically for characters, this will need to be bumped up to an inordinate amount, such as 20 or 30. The primary reason for this is that you’re asking LightWave to apply displacement on an object that has fewer polygons than existed in ZBrush. For example, if you subdivided the object in ZBrush until it had 1 million polygons, you’d need to increase the Render Subpatch level in Lightwave to about 1 million polygons to match what you saw in ZBrush. In practice, this isn’t really necessary. Just keep in mind that the more you subdivide your object in LightWave, the closer it will look to what you had in ZBrush.
WOW! 20 to 30! That´s really high, and i thought that 5 was too much!  The higher the poly count in Lightwave the closer i will get! So if i go something like 1/3 of the poly count of the High Poly i should get something similar to what i see in Zbrush, but with less quality.
Another odd thing, this is about Zbrush, i have the Ogre model brush in subdivision level 4, when i load the “tool” of the ogre and lower the subdivision level i mess up the model :evil: , i can´t go back to the high poly model because when i do that the model goes crazy and “implode” it self! Don´t know why that´s happening! Any idea? 
Thanks Steve for your time!
Cya
Lorigosolo
Storing the morph target simply tells ZBrush, “This is what the model looked like when it came in. Remember it.” When you then paint on your model, you are changing the geometry. Because ZBrush allows scalable non-destructive resolutions, changes you make at SDivsion Level 5 will be reflected as best as possible, even at SDiv Level 1. I honestly don’t know the technicalities of it, but I do know that if you try to export the SDiv Level 1 model (without switching back to the stored morph target), the exported model will not be the same as the one that you brought in. And with that being the case, the UVs will likely be off, causing problems with your Displacement Map. It’s imperative that you store the morph target right after you import the .obj file and draw it on the canvas. As a good habit, I also create the UV map at this stage as well.
I know that’s been a highly requested feature. My guess is that it will be implemented in the next revision or so.
Normal maps are essentially 3D bump maps. Where a bump map stores 2D information, a normal map stores 3D information. It is still a visual trick (like bump maps) but the detail they provide is vastly superior to bump maps.
In many cases, you can just use normal maps without additional displacements or bump maps. But there may be times where you want to use bump and displacements in addition to the normal map. In large part, determining when to do this will come as a trial and error. But if I can make a general rule of thumb, it would be this: Apply your normal map to your object first. Then render and check it. If you find that it isn’t affecting the profile of your object enough, add the displacement map starting with a fairly low Subpatch Render level (i.e. 4 - 6). Then increase the subpatch level as needed to get the level of detail you require.
That’s really weird. I’ve never had that happen. When I save out the object as a tool (either with a high SDiv Level or a low SDiv level) and load it in again, I can change resolutions without affecting the object. It sounds to me the displacement in the alpha palette is being applied to the model, but I don’t know how that would be happening. I’m sorry that I can’t help you more with that problem. I’d recommend posting on the main troubleshooting forum and posting a few pics showing what’s going on. I’m sure someone with more ZBrush knowledge can help.
Cheers!!
Steve
I just wonder if is possible after doing all the texturing, painting and so on, can I import exactly what I see in ZB into LW, so I can animate my charater with all the textures and paintings I did in Zbrush?
here you can see a sample of creature that i did in zbrush, and i rig, animate and render in lightwave 3d, i did a guide about its workflow, it’s avaible on my web
Lightwave 9 supports displacement maps from Zbrush and can apply to an object with a displacement node in the node editer which is available from 9.0.