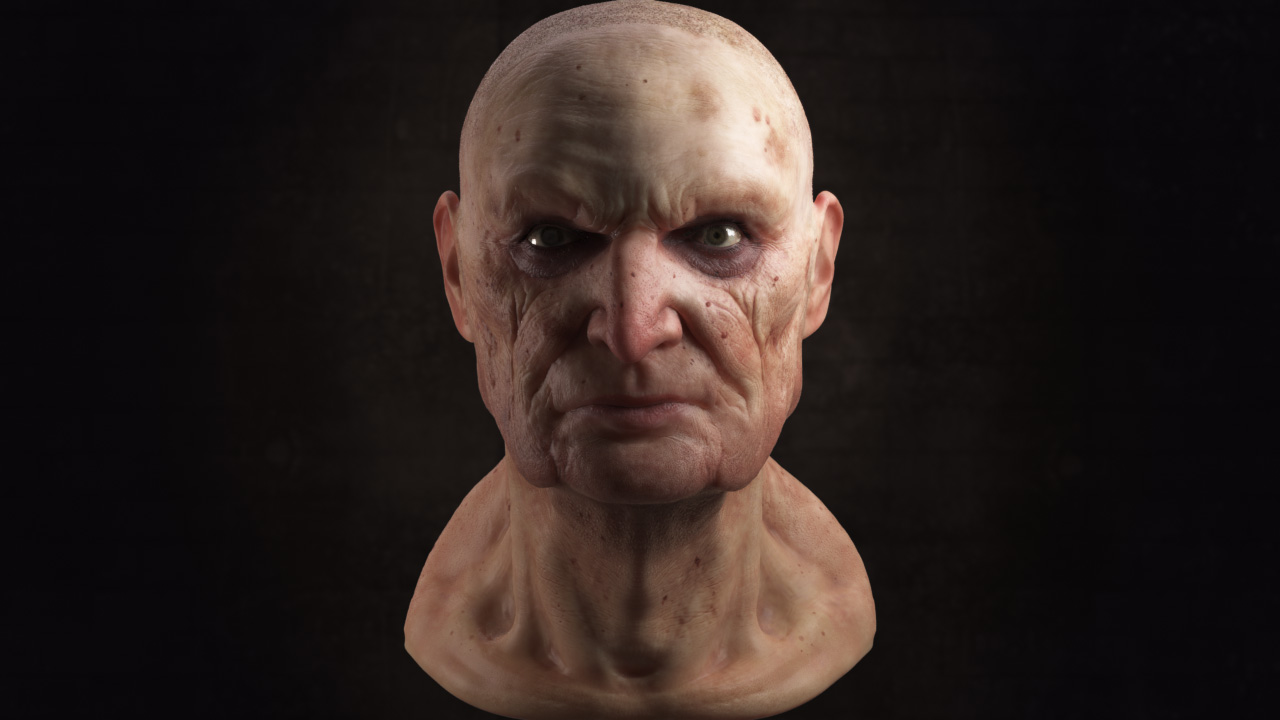
I’m at a stand-still where I don’t know where to go with this model.
I’d like your comments and critique please. Trying to get my dream job in game-development still.
Attachments


I’m at a stand-still where I don’t know where to go with this model.
I’d like your comments and critique please. Trying to get my dream job in game-development still.
Looks great man. I’d hire you!
He looks a bit like Ben Kingsley 
I’d like to see him with hair, eyebrows and eyelashes, plus the little lip of water that is on the bottom eyelid. Fantastic texture work though.
You probably could get a job quite quickly if you applied for an environmental artist for games. You have a lot of archvis stuff that probably could be converted into low poly and brought into UDK or Unity.
I’d say based on this head, and I believe you can tell a lot from one piece, if his anatomy is as good as this head then he’d do fine as a junior character artist in gaming. I’ve been doing this professionally for 14 years and he’s got the eye for it.
Topology is important, if you can show off your topology that would be good. Also, finish the body, bake out the maps (normal maps etc.), show it off in a realtime engine like Mirmaset and that will make companies feel more at ease about hiring you.
You also got two things besides a good eye going for you, you are eager to prove yourself and you will be cheaper than an experienced artist. You just need a foot in the door somewhere and your career will take off.
Would say you’ve got the sculpting and texturing part done, just need a low poly model or 2 with good topology to kick the door open. great job.
I’m not knocking his anatomy. Its just very hard to get a job a character artist so I hear, due to the amount of competition. Enviromental artist are always in demand, and he has fantastic skills in that department. I’m personally thinking about making a ton of props and making a prop reel for job purposes to get in the industry. One big problem is that a job requirement for a lot of studios is several years in the industry and work in a AAA game. How can you have that if your just starting out!?!
Very nice. I can see you have some a-symmetry but make sure you have some on that crease/tree branch line on his cheek. I can see they are the same on both sides.
I know this is a zbrush forum but thanks for posting your Vray specs. Your using two lights or a light and a bounce card and a HDRI? Or maybe no HDRI? Pretty amazing your able to achieve that effect with only one texture map. I’m just now starting to get into Vray for Maya.
I’d also like to see him with some hair.
tobbeo - Thank you!, It’s hard for game companies to see the relatively short jump from Arch-vis to games, I’m hoping they’ll give me a chance. Your work is excellent. The Dragonage shots look amazing. I will show topology and some normal mapping as well, I’m just so far removed from Games (being in arch-vis) that for a modern game engine, I’m not sure what acceptable poly-limits are. I have done some work with UE2 but that was the last time. A modern main-character type for a real-time engine is probably 10k polys for the full char?
womball - Thanks man, and I’m glad you checked out my site, right now I’m just focusing on building a more game oriented portfolio to try and get that dream job. I will do some hair tests and put some on him as well.
GX@W - Thanks, I’m generating this shot with a low-poly model and displacement, I’ll work towards showing the low-poly and normal mapping next.
Mrguy - The lighting setup is simple. 2 VRay lights, and a VRayHDRI set very low to fill in some of the blacks. GI is on, and that’s about it. If you need any VRay help don’t hesitate to ask :). And you’re right, there’s no asymmetry on the cheek wrinkles, I’ll fix that up. Thank you.
I wanted to share with all of you ZBrushers as well a script that I wrote while working on this head. I had a hard time nailing down the glossiness value for the skin. So I wrote a script that would render out a bunch of glossiness values (set by me) so I could pick the best one, but it does so much more.
Here is a video showing the functionality on Youtube.
The script is called “Tweaker”. It’s on my website (click the “Scripts” button at the top): www.colinsenner.com
It works with all rendering engines (Scanline, MR, VRay, Brazil, Maxwell, etc. I use VRay, but the steps are the same)
It allows you to tweak almost any property on an object, an object’s material, an object’s modifiers, any map, and renderer settings and it will render out a sequence of images for the settings you choose.
To nail down the head’s Glossiness property MAXScript->Run Script, select “Tweaker”, and press “Pick Object” and select the head. Under the “Material Properties” select the VRaySSS2 material’s “specular_glossiness”. Set the spinner “From” to maybe like .3, and “To” to .9 and by “.05” and hit render, select the directory to save the images to and check them out when they’re done!
Ok, ok, now let’s say I have a VRayHDRI map that’s lighting my scene and I want to find the best horizontal rotation for a shot. Easy. Run Tweaker, click “Pick Map” and select the HDRI that is lighting your scene. Double click on “Horizontal_Rotation” (or whatever it’s called) and set from to 0, and to to 360, and by 25. And you’ll get renders every 25 degress of the HDRI.
Use it and enjoy it, let me know your experiences with it.
Features:
I’m just now starting to learn how to render grass effectively and want to be doing more outside/inside rendering. I’m finishing up my last year of schooling at San Jose State and will be doing more character modeling so I foresee myself investing more time in the sss2 shader.
I’ve worked at a start up video game studio in San Fransisco for about 1.5 years now, so if you have any questions I’d be more then happy to give you some advise, considering you know your way around arch vis work. 
Good job with the modell, looks realistic,
and the script looks very usefull so i gonna try it out,thx!
Does the discoloration under the eyes look weird to anyone else? I can’t tell, I’ve been staring at this model for too long.
It could be more subtle under the eye. He really needs hair to tell how it all works.
I don’t think it’s too much. He’s got a Pope Ratzinger/Palpatine thing going on, but that’s fine. I think it’s a great render.
Hair creation ideas? I can use VRayFur to do it, but the results with being able to style it will be rough. I could always low poly hair or photoshop hair in. I’ll try a couple of things this week. Thanks guys for the help.
oh!!1 nice work!! and really thanks for sharring!!!
congrats
Wow, just floored me man! The skin texture on your character is sublime and very true to real life. I felt it had the real sub surface scatter effect that you would see in real life…the blood circulating underneath the skin and which makes the skin color appear slightly pink.
Had few questions though, was this rendered in max and which version of vray did you use? Saw your Arch Vis…damn, you have it going for you man. I wish you all the best!
Here is the head normal mapped and shown at low-res with 6,702 polys.
This about what you guys think game companies are looking for? Is this about a decent breakdown for how to show the stages of a model correctly?
Thanks for your input.
Here is the breakdown, still todo: Hair


@arthurduque - Thank you very much for your kind words.
@ K1LLSW1TCH - QUOTE
Had few questions though, was this rendered in max and which version of vray did you use? Saw your Arch Vis…damn, you have it going for you man. I wish you all the best! /QUOTE
Any VRay questions you need answering? Just let me know and I’ll be happy to help. Also, checkout the Tweaker script I wrote while I was working on this head if you want to interactively learn what every setting on a material/modifier/renderer does. It’s pretty neat and it’s on my scripts page, along with my main script “Relink Bitmaps” for relinking missing maps from old scenes.
-Colin
Thanks for the script, that’s actually very useful. I can see myself using it to show my sups different versions so they can pick and choose. In film especially it can really come down to a few specific properties and this makes it easy to generate a range of images with different values. Thanks!
Good job on the low poly head and normal map. You can probably bring out some more detail in the normal map, try using crazybump if you haven’t. It’s a very common tool when doing game assets. I used it on games like Fable II and Empire Earth 3. It’s a good way to get some extra detail out of your normal map.
You asked earlier in the thread and 10k is a reasonable amount for a fully fledged character but it depends on whether it’s a hero character, side character, and other factors of course.
Character work is a bit harder to get because so many people want to do it and if you compare the amount of characters that need to be done to the amount of assets and environments, assets and environments will far outweigh how many characters are needed.
Keep it up though, you obviously have talent so it’s just a matter of showing it to as many companies as you can until you get that first job and then it will get easier. Best of luck!