Z3 is just awesome. I followed the skull tutorial with the only reference being the X-plane pic included with the tutorial, and came up with this:

:b4: UPDATE: MatCap zip now includes the light file as well:
Attachments


Z3 is just awesome. I followed the skull tutorial with the only reference being the X-plane pic included with the tutorial, and came up with this:
:b4: UPDATE: MatCap zip now includes the light file as well:
:eek: Outstanding work! :eek:
Looks fantastic! How do you remove X-plane? I couldn’t do it?
Thanks!
Thanks guys!
Cole, you can hide a subtool like you hide a layer in Photoshop. Click on the eye icon. You can also delete the X-plane subtool if and when you are done with it.
That turned out excellent! Am gonna have to give that tutorial a go I think.
Nice to ‘see’ an old face return for a visit. Learned alot
from your posts of long ago. Thank you.
This is the best human skull i’ve ever seen lately 
Stunnig work and 5 stars!
Aminuts: Thanks, there’s a lot of ancient buried treasure in ZBC. Maybe the new Wiki will help organize the info once it gets going.
Leshiy3d: Wow, thanks. I really like your Native American bust.
Awesome mesh. Just a quick crit: The eye cavity has a really low res texture which kinda detracts from the work as a whole for me. Btw take anything I say with a grain of salt because I’m pretty much a ZNewb.
Yes, I had only a little time last night and wanted to take my model all the way to a finished, painted state, so it was definitely rushed. Consider it still a bit of a WIP.
I’m going to jump back a step and tweak it a bit. I’ll add some resolution to the eye-sockets this time.
Thanks for the input.
I updated the MatCap zip file to include the Light setup used in the Best Render above.
That is one of the best skulls i’ve seen yet
And lighting setups/materials are always welcome thank you!
This looks just amazing! I’ve only been using Zbrush for a week now and have been following as many tutorials as I can find and I’d love to see the processes involved. Especially the projection of the skull pic onto the model. I’ve followed the original skull tut and the projection tut but I still need my hand held a little. Any extra info you can provide will be greatly appreciated. And thanks for the inspiring post!
Wow J, that is startlingly real. I wonder if it might not help to do a second material for the teeth? Thanks for the ShinyOldSkull mat file. It tweaks into a passable Netsuke material, too!
Sven
Very cool! 
Ryan
Nice sculpting!
woo~it looks really very nice,like a real photograph!
there have a lowres inside the eye socket,except it,the other parts of the model looks so perfect!
cool~
Namek: Thank you and you’re welcome. I’m working on an old teeth material now, and I’ll add it here as soon as I get it right.
lawndart, Thanks! The How to Sculpt page now has just about everything you need. If you look through and still have a question, post it here and I’ll work on it.
Sven: Thanks! Per your suggestion, I’m working on a tooth material now.
Ryan, Trurl, Jecn: Thank you for your comments!
Because I want something I can use in any future illustration from any angle and with and/or without the jawbone or teeth, I am going to use this model as a chance to learn all the ins and outs of retopology. With the tutorials by Marcus Civis and Rastaman, I now know how to properly ZProject, as well. The goal is to retop or make new meshes so that the jawbone, teeth, and main skull can be separated, and to capture at least 90% of the current level 6 or 7 sculpting in the new meshes. I also want the arches of bone and sockets in the skull correctly topologized, instead of faking it with the sculpting and texturing. This should also take care of the resolution problems from pushing in the eye-sockets and pulling out the teeth in the original mesh!
My first go at creating a new jaw-bone took about 40 minutes total, and the details follow. If I were to start over from scratch it would only take about 15 minutes to get to the same point due to learning various techniques the first time through.
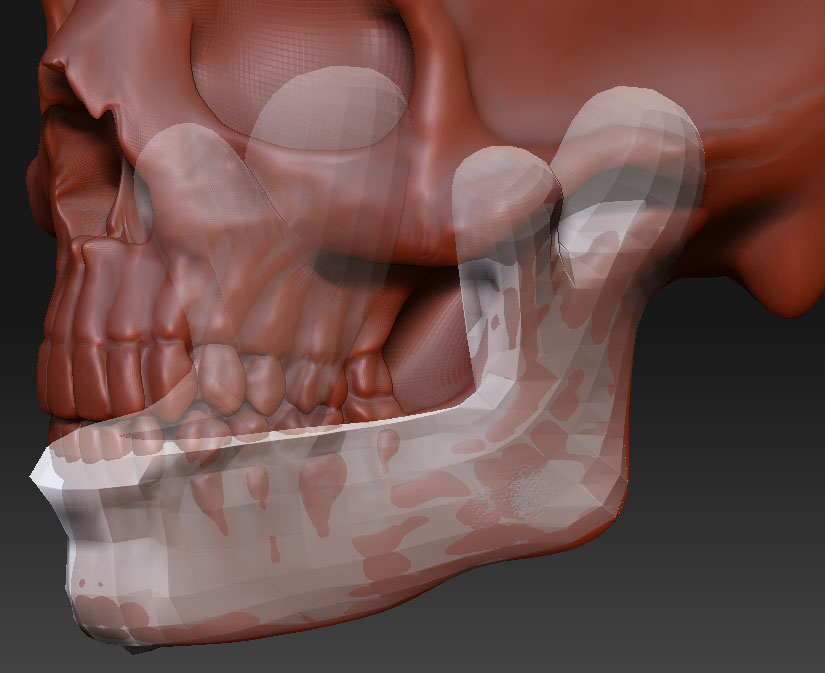
This approach uses a quick ZSphere mesh as a subtool, and ZProject:
[attach=59285]JawboneRetopA.jpg[/attach]
The above picture shows a ZSphere skin subtool which I have begun to Zproject at a lower res. To get to this point I…
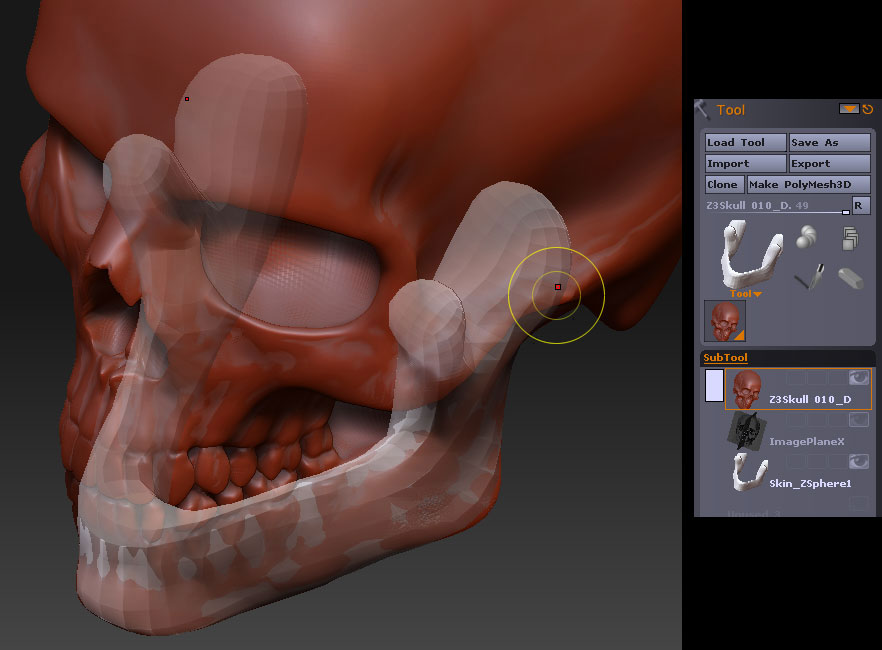
Append a ZSphere to the skull model while in edit mode.
Select the ZSphere subtool, set Transparent ON, X-Symmetry ON (‘X’ key), and re-create the jawbone shape with Zspheres, hitting ‘A’ to check the adaptive mesh from time to time.
When the ZSphere model is done, make an adaptive skin, append it to the Skull model, and hide or delete the ZSphere subtool model.
Tweak the low res adaptive jawbone level 2 mesh into a rough shape that is mostly correct. It is best to keep using X-Symmetry at this point.
Divide to the same level as the skull (level 6 in my case), but start ZProjecting at level 3! I turn off X-Symmetry to do ZProject. AT THIS POINT, DON"T FORGET TO CHANGE TO MOVE MODE AND CLICK ON THE SKIN MESH. This will delete (and reset?) the action line of the Transpose tool if one exists. Even if it doesn’t exist, this step ‘may’ be necessary just prior to starting the ZProjection. To be determined…
Turn on Frames to see the polygon structure better as you ZProject.
Use a combination of ZSub, ZAdd, and Smooth as you model to keep the polygons roughly square and evenly distributed. Also keep rotating the model so that you only Zproject polys down to the closest points under the new jawbone mesh. If I accidentally Zproject sideways, creating a folded mesh, I immediately use Smooth to get the polys back to a even distribution, then use ZAdd to pull them back up to the original jaw surface (since smooth ususally causes the polys to sink inward). I set ZAdd ON, and then use ALT to ZSub, and SHIFT to Smooth, so workflow is VERY fast and seamlessly smooth!
Notice in the above picture that I am mostly working on one side. I do this because even if trying to use X-symmetry with ZProject, it doesn’t usually work as expected or desired. To transfer over to the other side I mask the left side just short of the center:
[attach=59286]JawboneRetopMaskA.jpg[/attach]
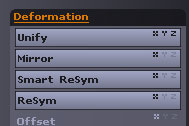
Then I press the magic Smart ReSym button in Tool:Deformation (with ‘x’ only):
[attach=59287]SmartReSymX.jpg[/attach]
Here is the result:
[attach=59288]JawboneRetopMaskB.jpg[/attach]
The above picture shows the symmetry restored. Working at low res first, and with Frames turned on, allows me to easily maintain a very even poly distribution as I work. I also can tweak the mesh using Tweak brush very easily at this stage, which is how I was able to get the mesh perfectly aligned to the teeth-line (otherwise the new mesh topology would have followed the surface of the teeth!).
Another trick to help with seeing the new mesh as I work is to set the material of the new mesh to something like the white cavity MatCap, or something else that contrasts well to the Red Wax of the skull:
[attach=59289]JawboneRetopB.jpg[/attach]
To get the material on the jaw bone, switch on ‘M’ or ‘RGBM’ in the Draw palette, make sure the jawbone mesh subtool is selected, select the desired material, and then press Fill Object in the Color palette. It may also be necessary to change to the Standard brush for this step (I’m not sure if the ZProject brush might try to pull color from the other model or something like that.) In my case, the skull is still set to material 00 I believe, so it displays as whatever material is currently selected. So I either reselect Red Wax, or I can Fill Object on the skull to set it to whatever material I want it to be.
Here is the final stage of the ZProjection at this resolution level (level 3).
[attach=59290]JawboneRetopC.jpg[/attach]
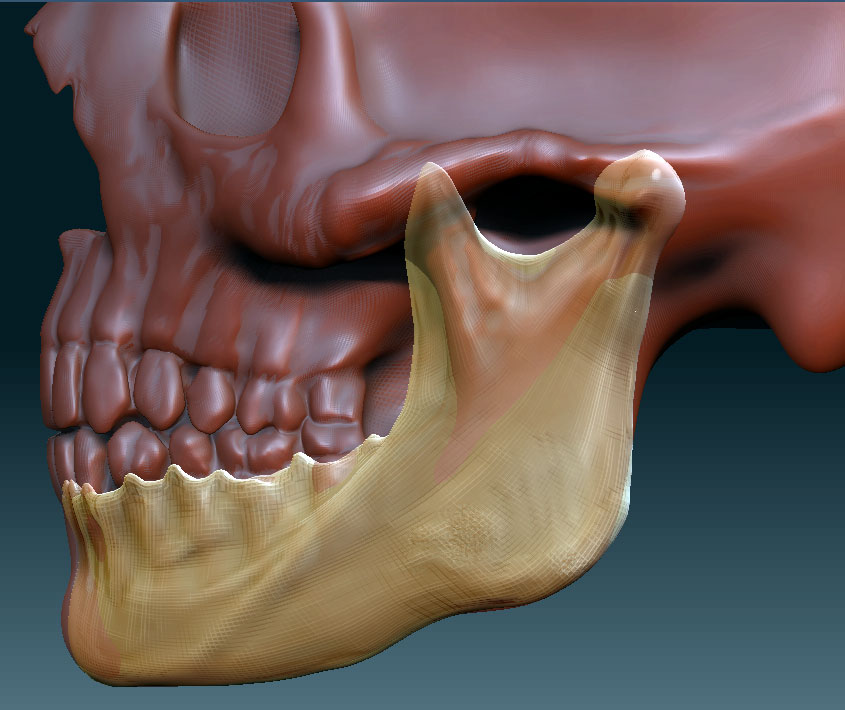
It is now ready for a higher level, and I will go straight to level 6 and transfer the level 6 detail to the jawbone mesh. The inner surfaces and joint-structure will have to be modeled from scratch, since that never existed in the base skull model.
[attach=59361]JawboneRetopD.jpg[/attach]
[attach=59364]JawboneRetopE.jpg[/attach]
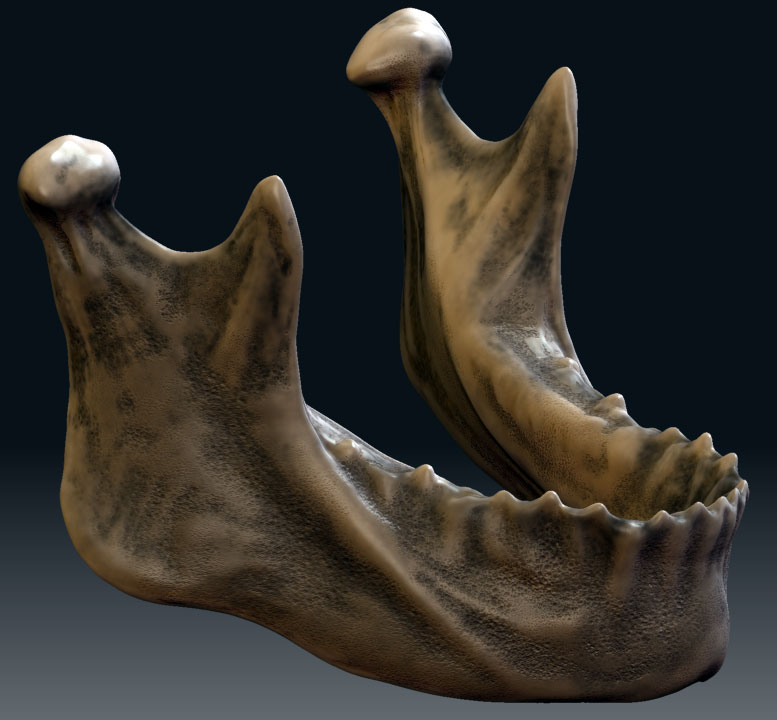
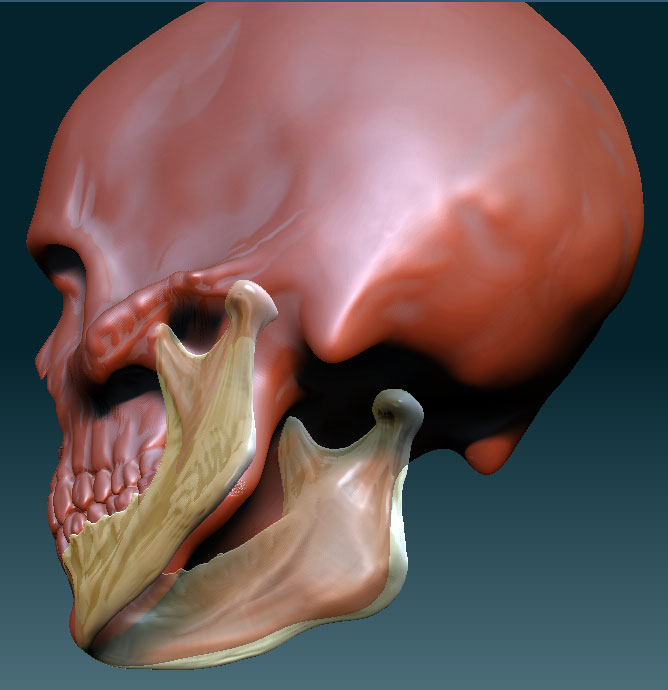
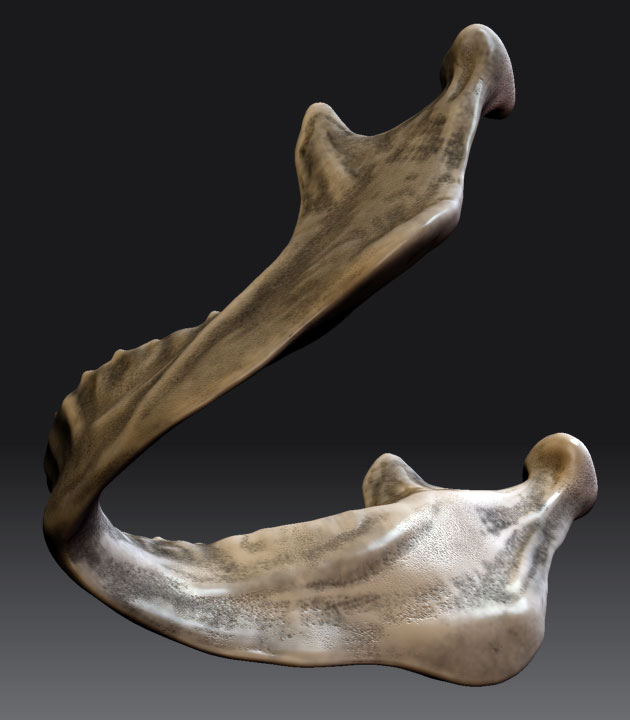
It is now at level 6. Divide twice more to level 8 and add final detals.
[attach=59367]JawboneRetopF.jpg[/attach]
(Yeah! Knaw on that bone ZBrush 2! You want the bone? You can’t handle the bone!)
I will probably use this same technique on the skull, but I may switch over to the other ZBrush retopology method in order to get the zygomatic arch and other tricky skull topology done correctly in the mesh. But even the arch could done with ZSphere modeling by bringing two extensions together and modeling a arched junction just like the real bone arch and knits with a visible seam.


Nice tut! But I can’t see the pics.
Sorry for the thick question, whats the x-plane you refer to?
…btw great model though I cant see the tut images.