ZBrushCentral

mutualism

Hi

Here’s my latest piece inspired by the amazing Geckos and Salamander type creatures I watched on a nature docomentary recently.

[attach=85051]Gecko.jpg[/attach]

[attach=85052]eye.jpg[/attach]

[attach=85053]ant.jpg[/attach]

this is a link to a high res version.

http://farm3.static.flickr.com/2201/2282306126_05c51fa9b2_b.jpg

I will post some process shots soon

Thanks

Keep on Z-ing
:wink:
fishadder

scared silly entry
http://farm3.static.flickr.com/2388/1820486850_4fcf265916_b.jpg

Attachments

Gecko.jpg

eye.jpg

ant.jpg

great model and render…
that eye is realy cool.
i can’t wait to hear how you did the water droplets (were ther rendered or painted later?) artistic minds want to know!

fantastic render. the ant’s material is just awesome

Thanks Guys!

I first build the models with ZSpheres then posed and textured them, saving off different material passes and layering them up in photoshop til i’m happy with the final skin.

Here’s a bit of the process on the gecko/salamander

gekorufs.jpg

Keep on Z-ing!
:slight_smile:
fishadder

Attachments

antrufs.jpg

dripRUFS.jpg

What are your settings for the zspheres when you turn them into a sculptable model? Are you using adaptive or unified skins?

Really nice scene.

Cheers

Mike R

My God!!! Your skills are really comming along! This is top row stuff!
I have set this as my desktop wallpaper to remind me that I have alot of cathing up to do! Well done sir!!!

Thanks Dustbin!

You really help me along dude!

As for what skin I use I think I make an adaptive skin and then bump up the density but after looking at the uniform skin i’m sure i’ve tried that too and then
subdivided the Geometry!?

Im still very new to all this!

What’s the best way of doing it as I seem to get distortion to my mesh relatively quickly and HD sculpting seems pretty impossible coz little black update squares seem to take ages to perform whatever it is it’s doing so i have yet to give HD a try which I’d love to do because of the nature of the microscopic stuff i’d like to build

Any tips would be very welcome!

Also anyone know how to get the best high res render saves because i 'm still using screengrabs in my ignorance!!!

I really like the way you acomplished the droplets :+1:

I don’t know how far you are in ZBrush? To save an image go to Document > Export and click export.

For the best anti-aliasing and to save on setting it too high create the image at twice the resolution you want and click the aaHalf button before you render. You probably know about the Quick button and the Display Settings but just in case - Under transform turn off the Quick button. Under Tool > Display Properties adjust to your desired smoothness and draw resolution.

Fishadder,

Nice to see more of your work, you had a really nice entry in the scared silly contest. I really like what you’ve done here. Great way to bring the viewers eye into the desire area of focus of the ant and right side of the salamanders head in regards to its clarity and subdueing the other elements of the image. Keep up the great works!! :+1: :+1:

I still dont seem to understand the process of texturing that you use. If i understand correctly, do you paint the gecko all one color three different times, then bring those snapshots into photoshop and mess around with different blend modes? That would cause chaos wouldnt it?

I would love to see a step by step process of the texturing process. This is very nice.

I very much like what you have done here and the materials are just so nice.
If you do a tut on this please give us an insight on your workflow, if its not a state secret - lol.

Thanks folks!

Blaine91555 - Thanks for the render tips I simply export what you see on the screen at the moment then scale it up in Photoshop and have to clean it up a bit so your advice on rendering is much aprecieted! I will give it a go!

AngelJ - Many thanks! I really enjoyed the Scared Silly competition because it was my baptism of fire as far as Z-Brush learning goes and it forced me to be productive and fast! unfortunately it’s been a while between that piece and starting this one and i felt like I forgot most of what I learned but now I’m back on the horse so to speak I’m really going to try and learn more propper techniques as I still feel like i’m winging it with my weird work-flow! :confused:

Rubent100 - You’re not the only one that doesn’t fully understand what i’m up to! I’m still confused big time!
Because i don’t know any better and because I seem to get better results this way, what I do is -

  1. build the model either from a blob or mostly with those handy little ZSheres

(I don’t know how to combine elements yet so i model each little bit, pose them as best i can and then comp them later)

  1. make a skin and texture it as nice as I can without too much distortion! lol!

  2. pose it how i want it in the scene (so my models don’t have any detail to the backs because you’re never going to see it!)

  3. then i choose materials in the colours I want and light them although the default light seems fine mostly. For example on the lizard i knew i wanted a slimy wet look on top with a more matt pink under belly so those would be 2 of about 5 or 6 materials i would export

Here’s what goes into a simple twig! -

TWIG.jpg

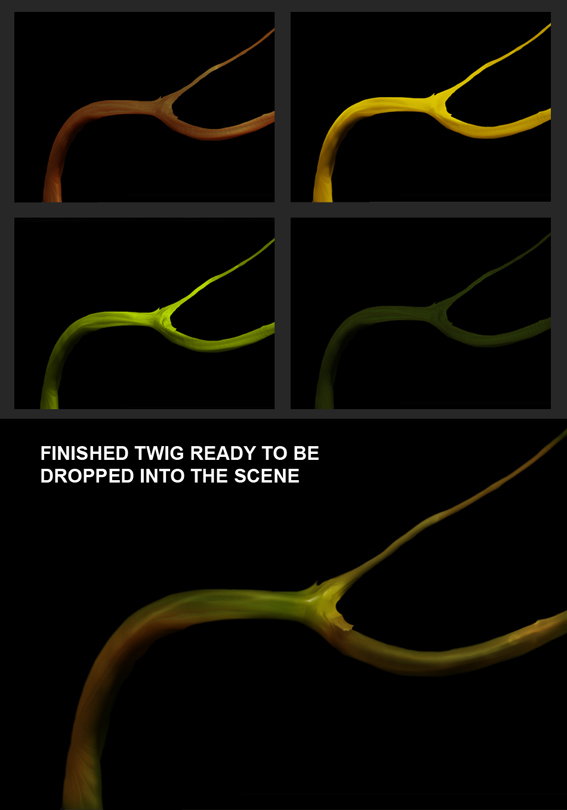
  1. Then i make each one a layer exactly on top of each other in photoshop.
    so i can use varying degrees of transparency and tweak the colours to create a skin I’m happy with.
    One layer for instance the matt pink belly layer I’d erase everything except for the belly areas. Or the patches on the skin would be a dark material pass with only the patch areas left on that layer etc

You can probably see it best in the ant break-down I posted earlier where all those material layers are combined and colours tweaked to create the desired surface look.

I tried painting models directly in ZBrush but couldn’t work out how to have different naterial looks on the same model like a shiny nose on a matt facefor example so I’d just get round it by exporting a shiny pass and matt pass and combining them in layers in Photoshop.

  1. Then I go to work hand painting on things like the Antenae of the ant and its black eye and generally tidying it all up! Also I have no idea how to do depth of field renders in 3D so I knock things out of focus by hand and on this particular scene hand painted in lots and lots! of little lense flare type light blobs!

Some one might look at it and think it’s a fully rendered scene with everything modelled and posed and lit and then rendered in the same shot but I’t a big fat composititng job in reality!
I have very little 3D knowlege! That’s why I love ZBrush so much!!!
I’m a traditionally trained and practicing illustrator who has always admired and dreamed of doing stuff in 3D but I tried to work some of the modelling packages years ago and just couldn’t do it! my brain’s not wired that way!

But when Zbrush apeared It felt so spontaneous and rewarding with a good learning curve and I’m finally able to achieve what I’ve always wanted to all be it in a round about limited way but I’m learning new things all the time especially here from very creative and helpful friendly Zbrush comunity!

Hope this sheds some light!
Keep on Z-ing!
:smiley:
fishadder

hey great mutualism man!
I like it :+1:

Than for your info and well done. Really like your efforts and your attitude.

Hi Folks

Here’s a quick alien head I knocked up to test the render options I got tips on earlier.

AREA51.jpg

Took about 10 minutes to build and 1 hour to layer and add Slime and Hair in Photoshop just for fun.
But i’m still only getting a max image size of 1.98 Meg and resolution to my images of 72dpi!

Anyone know what i’m so blatantly doing wrong!?

Keep on Z-ing!
:wink:
fishadder

and here’s the materials I used -

layers.jpg

Wow! Fishy this is amazing stuff. I love how you render every material and the combine it in PS. It is pure art! I love it!

BTW: that green snotty stuff is gross! LOL!! Awsome work dude. :+1:

what techniques did yo uuse to combine alll of those materials?

Hi,
you asked:Anyone know what i’m so blatantly doing wrong!?

You should increase the document size in ZB to,for example,
2048x2048 and then export it (either AA half sized or not,as
you like) to your desired output format.Then import it to your
image editor and there you should be able to adjust the dpi
resolution to what you need for printing.
Hope that helps,J.:wink: