ZBrushCentral

Mask by Density?

Hey there!

I’m trying to figure out a way to mask or polygroup by mesh density, for cleaning up photogrammetry scans. I’ve had a little luck with masking by smoothness, and then blurring, growing and sharpening the resulting mask, as the blur moves more on the less dense areas, but I feel like there’s got to be a better way.

In 2008 someone asked a similar question, and was told that there was no way. But we’ve come a long way in 11 years! Is this something that could be done in a script?

Hi Lindsey!

I’m sorry, but I’m still not aware of a way to do this directly off the top of my head.

When automated grouping methods come up short, you have to resort to manual grouping. Give PolyGroupIt a try, and see if that’s useful. It will let you expand every polygrouped region you make independently of the others, and then fill in the gaps when your general zones are established.

There is also just good old fashioned “hide and group”. Make sure you are familiar with the shortcuts and mechanisms for quickly hiding sections of geometry, and then group visible.

You could also polypaint your mesh in the zones you want, and convert that polypaint to polygroups.


Theoretical:

Thing to remember is, polygroups, masking, and polypaint are all interchangeable. If you can get to one in the region you want, you can convert it to the other. I can sort of imagine theoretical workflows that might let you indirectly arrive at polygrouping based roughly on density, but most would involve having a low poly version of your mesh with multiple subdivision levels, possibly getting UVs and textures involved–and I suspect you probably have a high poly mesh with no subD levels because of the photogrammetry. That could be created from your current mesh with a bit of work, and may make it easier to manage and polygroup. The procedure is described below if interested. Beyond that, I will give your issue some thought, and see if I can work out something more definite.

Click here for procedure to create new version of high poly mesh with multiple subd levels.

If your mesh currently does not have a low poly base with multiple subdivision levels, you can create them with a bit of work. Duplicate your mesh subtool, and ZRemesh it as desired. This will create a low poly version of the mesh with well distributed topology. You will lose detail when you reduce polygons, but that’s ok. Subdivide your new mesh up to sufficient subdivision level to hold the detail from the original, then project the detail (sculpting +polypaint) from the original mesh onto the duplicate. The procedure for transferring detail can be found here.

Thank you so much for your reply!

I’ve been trying different methods to generate these masks/polygroups. Unfortunate, the solve from our photogrammatry software does a pretty good job of guessing a color for the areas it doesn’t have data for, and so our incoming texture doesn’t have enough of a difference to use to generate good masks.

The biggest difference between the good and bad parts is smoothness, but I can’t seem to generate a mask with the current smooth masking tools to catch the large flat smooths areas, which seems like the obvious solution.

I’ve been manually grouping, using all my methods. It works, it’s just tedious on these 30- 40 mill hero assets. I am actually making the low res versions, but we need to patch the flat spots before we generate the lows.

I’ll look into polygroupIt, that has some promise.

Let me know if anything pops into your head.

Ok, I’m not completely certain I understand the issue here, so let me clarify some things to make sure we’re on the same page.

Polypaint and textures are interchangeable. You can convert one to the other and back and forth. So if you already have a texture, (speaking of a UV based texture here), that could be switched off, allowing you to polypaint the model. Polypaint can be converted into polygroups.. You could simply paint the model any way you feel like, and establish the groups from this.

If your model already has polypaint you want to preserve, this can be offloaded into a texture, then reapplied later.


*Remember that polypaint resolution is dependent on the resolution of your mesh, so make sure it has a high enough polycount to support the detail in any textures. Topology quality also matters–just like sculpting, evenly distributed quads as close to square as possible return the best results.


Just some more data points to add to your strategizing.

Yup, I understand that masks, polygroups, and polypaint can be switched back and forth.

We do have a texture incoming, but there isn’t a differentiation between the areas I need in that texture.

PolygroupIt is actually the closest I’ve come to getting a clean split between them, so thank you for pointing me to that tool.

Sure! I just wanted to stress that you don’t need to use that texture to establish polypaint, and hence polygroups, and hence masking by polygroups. Your existing texture needn’t factor into this at all :slight_smile:


Glad to hear it! I’m still going to think on your issue though, because it’s interesting.

Good luck, and maybe someone else will have a better idea than I do.

Oh, I know. Most of the time we end up re-projecting the texture anyway. It’d be great if the software spat out hot green where it doesn’t have data, but I bet that’d mess up other parts that are fine currently.

I’ll keep thumping on it, and if I come up with a cool solution, I’ll let you know. Thanks again!

@Lindsey_Robbins

I had a few ideas, but most of them involve having access to a mesh with multiple subdivision levels and a low poly base. If you have that, though, it’s going to be easier/faster to just go through and manually assign polygroups at the lowest SuBD level for quick masking. Polygroups are much easier to define at low poly level, because it’s much easier to isolate precise clusters.

I think in most scenarios here you would be better served simply creating a version of your mesh that is easier to work with, and manually assigning your polygroups. Purely as a theoretical exercise, though, one thing did occur to me that might be effective at the mesh’s probable current resolution. I have collapsed this idea below if interested.


Click for idea

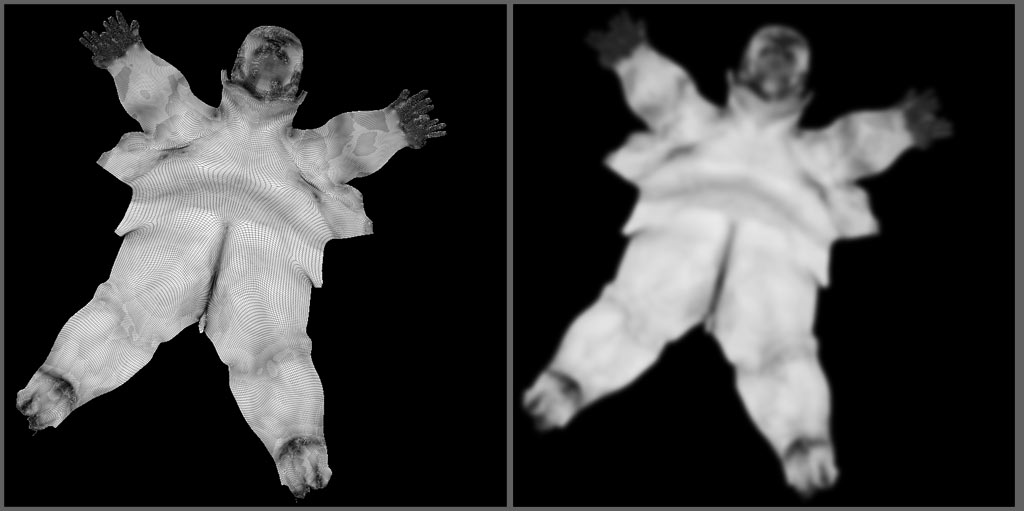
So basically my idea is to unwrap it with UV Master or another tool of your choice to get a flatten UV layout (or use existing UVs if applicable). Depending on your mesh density and topology this may prove resource intensive, as UV unwrapping performs better with lower poly meshes. But it will probably work, even if it takes a while.

With UV master, enter flatten mode with the mesh, and switch on polyframe. Apply the “Flat Color” material, set to white for maximum white/black contrast. Polyframe opacity can also be adjusted in Preferences > Draw for darker or lighter lines according to preference.

In a flattened UV layout with polyframe on, the denser areas of the mesh will tend to be darker from the frame line congestion. In an image editor create a texture with the flattened UVs and either:

  1. (Best) Use the Polyframe image as a guide to manually paint areas of color which can be applied as polypaint and then converted to polygroups, or masking with Mask by Color. The only advantage this has over just painting the mesh directly in Zbrush is the flattened polyframe guide, if that is useful. Otherwise far better to polypaint directly on mesh in Zbrush to avoid texture hassles.

  2. (Fast) Apply a gaussian blur to the flattened and framed mesh to eliminate the lines in favor of subtle shading. Adjust white/black levels as desired.

UVDensitymasking

That texture can then be applied as polypaint allowing polypaint based masking or grouping, or directly as masking via the Mask by Alpha feature. UV and texture craftsmanship/ seam management concerns apply.

This would obviously remove any existing UVs unless you use those. But remember that sculpting, color, and polygrouping can be transferred between different versions of your mesh.

Oh, that’s a totally interesting way to do it. We don’t have multiple subdiv levels (this thing is all tris coming out of the solve) but we DO make a low poly version that is UV’d. It may be worth it in some of these ones with hundreds of low poly spots ( backsides of boulders, and such) to do this with it to catch them.

Thank you for all your work on this, Spyndel! I’m slightly gratified that it’s not an easy solution that I’ve somehow just missed. This gives me a new direction to try, though. :smile: