ZBrushCentral

Mask and Extract to make hands, limbs, whatever you need.

Tired of self intersecting zspheres and fiddling with the xyz-res to make the perfect hand? I only use Zspeheres for simple linear things, like legs/tails.

  1. Load the polyplane tool, and draw it on the canvas.
  2. Subdivide the polyplane a couple of times to get enough resolution for a good mask.
  3. Think about what you want to make, and the best profile to use. Here, I wanted to make a chunky 3 fingered hand, so I sketched out a top down view using the masking tools. I then cleaned up the outline a bit using unmasking.
    [Hand_Masking.jpg](javascript:zb_insimg(‘101843’,‘Hand_Model.jpg’,1,0))
  4. Once you get it to a point to like, then you can retopo it, or leave it as it is if it’s not going to be used for animation. This method yields a decent mesh, with no non-manifold puckers/spikeys the way unified skin can.

I used this technique to sculpt major parts of the minotaur show here:
http://www.3d-miniatures.com/tiki-view_blog_post.php?blogId=1&postId=25

The torso, arms, and legs were quickly done using this technique, and then retopo’d to make them better candidates for posing.

No more dinking with zspheres, just mask, punch, and sculpt away.

Attachments
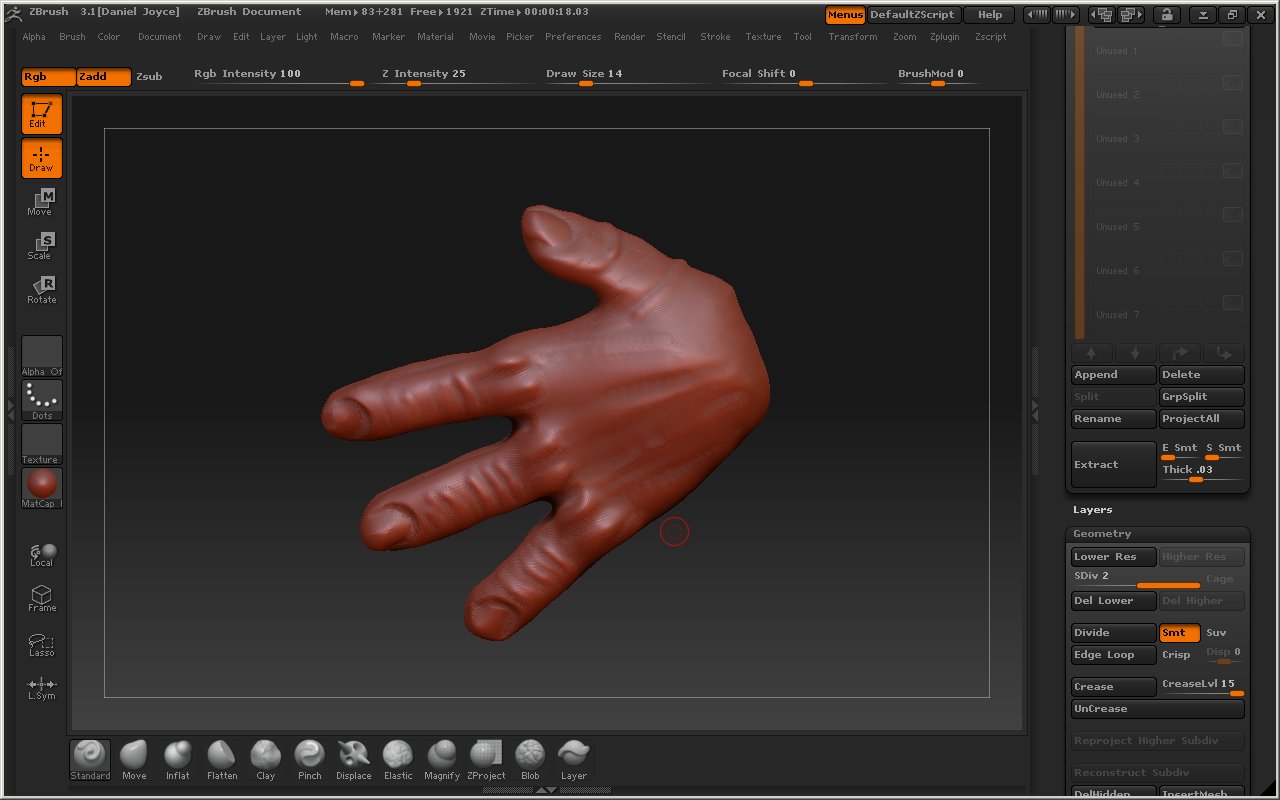
Hand_Model.jpg

Absolutely inspired…thanks.

www.peterminister.com

yeah i usually do this to make letters and stuff but now i know you can do lots of stuff thanz alot!!

I’ve been thinking of using this method for modeling. Frankly if you don’t want to animate, then making separate parts of the anatomy this way makes a lot of sense. I am studying Zspheres in detail, but they are tricky. Even if you want to animate a character which has multiple subtools for the hands and such, there is always the option of mesh insert to make one mesh by blending the separate parts at the same subdivision level and then make a retopo mesh. The only limitation i foresee with this method is th occurence of seams on the edges of separate subtools, such as the hand and the wrist etc.

here is a tip:
Instead of masking in Zbrush one can go in Zapplink and use Photoshop’s Pentool and get the precision power of bézier lines.It gives far more control than masking in Zbrush.You can now create very complex forms, even Cadlike stuff.

I use this method for every mesh parts I need,It’s a great way to build up many complex subtool-based models.
You retopologize with P.Multi on and the whole thing is in the box.
Cooked. No Sweat.

Thanks for posting this :slight_smile:
Some People will go to bed earlier.

Hey Christian ! What does P.Multi stand for ? and I didn’t understand what you meant when you wrote “and the whole thing is in the box.” Would you be kind to elaborate on it a bit.:slight_smile:

lol…sorry… it’s just an expression from the movie industry…it means that the movie is done and you can go back home.:cool:

P.multi is a setting in the Projection palette that you need to activate in order
to get a good projection when doing retopology over multiple intersecting
subtools.Otherwise you get crazy spikes everywhere.

also(to answer your concern about seams):
If you retopologize over an arm that is 2 parts (ex: hand+rest of arm)
since your new retopology mesh is only 1 part the seams will disappear like magic when you use a very light smooth brush on them.

Silly question. How did you get your brushes down along the bottom there like that? I’d like mine there too. That seems useful.

Erm, can you elaborate on this? Seems to me that combining this method and the one the OP showed would be exactly what I’m looking for for some things. :slight_smile:

OP? does that means original poster?
hmmm…elaborate,well…

Instead of painting the mask inside Zb you press the Zapplink button
and you use Photoshop instead.You can make precise shape using the pen tool,then you convert the shape to a selection(rightclick on shape and choose
`make selection) then edit-fill with black.Now you save file(save not save as)
And when you return to Zbrush it will have your shape painted on the plane.
Now you go in the masking subpalette and choose ‘‘mask by intensity’’.
The rest is just as explained by Crusoe The Painter.

Using Zapplink to create the mask is interesting but not really worth it. The majority of extracted meshes like this would most likely be simplistic and the form would change when sculpting anyway. Also, the more refined a shape will mean more subdividing of the mesh plane which will give you a denser extracted mesh in the end. Not everyone likes working with dense meshes at the beginning of the sculpting process.
But, if you find this way better then who am I to complain. Anyway, I’m basically just making a point.

Cheers,
Paul

hey nice trick (depend on particular object)
thanks for sharing.

How do you attach multiple parts together?

actually,you can’t…

1-You need to use subtool master to merge the subtools
2-Then you need to retopologize over them and use the p.multi option when
projecting the retopology mesh over the merged subtools(otherwize you will get a lot of spikes everywhere).
When it is done,you can smooth where the parts intersect and keep on sculpting.
If you don’t want to retopologize you can just merge the subtools
and use the clay brush to “try” to hide seams,but I woudn’t recommend it unless you are working on a gory monster or something like that.

Using Zapplink to create the mask is interesting but not really worth it. The majority of extracted meshes like this would most likely be simplistic and the form would change when sculpting anyway. Also, the more refined a shape will mean more subdividing of the mesh plane which will give you a denser extracted mesh in the end. Not everyone likes working with dense meshes at the beginning of the sculpting process.
But, if you find this way better then who am I to complain. Anyway, I’m basically just making a point.

Cheers,
Paul
I disagree on what you are trying to say mix_mash. I have tried out this workflow recently using Zapplink to create a silhouette of the mask by selecting a portion of the image in Photoshop and filling it with black and bring it back to Zbrush and it is a wonderful technique to start out on the basic foundations of the mesh as Crusoe the Painter and Christian Michelin suggests. You can turn something complicated by using masking as an alternative to alphas and I think there was someone who posted a model of a space man a long time ago and used the masking technique to create buckles and straps on the space man’s boots, that was cool.

As for the form changing when you would sculpt away you could use a morph target on Subdiv level 1 to insure that the original form stays in place even if you make changes in the higher Subdiv levels. As for the dense mesh after you extract the mask there is a menu under tools called unified skin which converts the overall extracted mesh into quads that solves the problem of getting rid of the triangles of the dense mesh as well as wittle down the poly count to about 1k to 7k and maybe even lesser but I think it would look more blocky and less smooth.

All I’m trying to say is that this stuff really works and saves you the time of building meshes from scratch which I normally do traditionally within Maya using the good old box mesh and just keep extruding the faces till I get the overall shape that I want. This workflow definitely saves you a lot of time.:smiley:

Thanks for sharing this it was just what i wanted to try for hands and works fine for armor ,straps,etc. also the photoshop method is very clean and precice thanks so much.