ZBrushCentral

Insert multi mesh - constant "depth"?

I’ve started playing with creating my own insert multi mesh brushes. For a start a simple “scales” brush.

Is it possible to set it up so that no matter how big I’ll make each scale by dragging it more/less the amount it will stick out of the surface will be constant?

So far it seems that IMM takes middle of meshes bounding box as the center, thus if I make the scale bigger it will pop out more. If we could set it to bounding box top and set up some offset we should get a constant “depth” no matter the scale.
Is it doable in some way?

Hello @PrzemekJ

The depth that the IM brush is imbedded can be adjusted in the Brush> Depth menu.

Note that this will keep a constant imbed depth, but the size of the inserted mesh may still result in variation in how far the mesh protrudes from the surface. To insert meshes at a constant size, press CTRL after starting the insertion, which will scale the mesh to a size dictated by the brush drawsize. As long as the draw size remains at the same value, the inserted meshes will be the same size.

:slightly_smiling_face:

Thx for trying to help @Spyndel .

But if you read through my post you’ll see you’ve basically rewritten what I’ve already posted :wink: .
So yeah, I know there’s a depth slider (which is basically the offset from the item center). And yes ,I know that if the item center (in some apps called pivot) is in the center of item’s bounding box the copies will “poke” through the surface more if you scale them up.

But that’s what I’m asking about - is there a way to set the item (insert mesh) center / pivot on top of the bounding box? If that’s doable somehow it would be possible to get uniform depth (“poking”) no matter the scale by using the offset (depth slider).
So far I’ve tried importing obj files from external dcc app (namely - Modo) where I deliberately set item center on the top. Sadly it looks Zbrush is not using those centers :confused: .

Not for the purpose of an IM brush.

ouch… ok, so is there a way to suggest a feature for Zbrush? IMO it would be immensely helpful for IMM workflows.
Is there any workaround - for example nanomesh (which are basically instances :stuck_out_tongue: …)? I still haven’t touched that bit.

Feature requests can be submitted to Pixologic Support.

In the meantime, why don’t you tell us what you want to do in a more specific sense? Tell us more about the specific effect you want to achieve, rather than how you think you should be able to achieve it.

basically place some differently sized scales on the surface (skin of the creature) - but each should have its top at the similar distance to the skin.
The models I work with are usually for 3d printing and later on manufacturing - thus this constant depth is important. I can’t have small scales (the ones I’ve… damn… scaled down :smiley: ) just barely poking though the skin as it wouldn’t show nicely on a real world model.
In the end I’ve did it by using Modo’s mesh paint feature, but it would be so much better to have it in Zbrush - not only performance is miles better, but also the whole workflow is nicer.
Check for example this image:

  • each scale has similar “thickness”.

So, yeah, I’ll try to record a video and send a feature idea :slight_smile: .

Well, between alphas, VDM brushes, Spotlight, Lazy Mouse 2.0 fixed depth sculpting, and good old fashion inflation masking, there are a dizzying number of ways to do this from a sculpting standpoint. Nanomesh would allow for a more randomized approach. But I will make the following assumptions:

  1. Because you’re willing to position every scale individually, you want more deliberate control over the design and placement of the scales. This makes Nanomesh a poor fit.

  2. You want to work non-destructively to your target mesh, with the scales as separate objects.

  3. You want the scales to share the same elevation, but different size and shapes.


Even if the feature you want were present, it’s my opinion that IM would be one of the slower ways to do this. In this case, IM would only save time if the inserted meshes contain detail that would be slow or time consuming to replicate in other ways (for instance mechanical detail). At the scale and intended output you’re working for, the detail issue will be minimal–most minor detail variance will be undetectable. You could go to all the trouble of creating the different scale meshes, then placing them one by one, but I would approach this situation in the following manner:


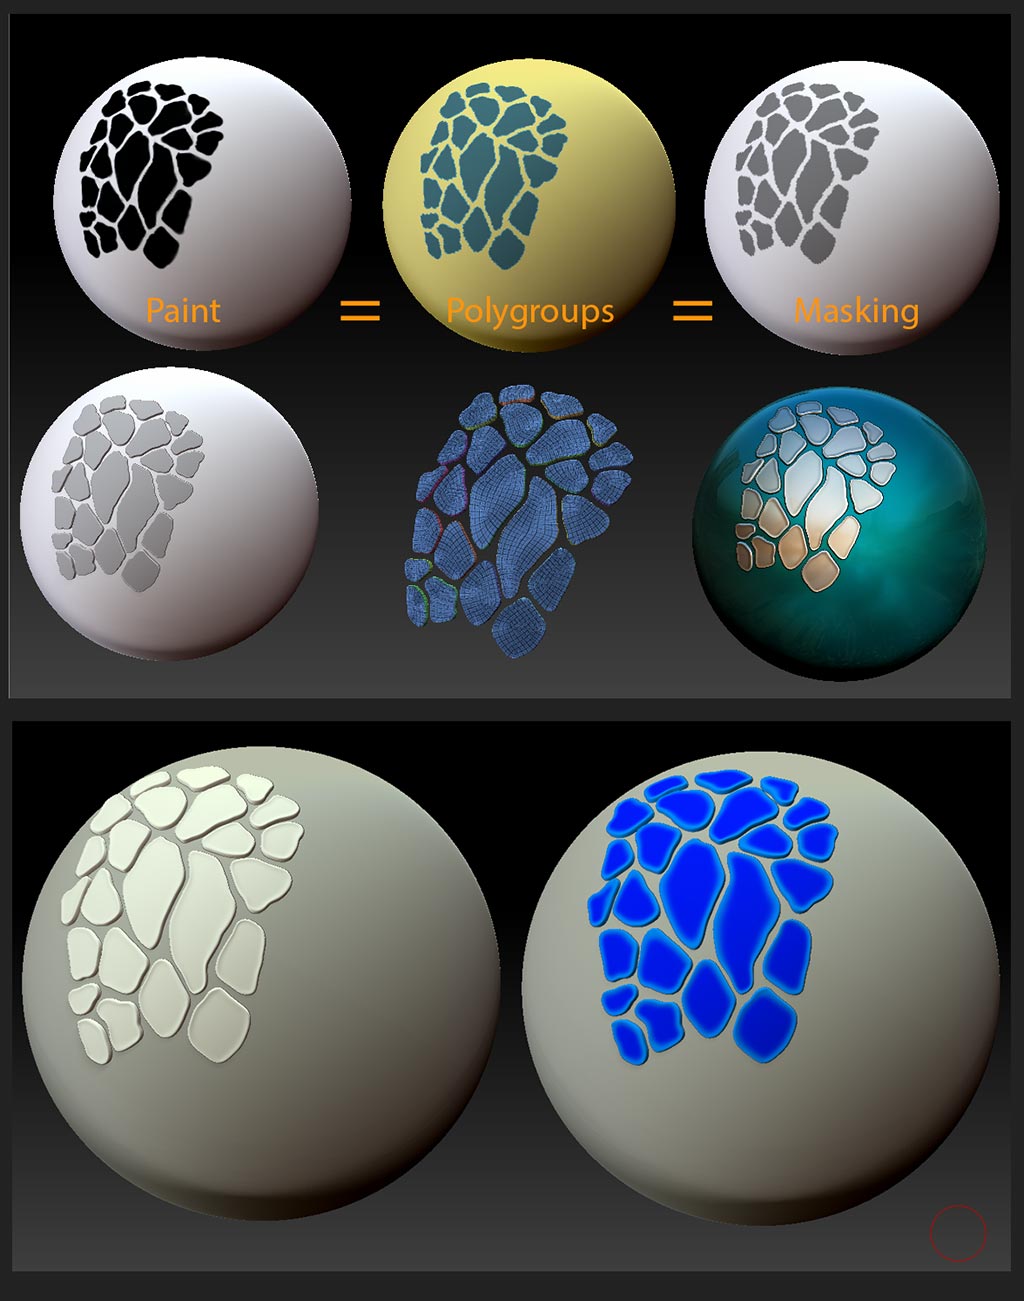
Keeping in mind that in ZBrush, Masking, Polygroups, and Polypaint are all interchangeable ( If you can establish one, you can convert it to one of the others), I would probably choose to do this with either Extracts or Panel Loops. I prefer Extracts for organic subjects because they’re versatile, fast, and are automatically created as a separate subtool.

To use Extracts, all you have to do is establish Masking in the pattern you want. How you do this is limited only by your imagination. In the following example, I simply Polypainted and converted to Polygroups, which can then be quickly masked with a single click. But you could use Spotlight to paint from a texture, paint or stamp with a pattern alpha, apply a texture with UVs and convert to polypaint, or even–at the risk of blowing your mind :wink: – go ahead and insert all the scales as individual IMs, and use the intersection masking plugin to derive masking.


Create your extracts at the desired settings. They will be created all at the same time, and all the outer surfaces will be a single polygroup, making it super easy to select all at once, and apply different effects with the aid of masking functions like shrink/grow/sharpen/blur mask. You can Dynamesh or ZRemesh with “Keep Groups” active to make the extracts more suitable for sculpting and painting.

I selected all the out surfaces at once, masked them, shrunk and blurred the mask to recreate the raised edge and color variance of the scales in your pic. All the Extracts share the same elevation, and contour to the surface of the subject perfectly.


scales


With the Brush> Auto Masking functions, it is possible to sculpt on individual scales, or even only the top surface, without affecting other nearby scales. This will allow you to add minor detail variation or surface texture quickly on a scale by scale basis if need be, for a far greater range of detail variation than if you were simply using the same few scales over and over.


This is how I would do it with the given assumptions. Your mileage may vary.

Good luck!

Thank you @Spyndel for such detailed answer. You rock!

Your assumptions are correct.
Once you have the instant meshes shapes done the masking workflow is slower IMO. But really cool to get even more variations.
There are some limitations though ( as with almost any workflow :smiley: ). First of all when I made scale prototypes I made them slightly indented in the middle, with sharp , a bit elevated edges . This turns out super nicely on 3d prints, gives you this extra “pop”. Something I won’t get with masking without tweaking scales as you did :slight_smile: .
Also scales are just one of the possible use cases. Another one is for example placing tech bits on some sci fi model that goes into physical production. Again control over elevation (how much the details sticks out of the surface) would be pretty amazing and in some situations a must have (for example when you’re working on a coin / medal with quite tight requirements)…
Another approach I’ll try as well will be using vector displacement brushes. While the parts made with those won’t be separate, it should be quite usable often.

So yeah, lots of approaches can be taken. I still love the idea of IMM / mesh paint (quite like kitbashing and I’m a fan of reusing the assets) so definitely have to send a proper feature enhancement idea :slight_smile: .