hey guys thx a million for all your help, sorry havnt been able to reply earlier but been away for a break, will try what you have all explained and see how it goes, thx again lads…
scratchy:
Can you give some examples of intersections of the mesh when using displacement with vray? I havn´t had any problems. Probebly you didn´t use shift in Vrays displacement modifier.
Anyway. There must be many people on this forum that uses some kind of workflow to produce maps, I don´t mean sculpting, but the isue that we have discussed here, and they must be willing to let us know there metods. And hopefully someone has been testing lots of differens metods and can describe there differenses. Come on now guys…
Sorry for my english by the way…
I stand corrected;) . Numse I have been using shift, but not with the right Amount & Shift settings.:rolleyes:
Anyway, with the correct settings taken from the OBJ file, Vray will render without bloating and is very easy to set up. It is not as fast as the scanline which is a surprise (default lighting for both) considering the scanline mesh is 1,200 000 polys and the vray 302 000. Although I had a large res in the Vray Dis mod 2048.
Here is the result with the settings on a character I’m working on:
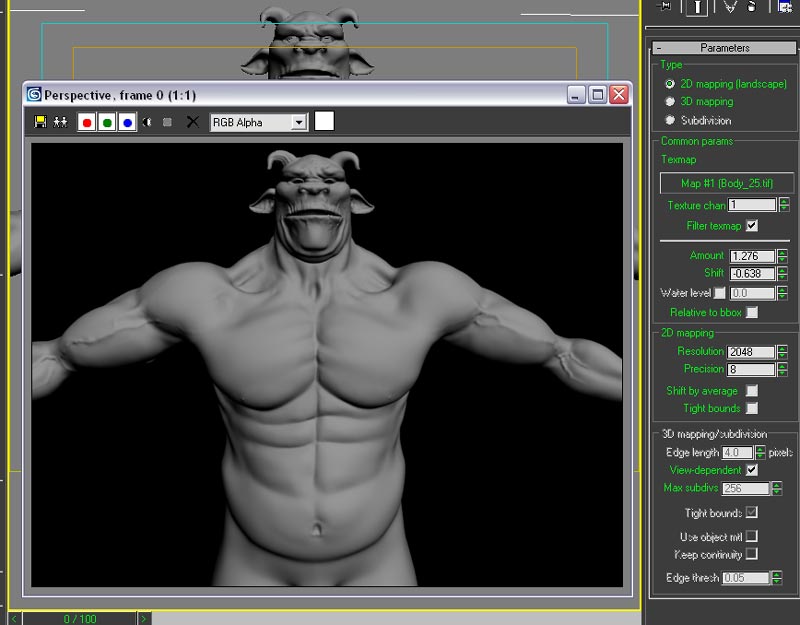
Don’t take these settings as the bible, or what you should use, they are just a guide, oky doky!
Numse why don’t you explain your way of doing it (step by step with screen shots), as you say this is the idea of this thread. You mentioned storing morph targets, this could be a good start. You obviously know about this.
Scratchy:)
Sure thing, maybe I´ll do a video later on. But I´m just a beginner at ZB… I would be glad if some pro´s would show there ways of doing this…
Oki, might sound weird (maybe stupid) for some of u but was wondering if there was any way of bringing back a displassement or Normal map exported from Zbrush back into Zbrush…Ex:
U created a model in maya, modified it in zbrush with all the details, exported the normal map…
Now for a reason us want to use that normal map to “reemboss” ure model (On wich the Uv’s wouldn’t have changed)…
Anyone have any ideas if it’s possible??
Hm. You want the sculpted model back in ZB? If you want the textures back in to zb, just import them.
i know u can reuse ure texture, i’m talking about re-using normal maps to recreate the VOLUMES back…not the texture
No I don´t think you can. You have to save your model in zb as a zbtool so you can import it again, or else you can´t get your mesh back.
Though there might be a way, but I don´t know if it works, and if it works, I don´t know why you want to do it like that. Anyway… you might be able to put the maps on your model in your 3D-app (like max or maya) and convert the displaced mesh to a new mesh.
Thanx for ure replys!! i founded how it works :))))
will post the workflow if someones wants to know how it works …it’s by importing ure normal/diplassement map in Zbrush as an alpha mask and not a texture and then doing tuning in the displacement attribute to get the right extrusion on ure new model…this is handy if u have different models, with an uv map that is similar (the contours of ure Uvs i mean) and dont want to paint from the start for every single of them…u can do a “basic” painting that u can re-use for all the others and carry on…if that makes sense ;)))
it was just a thought and i wanted to know if u could work the other way in Zbrush…
thanx all
My english is not very good (even if im living in england for a year now 
so appologies if it is hardly understandable
Hey Abe! Your asking these questions for all us 3D Max people.So thanks!
(from an American who ,like so many,refuses to learn any other language but my native tongue)
And also because it’s an english forum ;))) dont have choice realy -:lol:
im happy that u appreciate the effort
FYI:
I am currently experiencing some problems with scaling irregularities from Max to Z and back and I will soon be making a VTM on it (Max to Z & Back) when I find out all the issues of Z, OBJ format, & Max (and find out more about Z in general).
Sorry it will be in English only (Max script is my second language) .
.
Good news is, with some test’s Ive been doing. When using Max’s Displace mod (2 Iterations of Turbosmooth), Max Scanline S&%t’s itself at 1,200,000 polys, Brazil slams it down (it’s the Solo of renderer’s) at 10 sec’s a frame, without burping with the scene open at the same time (with 2 gigs of ram, default lighting etc).
Scratchy…
Just thought I’d pst some examples of the work I’ve been doing with Max and Z. Experimenting with the settings I’ve posted.
I’ve had to go over my polys for this mesh a couple of times in Max to make all of them quads. To stop some pinching problems at sub-d level 5 in ZB.
Which is really quite easy considering this mesh was originally detailed for Max alone (25,00 polys no sud-d’s to 6500 for Z).
http://www.zbrushcentral.com/zbc/showthread.php?t=26686
Z’d baby Z’d ROCKS
Scratchy
I´ll do a videotut soon.
Excellent, I’m looking forward to you increasing my skills of ZBrush and how to use it in Max with your knowledge.
You should post some of your work here in this thread, so we can see what we can look forward to Numse. I bet it’s fantastic!
Scratchy…
 I´m not that skillfull with ZB yet. The tutorial is for beginners that needs to know a basic way to make displacement and bump maps in ZB and get them to work on the model in Max (Vray). It doesn´t show much of what ZB can do :(… hope you like it anyway though, hehe…
havn´t done any finished pieces with ZB yet. But check my site to see my skills with Max and PS.
www.digitalartist.biz
MMMMM. Nice site Numse
Nice BM;) . The dragon could be one for Z’d, but you will have to re-model it to lose the tri’s (I’m assuming that their there).
tnx
Hehe, it´s the dragonhead I have used in my tut it´s finished. But as I said, nothing fancy in ZB… only basic stuff to show the flow
Your right anyway, the dragon would need a make-over. The mesh is baaad… though It´s been a while since I worked with it.
Hi,
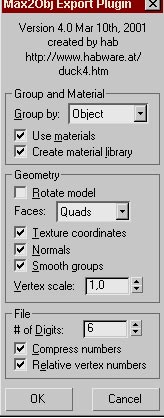
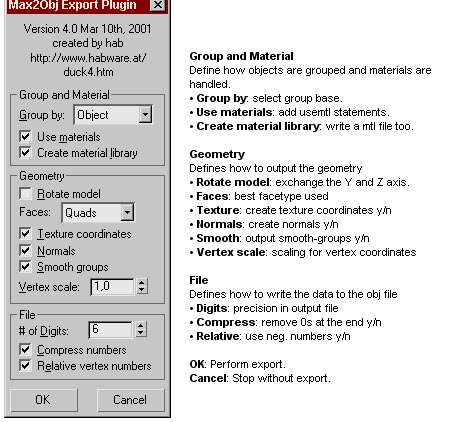
I have learned so much from here but this is my first time post a question. (By the way, you guys are wonderful to offer your knowledge.) I just switched from maya to max and I found this problem of exporting obj file in max. I followed the setting mentioned above and it solved my problem but I still dont quite understand what the settings mean. When I exported a mesh with compress numbers and relative vertex numbers checked and imported to zbrush, it became a mess. Only when they are unchecked it will be imported properly in zbursh. Can you quickly explain why? Thank you!
Nan
Here you go nan, this might explain these settings and what they do:)
Attachments