ZBrushCentral

Help - Prepare Photogrammetry to 3D print - Splitter crack

Hi Everyone,

I’m new to the 3D software space. I’ve been 3D printing and using Fusion 360 to build models. I’ve embarked on a journey with Photogrammetry! To get my 3D Mesh was easy (meshroom) but now to build a base for my mesh to sculpt then 3D print has me stuck! Would really appreciate any help!! I’ve watched many videos and downloaded many software, blender, meshlab, and meshmixer. Called Zbrush today and was told to try Project all or Bridge. I watched videos and not sure about it. Enough chatter let me show you what I’m trying to accomplish.

Photogrammetry of a 1 sided rock face with a crack. I’m left with something that looks like --v-- See pictures. I want to put a base underneath but how should I add that solid surface? Once solid I’d like to be able to round all edges, attached a picture of a model for demonstration.

Please let me know if you have any suggestions or would like my mesh to work on. Hoping to be turned into a Zbrush fan!

Also if you need more information please let me know.

Attachments

Crack Want This.png

Crack1.png

Crack.png

It’s difficult to tell what I’m looking at. I’m going to assume the perimeter of that mesh isn’t mostly concave and flat, creating a logical “opening” that can easily be closed off. There’s no point to cleanly slice or flatten with an intersecting plane without cutting off detail. That’s going to make that mesh difficult to work with, and close off many options.

Let me first ask you: How important is it to use that photogrammetry-derived mesh? Does it need to be that exact rock, or does it just need to just look like that rock? If the case is in any way the latter, my primary recommendation is to ditch it and simply sculpt your rock. It’s not a difficult subject, it’s what Zbrush is best at, and the sooner you learn to work with the sculpting tools, the sooner you start getting the most out of the program. I know the idea is that scanning an object is supposed to save you the effort of sculpting, but in this case I think it makes more work for you, and your lack of familiarity with basic zbrush functions wont make it any easier, either to do or for someone to explain. Working from reference, someone could sculpt a close approximation of that rock in a couple minutes. Any way you go, I think some sculpting will be required here.

Of the two stated recommendations, the idea behind the Project all recommendation will require you to read the second section here. The idea is that Project all is one of the ways you can fuse subtools together in Zbrush, so you’d have a base object subtool, your scanned mesh, and a heavily subdivided target mesh object that will have the detail from the two other visible subtools projected onto it.

I do not believe this will work in this case. I just don’t think Project all is going to understand what you want done with that 2d open mesh youve got (basically a distorted 2d plane), and Project All can require a lot of trial and error to dial in the settings you need. If the “Bridge” recommendation refers to the “Curve Bridge” brush, likewise I don’t believe you’ll have much fun with that.

For a projection method, in this instance, I think you’ll have the easiest results with the ZProject Brush. Create the base object you want as a subtool to your scanned mesh with enough subdivision to hold necessary detail. Position it over the target base subtool as desired (transparency may be useful), and use the ZProject brush to scrub over the scanned mesh area. If both positive and negative elevations are required, you will probably have to do a pass while ALT-brushing with the Zproject brush as well. Turn on Brush> Auto masking > Backface Masking to keep the Zproject brush from distorting the polygons on the opposite side of the mesh while sculpting.

zproject.jpg

If I were doing this, I would probably first attempt an alpha-based approach, like I do with most terrain generation tasks. Get a simple greyscale image of the rock, convert it into an alpha, and draw that alpha out with a sculpt brush and a drag rect stroke on a high resolution target mesh, at the desired elevation. Spotlight also has tools for this. Likewise you could try converting your scanned mesh into an alpha by angling the top parallel with the screen plane, and using the Alpha > From mesh function. Again, this would only result in an approximation of the rock, requiring you to sculpt a finished piece, but it would quickly get you in the ballpark.

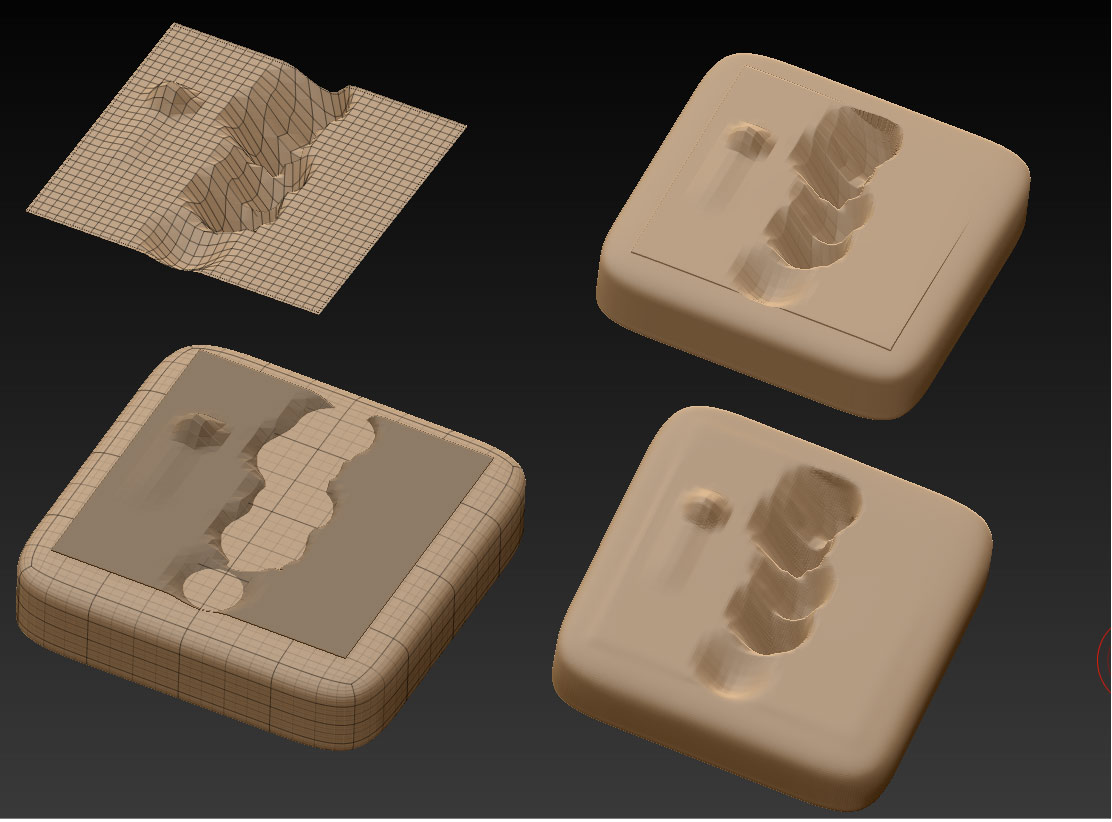
If you’re determined, however, to work with that mesh, you need to give it some depth in order to make it easier to work with. The simplest way I can see would be to Mask your scanned mesh, go to Tool> Subtool>Extract, and perform an extraction with a negative thickness (so the top remains unchanged) , and “double” switched off. The resulting extracted mesh will now have a thickness, and a top/bottom polygrouping you can easily isolate, mask, and move once you’ve familiarized yourself with the various hiding and polygrouping andd masking functions in Zbrush (commit these to muscle memory asap, or you’ll struggle doing things in ZB.)

Isolate the bottom polygroup and move it down with Gizmo as far as necessary to clear any negative recesses. Run it through Dynamesh to redistribute polygons, at the resolution required to hold any detail. Then slice through the mesh with the Trim Curve brush to cut off any excess and flatten the bottom (make sure to clear any interior detail). Use any of ZBs myriad sculpting approaches to smooth the edges as desired.

We’re fighting a dual uphill battle here of a somewhat tricky operation, and your general unfamiliraity with basic ZB functions. The sooner you can address the latter, the easier things like the former will be, which is why my primary suggestion is to simply sculpt the rock in Zbrush as a learning experience if at all possible. In all honestly, for simple objects like this (as opposed to scanning someones head), an artistic approach is almost always going to produce faster, and better looking results than the process you’ve selected. You’re tackling a lot of tools and concepts all at once–you may need to try a more focused and methodological learning approach with fewer balls in the air.

Scott,

I appreciate the time you took to reply to my post. You have many good suggestions by trying to tackle the project in a multitude of directions.

Unfortunately for the ease of construction, my plan is to have a replica of specific areas on a rock face. I still completely agree with learning all areas of Zbrush and will move forward on that journey.

I’m not sure how to respond to all of your post as I will be working on getting more familiar with Zbrush and also try some other approaches. Which I’m very happy to have your other approaches to try.

I did work on it a little bit yesterday and got something I could print, but not ideal and had to use multiple programs.

Zbrush > Remesher >send to Blender > select outside edge > extrude down > back to Zbrush > Dynamesh (fills in holes) > then I did project it.

Glad to have your post to try other methods.

I’ll post back as I move forward.

Thank You!

EJ

Attachments

Crack2.png

Unfortunately for the ease of construction, my plan is to have a replica of specific areas on a rock face.

I’d implore you to try an alpha based approach. Convert your mesh into an alpha, and brush it onto whatever target rock “base” you wish until you find the elevation you want. This will capture the crevice and all the rocky surface detail on the object without then having to obliterate much of that detail by smoothing the base after the fact. A brush like Dam Standard can be used to further chisel out the crevice–since the mesh is basically a square 2d plane instead of a 3 dimensional scan, the end “rock” was always going to involve some degree of approximation. There’s really no need to use multiple tools for this. I think you’re making it more complicated than it needs to be.

I’m not critiquing your goal–if you want to use photogrammetry-derived meshes for work in Zbrush that’s certainly possible, but you’re trying to leapfrog over vital program knowledge that will help you do it. I strongly recommend trying to do this with a more direct approach in your chosen tool first, and then apply that knowledge gained towards more advanced goals. You’ll get better results, and make it easier for people to help you with more specific tasks, rather than trying to run before you can walk with broad inquiries that encompass many areas of knowledge.

Only my two cents. Good luck.

Hello Scott,

Thanks again for the reply. You are helping me narrow in the path I need to take to accomplish what I’m seeking. You are not in any way offending me and I hope you are not offended by anything I’m saying because I’m grateful for your time, just throwing that out there.

The comment you made about “recommend trying to do this with a more direct approach in your chosen tool first…” In a more outer layer thinking of this, is what I’m trying to figure out and why I’ve so hastily tried to find a solution. My question is; Will Zbrush do everything I need. You have answered this “-if you want to use photogrammetry-derived meshes for work in Zbrush that’s certainly possible”

From your posts I see now it is possible but I want to ask 1 more questions to make sure I don’t waste time learning a program that doesn’t quite fit.

  1. Measuring and Scaling - (First, I know photogrammetry isn’t super accurate already) Lets say, looking at the width of the crack or a more pronounced feature on the rock face, can I scale the model quite accurately to represent the original? Is the measuring in Zbrush accurate and true to real world?

Figuring the answer to my question…My thought for gaining knowledge is to follow tutorials on youtube. Goal is to learn pretty much all tools and buttons, become 1 with the software in terms of use and navigation. Hopefully find someone who has similar goals as me. Do this at the beginning and see where it takes me.

If you have any suggestions on how to get started or any person I should follow please let me know!

Thank You,
EJ

My question is; Will Zbrush do everything I need.

Unfortunately, I have no idea what your needs are. No tool does everything. It’s obviously not, say, an animation tool, though it works great as a companion to those tools. Zbrush does a lot of cool stuff though, and some stuff that no other tool does nearly as well. At the very least, it makes a very useful companion to a number of other tools.

I use ZB mainly for print these days, and ZB does everything I need in terms of mesh creation–I no longer use other modelers. However, my interests are mainly artistic, and not industrial. I don’t require excessively accurate machine quality. With a pair of calipers, between ZB and my slicer, I get where I need to go.

  1. Measuring and Scaling - (First, I know photogrammetry isn’t super accurate already) Lets say, looking at the width of the crack or a more pronounced feature on the rock face, can I scale the model quite accurately to represent the original? Is the measuring in Zbrush accurate and true to real world?

Zbrush has scaling tools geared for print, though it will not replace a CAD style tool, if that’s the sort of precision you need. Every 3d print slicer is different though, and you will have to discover a workflow that works for your tools. It may take a bit of experimentation to dial in the settings/workflow between the two apps. I don’t have any direct experience with photogrammetry, but if you want a more mathematically precise recreation, it would require a 360 scan of the object, not just a top down. You can always bust out some calipers to get gross measurements for an object, but I doubt you could get the finer interior measurements of the crevice exactly right without that.

Figuring the answer to my question…My thought for gaining knowledge is to follow tutorials on youtube. Goal is to learn pretty much all tools and buttons, become 1 with the software in terms of use and navigation. Hopefully find someone who has similar goals as me. Do this at the beginning and see where it takes me.

If you have any suggestions on how to get started or any person I should follow please let me know!

Tutorials are great. I gave you my best suggestions already though–sculpt the stone from scratch first. Get a feel for the brushes, how to mask, how to use alphas to apply fine surface detail. Learn how to work with subtools and subdivision, and how to navigate the world space. Commit the shortctus for Masking, Mesh Visibility, and polygrouping to muscle memory–they should be as natural as breathing. It’s how you move one section of polygons and not another quickly in ZB. Study dynamesh and Zremesher, along with various projection methods, to learn how to retopologize a model on the fly, fuse meshes, and transfer detail from one mesh to another.

The problem is there’s no one button solution to what you want to do–it requires knowledge of all those areas, and it’s a bit difficult to advise you on your goal if one has to explain all those basics along the way too. Once you’re comfortable creating and working with objects in ZB, dive into decimation master and the 3D print hub to start working back and forth between your slicer, and figure out the things you need to do to get meshes into and out of ZB that are adequate for your intended output.

Once you know those basics, you’ll be able to answer your own question about how best to get what you need.

Good luck!